Bruce Barnbaum - The Art of Photography - An Approach to Personal Expression
Здесь есть возможность читать онлайн «Bruce Barnbaum - The Art of Photography - An Approach to Personal Expression» весь текст электронной книги совершенно бесплатно (целиком полную версию без сокращений). В некоторых случаях можно слушать аудио, скачать через торрент в формате fb2 и присутствует краткое содержание. Жанр: Старинная литература, на английском языке. Описание произведения, (предисловие) а так же отзывы посетителей доступны на портале библиотеки ЛибКат.

- Название:The Art of Photography: An Approach to Personal Expression
- Автор:
- Жанр:
- Год:неизвестен
- ISBN:нет данных
- Рейтинг книги:5 / 5. Голосов: 1
-
Избранное:Добавить в избранное
- Отзывы:
-
Ваша оценка:
The Art of Photography: An Approach to Personal Expression: краткое содержание, описание и аннотация
Предлагаем к чтению аннотацию, описание, краткое содержание или предисловие (зависит от того, что написал сам автор книги «The Art of Photography: An Approach to Personal Expression»). Если вы не нашли необходимую информацию о книге — напишите в комментариях, мы постараемся отыскать её.
The Art of Photography: An Approach to Personal Expression — читать онлайн бесплатно полную книгу (весь текст) целиком
Ниже представлен текст книги, разбитый по страницам. Система сохранения места последней прочитанной страницы, позволяет с удобством читать онлайн бесплатно книгу «The Art of Photography: An Approach to Personal Expression», без необходимости каждый раз заново искать на чём Вы остановились. Поставьте закладку, и сможете в любой момент перейти на страницу, на которой закончили чтение.
Интервал:
Закладка:
Starting this procedure in the normal development solution retains the lowest zones that would be lost with full compensating development, and tends to begin separating local contrasts in the mid and upper zones in a snappier manner. Then, before those upper zones attain too much density, the negative is placed into the extremely dilute compensating solution. This clamps a lid on the upper zones, preventing them from getting too dense but giving the mid and high densities wonderful local separations. All this results from the initial “kick” of the stronger first solution (Figure 9-10).
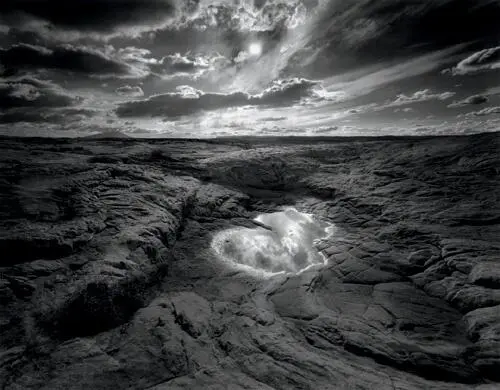
Looking directly into the sun, I carefully placed the camera so that the clouds closest to the sun (but not the sun itself) were seen in the pool’s reflection. Contrast was excessive, from the sun and clouds to the sandstone in the foreground. When I came upon this scene in 1996, I had already evolved the two-solution compensating development, which gave me control of a greater contrast range than I could have retained with compensating development alone. This proves that every technical advance allows a further artistic advance .
Figure 9-10. Slickrock and Reflecting Pool
To alter the final contrast level, I simply extend or reduce the development times in the first developer (agitation and non-agitation) by a few seconds in either direction. If I want more contrast, I add five seconds of agitation followed by five seconds of non-agitation; if I want lower contrast, I reduce both the agitation and non-agitation times by about five seconds. In either case, after removing the negative from the first solution, I agitate for about 30 seconds in the compensating solution to dilute the active solution in direct contact with the emulsion. This initiates the compensating effect that prevents excessive density in the upper zones. In all cases, I maintain the overall 10-minute development time for the two solutions. You can experiment with time variations to suit your needs. I now use this procedure in place of the pure compensating development procedure found in the Time/Temperature Figure 9-6 through Table 9-4.
Development Procedures for Sheet Film and Roll Film
Both sheet film and roll film must be developed uniformly, from edge-to-edge, corner-to-corner. While you may be able to overcome inappropriate negative development (i.e., too dense or slightly too thin, too contrasty or not contrasty enough), it is virtually impossible to correct uneven negative development during printing. This section explains procedures that yield evenly developed negatives.
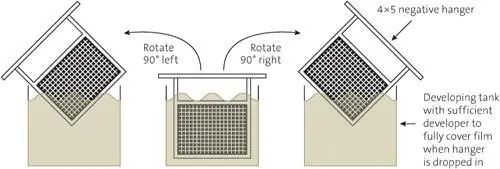
After dropping the hangers into the tank and banging them down several times to dislodge any air bubbles on the negatives, agitate by raising the hangers first against the left edge of the tank and rotating 90 degrees to the left, then dropping them back into the tank. Then raise them against the right wall of the tank, rotate 90 degrees to the right, and drop them back into the tank. Repeat the procedure for all agitation. Do not hesitate at the 90 degree position, but immediately return the hangers to the tank .
Figure 9-11. Agitation Procedure for Sheet Film Development in Hangers
For sheet film development, we’ll look at these three common procedures:
Hanger Development
Tray Development
Mechanical Drum Development
Hanger Development
In hanger development, the film is placed in metal holders, or hangers, which are immersed vertically into a large tank of developer. Agitation is accomplished by lifting the hangers completely out of the liquid, rotating them 90 degrees to the right, dropping them back into the tank, lifting and rotating them 90 degrees to the left, and repeating the procedure several times.
In practice, I lift the hangers up and lean them against the upper right edge of the tank while rotating to the right, and against the upper left edge of the tank while rotating to the left. This action must be continuous, and neither too fast nor too slow, or unevenness could result. DO NOT STOP to allow the hangers to drain at the 90-degree rotation point . Instead, reverse the motion smoothly and swiftly, like a billiard ball hitting and ricocheting off the edge of a pool table. This will insure even development.
My general procedure is to agitate continuously for the first minute, and then for each successive minute, agitate again for the first 15 seconds with the remaining 45 seconds of each minute devoid of agitation. Only with the N+2, C–3, and two-solution compensating procedures does this vary. Agitation is continuous for development of T-Max 100 developed in Kodak D-76, T-Max RS, or XTOL.
Tray Development
Tray development is theoretically simpler but often much more difficult to master without damaging the film during development. The procedure is to slide the film into a tray of developer one sheet at a time, stacking one sheet on top of another. Agitate by pulling out the bottom sheet and laying it on top of the stack, making sure the top sheet is then fully submerged. Repeat this simple procedure continuously.
This procedure must start with a pre-soak of the negatives, or they will stick to one another like glue. To begin, submerge the first negative in plain water for several seconds, then submerge the second for several seconds together with the first, then add the third, and so on. After all of the negatives have been submerged, run through the stack several times before transferring them to the developer. This will assure that all of the negatives will separate from one another and that development will begin smoothly.
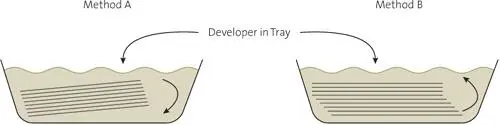
There are two methods of tray development. Method A shows that by cradling the entire stack of negatives at a slight angle with one hand, the top sheet can be removed and slid under the bottom sheet of the stack. Continue the procedure without pause for the entire duration of development. Method B shows agitation by pulling the bottom sheet from the stack and placing it on top. This procedure also requires a constant shuffling motion from bottom to top from the start of development until development is complete. With practice, Method A may prove less subject to scratching .
Figure 9-12. Agitation Procedure for Sheet Film Development in Trays
For those who have mastered this procedure, 15 to 20 negatives can be developed at a time. The pitfall is that it is very easy to scratch negatives against a sharp corner of the one above or below during agitation. Experience will overcome this initial problem.
Because agitation in trays is continuous, while in tanks it is periodic, the characteristics of the developed negative are different. In the tank, 45 seconds of unagitated “hang time” per minute slows development, so for equal development times the hanger-developed negative is less dense and contrasty than the tray-developed negative. Of course, if many negatives are developed simultaneously in trays, there is a long period of non-agitation for each negative as it slowly moves from the top of the stack to the bottom (before it is again agitated by being pulled out and placed on top). This lengthy period of non-agitation makes tray development closer to hanger development.
In the compensating procedure, periods of non-agitation are essential to create the compensating effect. During the “hangtime”, the dilute developer in contact with the heavily sensitized portions of the negative is quickly exhausted; further development ceases until the next agitation brings new developer in contact with those areas. During that same hangtime, however, the thin portions of the negative cannot exhaust the developer as quickly, and they are more fully developed. This means that if you use tray development, the compensating effect is lost unless you allow periods of nonagitation.
Читать дальшеИнтервал:
Закладка:
Похожие книги на «The Art of Photography: An Approach to Personal Expression»
Представляем Вашему вниманию похожие книги на «The Art of Photography: An Approach to Personal Expression» списком для выбора. Мы отобрали схожую по названию и смыслу литературу в надежде предоставить читателям больше вариантов отыскать новые, интересные, ещё непрочитанные произведения.


Обсуждение, отзывы о книге «The Art of Photography: An Approach to Personal Expression» и просто собственные мнения читателей. Оставьте ваши комментарии, напишите, что Вы думаете о произведении, его смысле или главных героях. Укажите что конкретно понравилось, а что нет, и почему Вы так считаете.