Jeff Strong - Home Recording For Dummies
Здесь есть возможность читать онлайн «Jeff Strong - Home Recording For Dummies» — ознакомительный отрывок электронной книги совершенно бесплатно, а после прочтения отрывка купить полную версию. В некоторых случаях можно слушать аудио, скачать через торрент в формате fb2 и присутствует краткое содержание. Жанр: unrecognised, на английском языке. Описание произведения, (предисловие) а так же отзывы посетителей доступны на портале библиотеки ЛибКат.
- Название:Home Recording For Dummies
- Автор:
- Жанр:
- Год:неизвестен
- ISBN:нет данных
- Рейтинг книги:4 / 5. Голосов: 1
-
Избранное:Добавить в избранное
- Отзывы:
-
Ваша оценка:
Home Recording For Dummies: краткое содержание, описание и аннотация
Предлагаем к чтению аннотацию, описание, краткое содержание или предисловие (зависит от того, что написал сам автор книги «Home Recording For Dummies»). Если вы не нашли необходимую информацию о книге — напишите в комментариях, мы постараемся отыскать её.
You no longer need an expensive professional studio to record pitch-perfect music. Today, the tools to create high-fidelity, multi-track audio are found on computers, tablets, and even smartphones. This friendly, no-jargon guide from a master musician, composer, and recording engineer shows you how to use technology to lay down, edit, mix, and master your ideas. Along the way you'll get insider tips that help you create your sound and transform your good recordings into great ones.
Acquire the right hardware Find the ideal recording space Get to know different mics Record live or virtual sounds Get rhythmic with tracks and loops Enhance and edit tracks Polish songs to perfection Distribute your finished product
Home Recording For Dummies — читать онлайн ознакомительный отрывок
Ниже представлен текст книги, разбитый по страницам. Система сохранения места последней прочитанной страницы, позволяет с удобством читать онлайн бесплатно книгу «Home Recording For Dummies», без необходимости каждый раз заново искать на чём Вы остановились. Поставьте закладку, и сможете в любой момент перейти на страницу, на которой закончили чтение.
Интервал:
Закладка:
TDIF
TDIF (Teac Digital Interface Format) is Teac’s return volley to the ADAT Lightpipe format. TDIF uses a standard computer cable with a 25-pin connector. Like the ADAT Lightpipe, TDIF cables can transmit eight channels of digital data at a time. TDIF isn’t nearly as common as ADAT Lightpipe because Alesis made its Lightpipe technology available to other companies to use for free. Alesis encouraged these companies to adopt it as a “standard” because the Alesis ADAT recorders were so common.
USB
USB, which stands for Universal Serial Bus, is a common component in nearly all modern computers. In fact, your computer probably has more than one USB port. USB connectors are directional and contain two end types (see Figure 3-8 for an example):
A Connector: This is used for a receiving device such as your PC or USB hub.
B Connector: This is used for a sending device, such as your USB audio interface or printer.
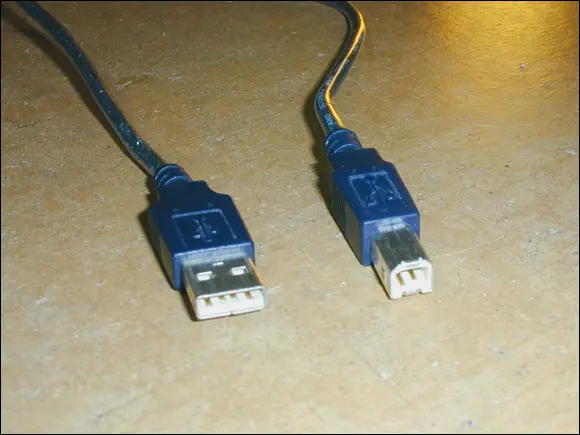
FIGURE 3-8:USB uses two types of connectors: the “A” connector (left) and the “B” connector (right).
USB connectors come in three sizes:
Standard: This size is used for computers and peripheral equipment, such as printers.
Mini: This size is generally used for larger mobile or portable devices.
Micro: This size is used for phones and thinner mobile devices.
Aside from having two different types of jacks and plugs, USB also has different standards. These are the ones that matter for audio recording (see Chapter 2for USB interface options):
USB 1.1: This standard (the original) can handle a data rate of up to 12 Mbps (megabits per second). You’ll still find some USB 1.1 audio interfaces on the used market, but I recommend skipping them because you’ll be disappointed in their performance.
USB 2.0: Also called High-Speed USB, this standard can handle 40 times the data flow of the earlier standard — 480 Mbps. This is the most common connection for audio interfaces and can meet most home recordists’ requirements.
USB 3.x: This is also referred to as SuperSpeed or SuperSpeed+ USB. This connection transfers data ten times faster than USB 2.0 and will allow you to record a full symphony without a problem (you would need an audio interface with a lot of inputs and this will cost you).
USB C: USB-C is twice as fast as USB 3. Though it uses the same connector as Thunderbolt (see the Thunderbolt section later in this chapter), it is considerably slower. It is fast enough, however, for any audio you may want to record.
FireWire
Developed by Apple, FireWire (also known as IEEE 1394 or iLink) is a high-speed connection that is used by many audio interfaces, hard drives, digital cameras, and other devices. You won’t find FireWire ports on any new computers, but you will still find some audio interfaces with them. Luckily, all these audio interfaces also have USB ports.
Like USB, FireWire comes in two flavors, which are described as follows:
FireWire 400: This standard supports data transfer speeds of up to 400 Mbps. Many audio interfaces currently use FireWire 400 as a way to connect with your computer. These interfaces can handle quite a few inputs and outputs.
FireWire 800: Yep, you guessed it — this standard can handle data transfer rates of 800 Mbps. Several FireWire 800 devices are available.
Thunderbolt
Thunderbolt is the fastest connectivity format to date, with speeds between 20 gigabits per second (Thunderbolt 2) and 40 gigabits per second (Thunderbolt 3). Audio interface manufacturers are excited about this amazing speed, and many experts see Thunderbolt as the next format that the pros will embrace.
Unfortunately, things got confusing when Thunderbolt 2 was quickly replaced by Thunderbolt 3 just as audio interface manufacturers rolled out a variety of Thunderbolt 2 interfaces. Each has a different type of connector (see Figure 3-9) and a different protocol, which I outline here:
Thunderbolt 2: Thunderbolt 2 uses the mini DisplayPort and can transfer data at speeds up to 20 gigabits per second (Gbps). This was available on computers between mid-2013 and late 2015.
Thunderbolt 3: Thunderbolt 3 employs the USB-C connector and doubles the speed of Thunderbolt 2 to 40 Gbps. You can find Thunderbolt 3 ports on computers and peripherals made after late 2015.

FIGURE 3-9:Thunderbolt is a high-speed data-transfer protocol that comes in two varieties: Thunderbolt 2 (left) and Thunderbolt 3 (right).
Working Efficiently
I hope that you’ll spend many hours in your studio creating great music (possibly to the dismay of the rest of your family). One important thing to keep in mind is that you need to be comfortable. Get a good chair and set up your workstation to be as easy to get around as possible. Figure 3-10 shows a classic L setup. Notice how everything that you need is within arm’s reach. If you have enough room, you may want to consider a U-shaped setup instead, which is shown in Figure 3-11.
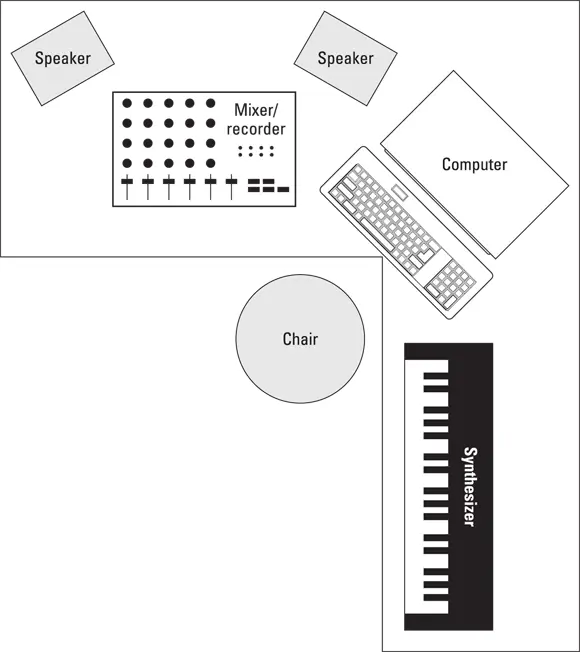
FIGURE 3-10:A classic L setup: Everything is easy to reach.
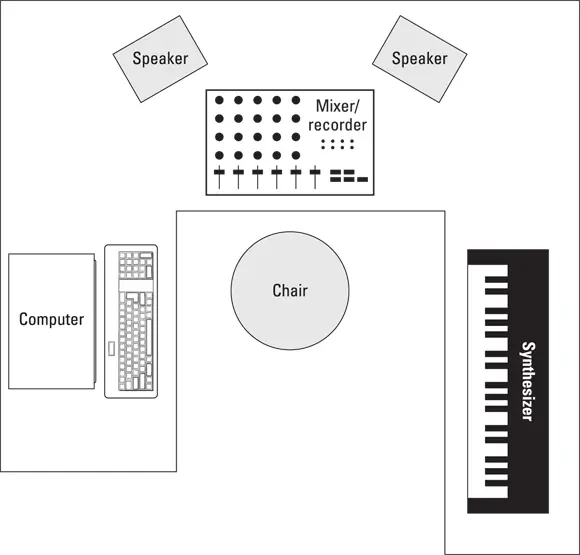
FIGURE 3-11:The U-shaped setup can work great if you have the room for it.
If you use a lot of outboard gear — such as preamps or effects processors — and you think that you need to plug and unplug a lot, invest in a good patch bay (see Figure 3-12) so that you don’t have to strain to access the cords that are tucked away behind your mixer. A patch bay is a device that has a bunch of inputs and outputs that allows you to route your gear in (and out) in an almost infinite variety of ways. If you do much plugging and unplugging, you’ll quickly find out that a patch bay is an indispensable item. It can save your back — and your cords (repeated plugging and unplugging wears them out quickly and produces buzzes that can be hard to locate).

FIGURE 3-12:A patch bay lets you plug and unplug gear without having to crawl behind each piece of gear.
Taming heat and dust
The number-one enemy of electronic equipment is heat. Dust is a close second. Try to set up your studio in a room that you can keep cool and fairly dust-free. Air conditioning is a must for most studios. Be careful with a window air conditioner, though, because it can make a lot of noise, requiring you to shut it off when you record. Depending on where you live, this can quickly warm your room. Regarding dust, try to cover your equipment when you’re not using it, especially your microphones. A plastic bag placed over the top of a mic on a stand works well.
 You can also just put away your mics when you’re not using them. However, if you use a particular mic a lot, you’re better off leaving it on a stand rather than constantly handling it — some types of mics are pretty fragile. (You can find more details on caring for your mics in Chapter 6.)
Интервал:
Закладка:
Похожие книги на «Home Recording For Dummies»
Представляем Вашему вниманию похожие книги на «Home Recording For Dummies» списком для выбора. Мы отобрали схожую по названию и смыслу литературу в надежде предоставить читателям больше вариантов отыскать новые, интересные, ещё непрочитанные произведения.


Обсуждение, отзывы о книге «Home Recording For Dummies» и просто собственные мнения читателей. Оставьте ваши комментарии, напишите, что Вы думаете о произведении, его смысле или главных героях. Укажите что конкретно понравилось, а что нет, и почему Вы так считаете.