1 In the taskbar’s Search box, type select.
2 In the search results, click Select Which Icons Appear on the Taskbar. The Settings app displays the Select Which Icons Appear on the Taskbar screen, as shown in Figure 1.8. 1.8Use the Select Which Icons Appear on the Taskbar screen to configure your notification area icons.
3 Click the switch to On for each icon you want to display in the notification area.If you want to show every icon on the taskbar, click the Always Show All Icons in the Notification Area switch to On.
4 Click the Back arrow in the top-left corner of the Settings window. Settings takes you to the Taskbar screen.
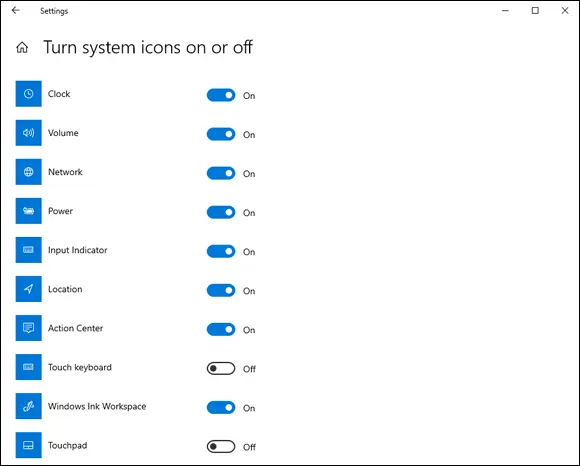
5 Click Turn System Icons On or Off. Settings opens the Turn System Icons On or Off screen, shown in Figure 1.9.
6 Click the switch to Off for each system icon you want to prevent from appearing in the notification area. Windows puts the new settings into effect.

1.9Use the Turn System Icons On or Off screen to toggle the display of system icons in the notification area.
Customizing the Lock Screen
Locking your computer is a useful safety feature because it prevents unauthorized users from accessing your files and your network. There are two main ways to lock your computer:
Open the Start menu, click your user icon on the left side of the menu, and then click Lock.
Press Windows+L.
Rather than remembering to lock your computer, you can configure Windows to automatically lock the computer after it has been idle for a specified amount of time. Here are the steps to follow:
1 Open the Settings app.
2 Click Personalization. The Personalization settings appear.
3 Click Lock Screen. The Lock Screen settings appear.
4 Click the Screen Timeout Settings link. The Power & Sleep settings appear.
5 Use the Sleep list to choose the number of minutes of idle time after which Windows puts your PC to sleep (and, therefore, locks the PC). If you have a tablet or notebook PC, be sure to set the sleep timeout both for when your PC is plugged in and when it is on battery power.
If you find yourself looking at the Lock screen frequently, you can improve the experience by customizing the Lock screen in two ways: by changing the background and by adding apps. The next two sections provide the details.
Changing the Lock screen background
You can make your Lock screen more interesting by changing the image that appears as its background. Windows comes with several system pictures that you can use, or you can use one of your own photos. Here are the steps to follow to change the Lock screen background:
1 Open the Settings app.
2 Click Personalization. The Personalization settings appear.
3 Click Lock Screen. The Lock Screen settings appear, as shown in Figure 1.10. 1.10Use the Lock Screen settings to change the background image you see when you lock your PC.
4 Use the Background list to choose Picture. If you want to use a series of Microsoft Bing photos as the Lock screen background, click Windows Spotlight, instead.
5 To use a system image, click the thumbnail of the picture that you want to use. You can skip the rest of these steps.
6 To use one of your own pictures, instead, click Browse. The Open dialog box appears.
7 Click the picture that you want to use.
8 Click Choose Picture. The image appears the next time that you lock your computer.
Adding an app to the Lock screen
When you lock your PC, Windows displays status icons for some apps. For example, the status icon for the Mail app shows the number of unread messages. The Lock screen also shows any new notifications that appear for the Calendar app, such as an upcoming appointment. If you lock your computer frequently, you can make the Lock screen even more useful by adding icons for other apps, including ones that support notifications.
Before getting started, you need to understand the difference between a quick status and a detailed status on the Lock screen:
Quick status. This means that the Lock screen shows only a small icon for an app, and that icon displays some sort of indication that you have new, unread, or pending items in the app. For example, the Mail app shows the number of unread email messages. You can display a quick status for up to seven apps.
Detailed status. This means that the Lock screen shows more information from the app. For example, if you have an upcoming event in the Calendar app, the Lock screen shows the details of that event, including the event title, location, and time. You can display the detailed status for only a single app.
Follow these steps to control which applications appear on the Lock screen:
1 Open the Settings app.
2 Click Personalization. The Personalization settings appear.
3 Click Lock Screen. The Lock Screen settings appear.
4 To choose which app displays its detailed status, click the button that appears under the Choose One App to Show Details Status on the Lock Screen heading, then choose an app from the list that appears. If you don’t want to see a detailed status, click None.
5 To set a quick status icon for an app, click a button that appears under the Choose Which Apps Show Quick Status on the Lock Screen heading, then choose an app from the list that appears. If you don’t want an app associated with the icon, you can click None.
6 Repeat Step 5 to set the other quick status icons. Windows puts the new settings into effect, and the apps will now appear on the Lock screen.
Extending Your Desktop with Multiple Monitors
If you have a second monitor or even an extra TV that’s relatively modern, you can improve your productivity and efficiency by connecting that display to your PC. To work with an extra monitor, you need two things (besides the extra monitor):
Your PC must have an unused video output port that’s compatible with the video input port on the monitor.
A compatible cable to connect the ports.
There are many different types of video ports. However, all modern PCs and monitors (including TVs) use HDMI ports connected with an HDMI cable.
After you’ve connected your PC and the external monitor, you then need to configure Windows to extend the desktop to the second monitor.
Here are the steps to follow to connect and set up a second monitor:
1 Connect the second monitor to your PC. That is, you perform the following general steps:Connect one end of the cable to the compatible port on the back of the monitor.Connect the other end of the cable to the compatible port on the back of your PC.
2 Open the Settings app and click System. The System settings appear.
3 Click Display. The Display settings appear.
4 Use the Multiple Displays list to choose Extend These Displays, as shown in Figure 1.11. Windows asks you to confirm the display changes. 1.11Use the Multiple Displays list to choose Extend These Displays.
5 Click Keep Changes.
6 Click the monitor that you want to set as the main display.
7 Click Make This My Main Display. Windows connects to the second monitor and uses the selected monitor as your main display.
After extending your desktop, you might find that your mouse pointer stops at the right edge of the left screen. This means that you need to swap the icons of the left and right monitors as they appear in the Display settings screen. To do that, drag the left monitor icon to the right of the other monitor icon (or vice versa).
Читать дальше


