Working with Settings
Customizing the Start Menu
Customizing the Taskbar
Customizing the Lock Screen
Extending Your Desktop with Multiple Monitors
Setting Up Multiple Desktops
Most of your Windows customization work involves tweaking settings , which are options—usually in the form of a check box, switch, radio button, or list—that control the look and operation of either Windows itself or of a particular app that’s installed on your PC.
When you want to customize Windows, you’ll almost always need to open the aptly named Settings app, which is home to most Windows customization options. The Settings app is so important that Windows gives you a dozen or so ways to open it. Here are the six most useful methods:
Click Start and then click Settings (the gear icon).
Press Windows+I. (The Windows key is the one that has the Windows logo on it; you’ll find it on the lowest row of the keyboard, to the left of the spacebar, between the Ctrl and Alt keys.)
Click the Notifications icon on the far right of the taskbar and then click All Settings.
In the taskbar’s Search box, type se (which should be enough to display the Settings app in the search results; if not, continue typing settings until you see Settings in the results) and then press Enter.
If you have Cortana enabled (see Chapter 5), say “Hey Cortana” and then say “Open Settings.”
Right-click the Start icon and then click Settings.
Whichever method you use, you see the Home screen of the Settings app, as shown in Figure 1.1.
From here, you can either use the Settings app's Search box to locate the setting you want or click a category to see the subcategories and settings associated with that category. For example, Figure 1.2 shows the screen that appears when you click the System category. When you click a subcategory on the left, the settings for that subcategory appear on the right (such as for the Display subcategory shown in Figure 1.2). To return to the previous Settings screen, click the Back arrow in the top-left corner; to return directly to the Home screen, click Home.
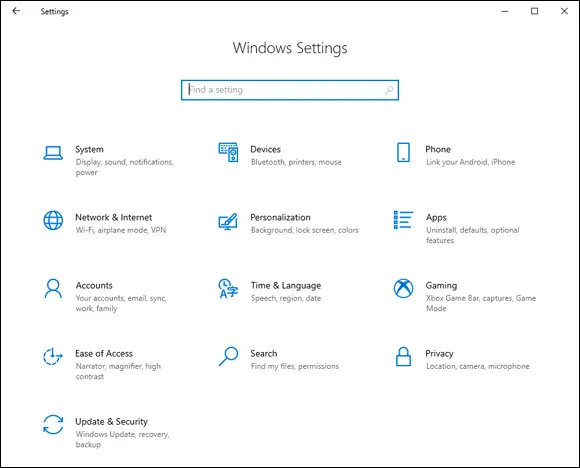
1.1The Home screen of the Settings app.
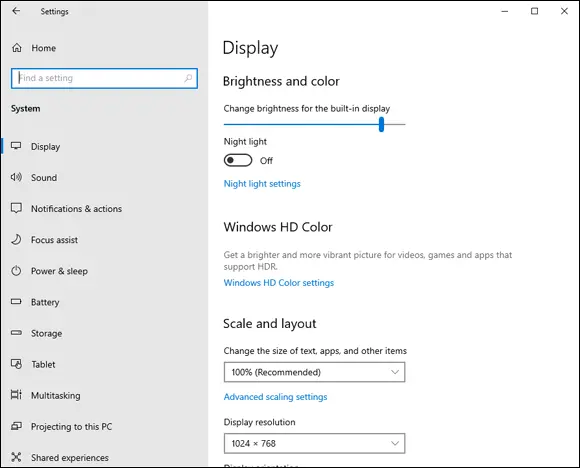
1.2When you open a category, click a subcategory on the left to see its settings on the right.
Use the taskbar’s Search box to quickly search for the setting you want to work with. Click inside the taskbar’s Search box, type settings:, a space, and then begin typing the setting name. For example, to work with the Show More Tiles on Start setting, type settings: show more, then click Show More Tiles on Start from the search results that appear.
Synchronizing settings between PCs
If you use the same Microsoft account to sign in to Windows on multiple devices, you can get a more consistent and more efficient experience by synchronizing your settings on all those devices. Here’s how to set this up:
1 Open the Settings app.
2 Click Accounts.
3 Click Sync Your Settings. The Sync Your Settings screen appears.
4 Make sure the Sync Settings switch is set to On. Click it to toggle it On if needed.
5 In the Individual Sync Settings section, set the switch to On for each type of setting you want synced. The four setting types are Theme, Passwords, Language Preferences, and Other Windows Settings.
Accessing an app’s settings
Most apps also come with a collection of their own settings, which you can work with to get more out of the app or to customize the app to suit the way you work. For most Windows apps, there are two main ways to access settings:
Open the app and click Settings (the gear icon), which usually appears in the lower-left corner of the screen (see Figure 1.3).
In the Start menu, right-click the app, click More, and then click App Settings.
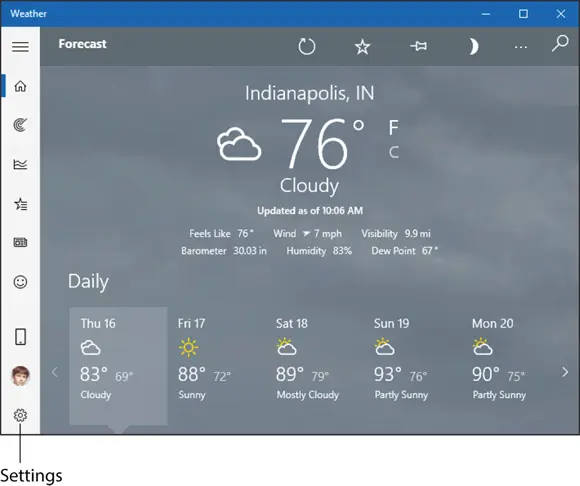
1.3For many Windows apps, click Settings (the gear icon) to access the app’s options.
Customizing the Start Menu
Although you can use keyboard shortcuts and features such as the taskbar to launch and work with apps and other features, to perform most of your Windows work, you need to negotiate the Start menu. Therefore, you can make your Windows chores easier and more efficient if you take a few moments to customize the Start menu to suit your needs.
Pinning an app to the Start menu
If you have an app that doesn’t appear as a tile on the Start menu, you usually open the app by first navigating the Start menu’s apps list to locate the app, possibly negotiating one or more submenus along the way. For an app you use often, you can avoid this extra work by pinning the app so that it appears permanently on the right side of the Start menu. After you have pinned an app, you launch it by displaying the Start menu and clicking the app.
Follow these steps to pin an app to the Start menu:
1 Click Start.
2 Locate the app that you want to pin to the Start menu.
3 Right-click the app and then click Pin to Start. A tile for the pinned app appears on the right side of the Start menu.
To remove an app tile from the Start menu, click Start, right-click the tile, and then click Unpin from Start.
Arranging and sizing Start menu tiles
Here are some useful techniques for restructuring the Start menu’s tiles to suit the way you work or play:
Move an app tile within the Start menu. Click Start, then click and drag the app tile to its new position.
Group app tiles. Move an app tile below any existing tile to create a new group. Hover the mouse pointer just above the moved app, then click the Name Group text box that appears. Type your group name (see Figure 1.4) and then press Enter. Move other apps into the new group as needed. 1.4You can create groups to organize your Start menu apps.
Change the size of a Start menu tile. Click Start, right-click the app’s tile, click Resize, and then click the size you want. In all cases, you can choose either a Small or Medium square. With some apps, you can also choose either a Wide rectangle or a Large square.
Customizing Start menu settings
The Start menu offers a few settings that you can tweak to customize how the Start menu works. Open the Settings app, click Personalization, and then click Start. This opens the Start screen (see Figure 1.5), which offers the following switches:
Show more tiles on Start. Set this switch to On to expand the size of the Start menu to show more tiles.You can also widen the Start menu by dragging the right edge of the menu.
Show app list in Start menu. Set this switch to Off to remove the list of installed apps from the Start menu. If you set this switch to Off, you can still access the apps by opening the Start menu and then clicking All Apps.
Читать дальше
