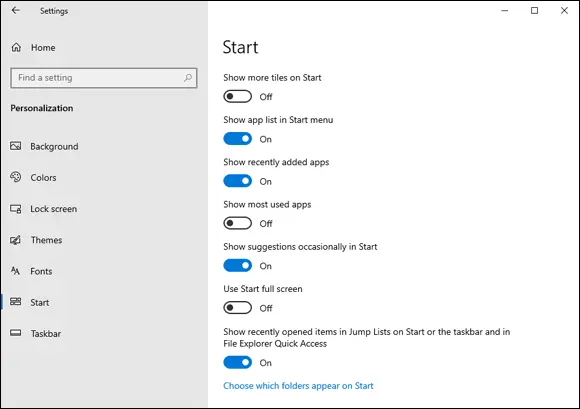
Show recently added apps. Set this switch to On to see newly installed apps at the top of the Start menu’s app list.
Show most used apps. Set this switch to On to add a Most Used section to the top of the Start menu’s app list. Windows uses the Most Used section to display the apps you launched most frequently.
Show suggestions occasionally on Start. Set this switch to Off to prevent Windows from displaying suggestions (that is, ads) about which apps to install.
Use Start full screen. Set this switch to On to have the Start menu take up the entire screen when you open it.
Show recently opened items in Jump Lists on Start or the taskbar and in File Explorer Quick Access. Set this switch to On to see a Recent section when you right-click an app that enables you to open items such as documents.
Choose which folders appear on Start. Click this link to open the Choose Which Folders Appear on Start screen, which includes a switch for each potential Start menu folder. For each switch, set the switch to On to display the folder, or Off to hide the folder.

1.5Use the Start screen settings to personalize your Start menu.
The taskbar that runs across the bottom of the Windows screen gives you one-click access to the Start button, the Search box, the Cortana voice assistant, and Task View (see Chapter 5). The taskbar also enables you to switch to a running app (by clicking the app’s taskbar button), access an app’s recent documents (by right-clicking the app’s button), and launch an app (by clicking its button; see the next section). In short, the taskbar is one of the most useful and most important features in Windows, so you need to know how to customize it to suit your needs. The next few sections tell you everything you need to know.
Pinning an app to the taskbar
Pinning an app to the Start menu, as I discuss earlier in this chapter, is helpful because it puts the app just two clicks away. If you have an app that you use frequently, you might prefer to have that app just a single click away. You can achieve this by pinning the app to the taskbar. You can pin an app to the taskbar either from the Start menu or from the taskbar itself:
Pinning an app via the Start menu. Open the Start menu, right-click the app that you want to pin to the taskbar, click More, and then click Pin to Taskbar.
Pinning an app via the Taskbar. Launch the app that you want to pin to the taskbar, right-click the running app’s taskbar icon, and then click Pin to Taskbar.
Either way, Windows adds an icon for the app to the taskbar.
To change the order of the taskbar icons, drag a taskbar icon to the left or right and then drop it in the new position. Note that this technique applies not only to the icons pinned to the taskbar, but also to the icons for any running programs.
If you no longer want an app pinned to the taskbar, you should remove it to reduce taskbar clutter and provide more room for other app icons. To remove a pinned app icon, right-click the icon and then click Unpin from Taskbar.
Customizing taskbar settings
The taskbar comes with a few settings that enable you to customize the look and operation of the taskbar, which can help you be more productive. Open the Settings app, click Personalization, and then click Taskbar. This opens the Taskbar screen, shown in Figure 1.6.
There are a ton of settings here, so here’s a look at the most important ones:
Lock the taskbar. When this switch is On, you can’t resize or move the taskbar, and you can’t resize or move any taskbar toolbars. This is useful if you share your computer with other users and you don’t want to waste time resetting the taskbar if someone else changes it.You can also toggle taskbar locking on and off by right-clicking an empty section of the taskbar and then clicking Lock the Taskbar.
Automatically hide the taskbar in desktop mode. When this switch is On, Windows reduces the taskbar to a thin line at the bottom of the screen when you’re not using it. This is useful if you want a bit more screen room for your applications. To redisplay the taskbar, move the mouse pointer to the bottom of the screen. Note, however, that you should consider leaving this option unchecked if you use the taskbar frequently; otherwise, auto-hiding it will slow you down because it takes Windows a second or two to restore the taskbar when you hover the mouse pointer over it. 1.6Use the Taskbar screen to customize your taskbar.
Automatically hide the taskbar in tablet mode. This is the same as the preceding switch, except it controls whether the taskbar is hidden when you use tablet mode. (To learn more about tablet mode, see Chapter 8.)
Use small taskbar buttons. Set this switch to On to shrink the taskbar’s program buttons. This not only reduces the overall height of the taskbar (so you get more room for the desktop and your programs), but it also enables you to populate the taskbar with more buttons.
Use Peek to preview the desktop… Set this switch to On to enable the Peek feature. When you have Peek activated, move the mouse pointer over the right edge of the taskbar, and Windows temporarily hides your open windows so that you can see the desktop. Move the mouse pointer off the right edge of the taskbar to restore your windows.
Show badges on taskbar buttons. Set this switch to Off to prevent Windows from showing badges on taskbar buttons (such as the number of unread messages in the Mail app).
Taskbar location on screen. Use this list to choose where you want to place the taskbar: Bottom, Left, Right, or Top. For example, if you want to maximize the available screen height, move the taskbar to the left or right side of the screen.
Combine taskbar buttons. Use this list to choose how you want Windows to group taskbar buttons when an application has multiple windows or tabs open:Always hide labels. Choose this option to have Windows always group similar taskbar buttons.When taskbar is full. Choose this option to have Windows group similar taskbar buttons only when the taskbar has no more open space to display buttons.Never. Choose this option to have Windows never group similar taskbar buttons.
Customizing the taskbar’s notification area
The notification area appears on the right side of the taskbar, to the right of the icons for the running and pinned apps, as shown in Figure 1.7.

1.7The taskbar’s notification area.
You can click the Show Hidden Icons button to see your hidden icons.
The notification area shows only a few icons by default: Network, Volume, and Notifications, and notebook PCs also show the Power icon. You might want to customize the default arrangement. For example, many notification icons offer quick access to their programs’ features when you right-click them. If there is an icon that you right-click frequently, you might want to configure the notification area to show the icon on the taskbar. Here are the steps to follow:
Читать дальше


