Mount Sinai Expert Guides
Здесь есть возможность читать онлайн «Mount Sinai Expert Guides» — ознакомительный отрывок электронной книги совершенно бесплатно, а после прочтения отрывка купить полную версию. В некоторых случаях можно слушать аудио, скачать через торрент в формате fb2 и присутствует краткое содержание. Жанр: unrecognised, на английском языке. Описание произведения, (предисловие) а так же отзывы посетителей доступны на портале библиотеки ЛибКат.
- Название:Mount Sinai Expert Guides
- Автор:
- Жанр:
- Год:неизвестен
- ISBN:нет данных
- Рейтинг книги:4 / 5. Голосов: 1
-
Избранное:Добавить в избранное
- Отзывы:
-
Ваша оценка:
Mount Sinai Expert Guides: краткое содержание, описание и аннотация
Предлагаем к чтению аннотацию, описание, краткое содержание или предисловие (зависит от того, что написал сам автор книги «Mount Sinai Expert Guides»). Если вы не нашли необходимую информацию о книге — напишите в комментариях, мы постараемся отыскать её.
Mount Sinai Expert Guides — читать онлайн ознакомительный отрывок
Ниже представлен текст книги, разбитый по страницам. Система сохранения места последней прочитанной страницы, позволяет с удобством читать онлайн бесплатно книгу «Mount Sinai Expert Guides», без необходимости каждый раз заново искать на чём Вы остановились. Поставьте закладку, и сможете в любой момент перейти на страницу, на которой закончили чтение.
Интервал:
Закладка:
Select the depth on the US machine where artery can be easily visualized, i.e. minimum depth needed (a rough guide is approximately 2 cm for radial, 2–3 cm for axillary, and 4–5 cm for femoral). (Note: this requires a transverse orientation of the US probe.)
Clean site of insertion plus a diameter of approximately 15 cm with chlorhexidine gluconate and isopropyl alcohol (Chloroprep).
Wash hands and put on cap, mask, sterile gown, and sterile gloves.
Prepare sterile field: drape patient with sterile sheets and drapes so that only prepped area is exposed.
Place sterile US gel into sterile US probe cover, then insert US into sterile covering; fasten covering with rubber bands.
Place sterile US gel onto insertion site.
Draw up 5–10 mL 1% lidocaine and label syringe.
Remove and gently but firmly twist the introducer (i.e. insertion) needle onto syringe.
Remove GW from paper covering and retract GW into plastic sheath until 2 mm is exposed.
Place gauze on sterile field near insertion site.
Set up tools on sterile table in the order in which they will be used: lidocaine, insertion needle and syringe, GW, catheter, needle holder, suture.
Hold US in the non‐dominant hand, select insertion site, inject 3–4 mL lidocaine with dominant hand, and place lidocaine syringe into sharps sponge.
Hold US with non‐dominant hand; hold insertion needle and syringe with dominant hand.
As soon as insertion needle pierces the skin, introduce negative pressure by pulling the plunger on the syringe.
Slowly advance syringe at a steep, 70–80° angle for axillary ( Figure 3.8A) or femoral arterial cannulation; use a more shallow angle (e.g. 45° or less) for radial arterial cannulation ( Figure 3.8B), all under US guidance.
As soon as blood is aspirated into syringe and introducer needle tip is visualized inside the artery, near its center, place US probe down and stabilize introducer needle with non‐dominant hand. Twist syringe off with dominant hand. (Optionally the needle may be inserted without an attached syringe depending on operator preference.)
Advance half the length of GW into insertion needle:If any difficulty is encountered during GW insertion (wire not advancing, e.g. bouncing back), withdraw GW, reattach introducer syringe, and apply negative pressure while visualizing artery under US. Never force GW into artery as this can cause damage to vessel walls and arterial perforation. Excessive force placed on GW will result in a bent wire.If insertion needle is noted to be centrally located (e.g. not buried into the posterior wall) inside the artery and GW cannot be advanced, turn insertion needle 90° and attempt to advance GW.If resistance or bounce is still encountered, remove insertion needle and place point pressure until hemostasis is confirmed; after hemostasis is achieved, procedure can be attempted again at a different site.
Remove insertion needle and place in sharps sponge.
Visualize GW in artery with US.
Advance catheter over GW, ensuring that contact with the GW is maintained at all times (i.e. there must always be one hand holding the GW when placing it and when placing the catheter over the GW).
As the catheter approaches the skin, pull GW out until it exits the arterial catheter. Hold this end of the GW with one hand as the other hand advances the catheter into the vessel.
Remove GW and immediately cover end of catheter to prevent bleeding. After GW is completely removed, verbalize ‘wire out.’
Apply connective tubing to the arterial catheter in sterile fashion.
Have the nurse forward flush the arterial catheter, then check for a good waveform on the monitor ( Figure 3.9) before securing the catheter.
Instill 1 mL of lidocaine at the intended suture sites.
Suture catheter to skin: place suture through skin, then wrap suture around arterial catheter three times before tying knot. Ensure sutures are snug, but not overly tight or loose.
Clean insertion site with chlorhexidine gluconate and isopropyl alcohol and allow to dry (1–2 minutes).
Apply dressing, e.g. Tegaderm (transparent film dressing) or Tegaderm with impregnated chlorhexidine.
Note: the description above describes using a free GW with a separate needle and catheter. Some kits have the GW integrated into the needle and catheter assembly ( Figure 3.7B); in this case after gaining access to the artery the GW is advanced through the assembly into the artery, followed by catheter insertion over the GW and removal of the entire assembly. Alternatively, radial artery access can also be performed without a GW, using an angiocatheter over a needle assembly in a fashion similar to inserting an intravenous catheter ( Figure 3.7A), advancing the catheter over the needle after cannulating the artery.
Management of complications
Thrombosis: catheter removal, vascular surgery consultation, anticoagulation as indicated.
Hematoma: point pressure (hydrophilic polymer and potassium ferrate powder (StatSeal) to stop bleeding), suturing, vascular surgery consultation.
Nerve compression (e.g. axillary artery pseudo‐aneurysm): catheter removal, vascular surgery/neurology consultation.
Follow‐up
Catheter site should be examined daily to ensure that insertion site is clean, dry, and without erythema or discharge.
Dressing should be changed when soiled and at least once weekly.
Catheters should be removed as soon as indications resolve.
After arterial catheter removal: nurse should monitor insertion site for bleeding/hematoma for 2 hours.
Reading list
1 Killu K, et al. Utility of ultrasound versus landmark‐guided axillary artery cannulation for hemodynamic monitoring in the intensive care unit. ICU Director 2011;May:54–9.
2 Saugel B, Scheeren TWLW, Teboul J‐LL. Ultrasound‐guided central venous catheter placement: a structured review and recommendations for clinical practice. Crit Care 2017; 21(1):225.
3 Weiner M, Geldard P, Mittnacht A. Ultrasound‐guided vascular access: a comprehensive review. J Cardiothorac Vasc Anesth 2013; 27(2):345–60.
Suggested websites
http://www.carefusion.com/our‐products/browse‐brands/chloraprep
http://www.ethicon.com/healthcare‐professionals/infection‐prevention/biopatch‐protective‐disk‐chg
http://www.3m.com/3M/en_US/company‐us/all‐3m‐products/~/All‐3M‐Products/Health‐Care/Medical/Tegaderm/?N=5002385+8707795+8707798+8711017+8711738+3294857497&rt=r3
Images
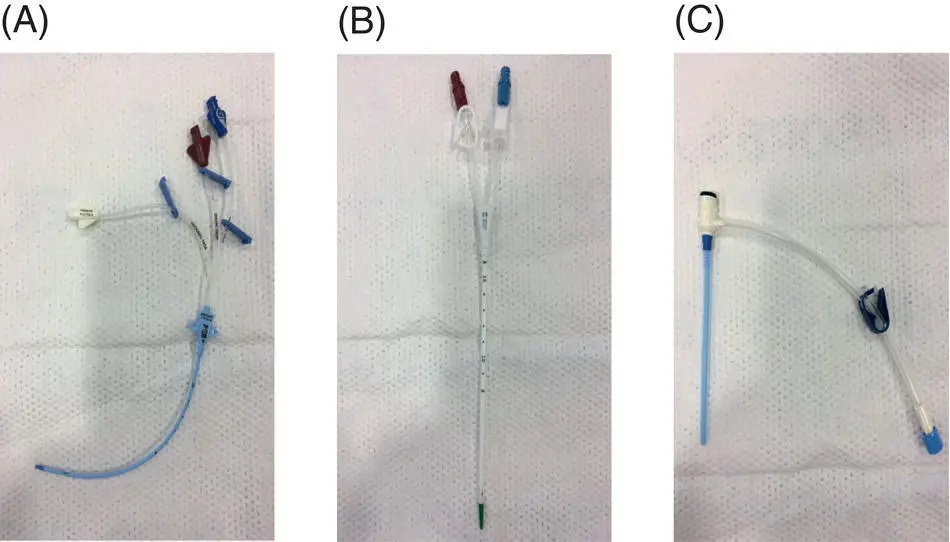
Figure 3.1 Catheter types: (A) multilumen, (B) large bore (e.g. dialysis, plasmapheresis), and (C) introducer.
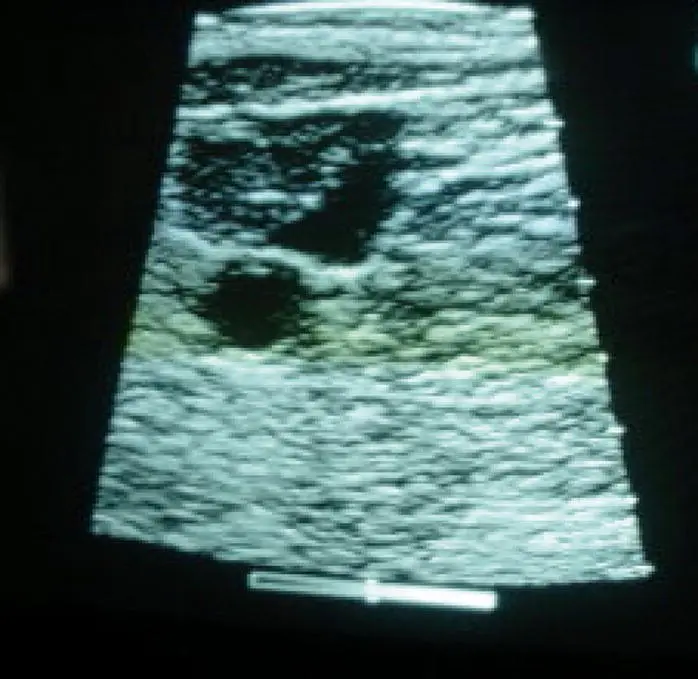
Figure 3.2 Non‐occlusive thrombus in right internal jugular vein.
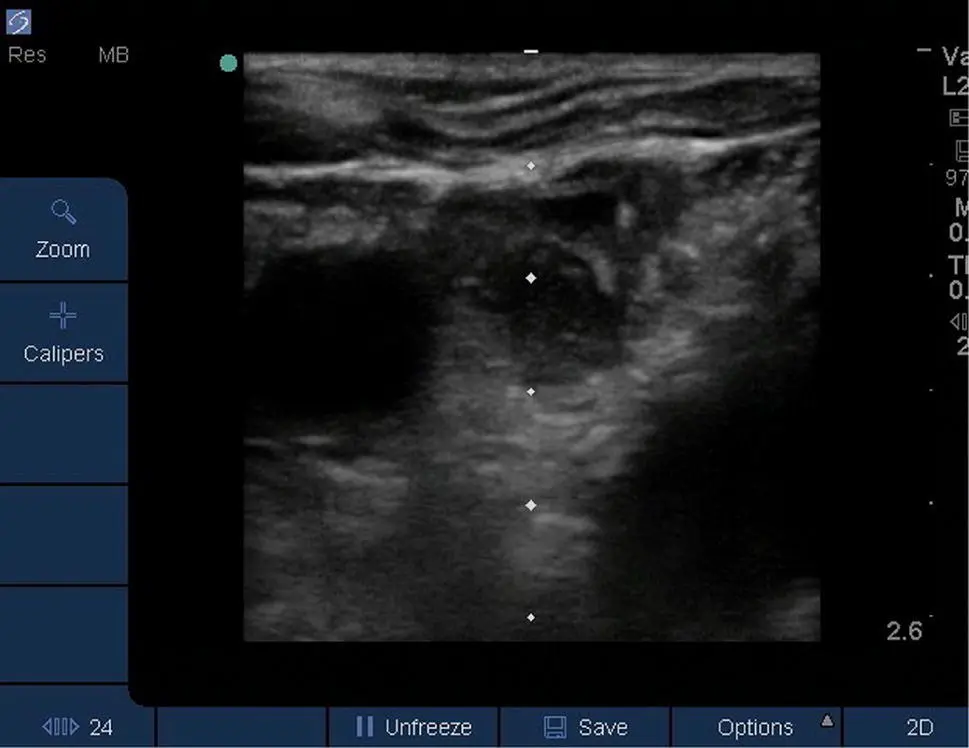
Figure 3.3 Depth scale set at 2.6 cm. Note that entry point to vessel is at 1 cm. The operator should be aware of these depths while performing the procedure.
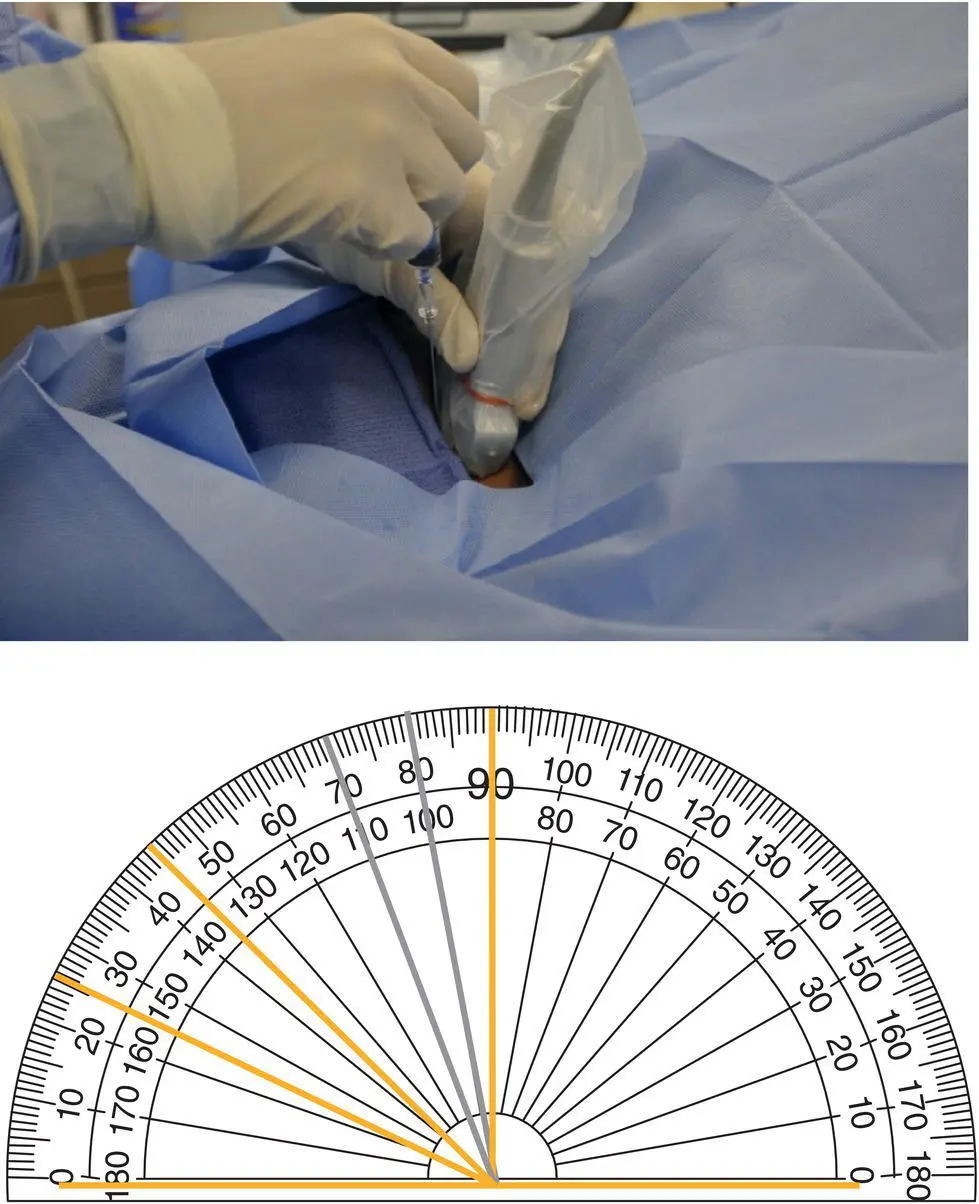
Figure 3.4 Note the angle between the needle and ultrasound probe is 70–80°. This optimizes needle tip visualization and vein penetration. This angle is suggested for central venous access of the internal jugular, lateral subclavian (or axillary), and femoral veins.
Читать дальшеИнтервал:
Закладка:
Похожие книги на «Mount Sinai Expert Guides»
Представляем Вашему вниманию похожие книги на «Mount Sinai Expert Guides» списком для выбора. Мы отобрали схожую по названию и смыслу литературу в надежде предоставить читателям больше вариантов отыскать новые, интересные, ещё непрочитанные произведения.


Обсуждение, отзывы о книге «Mount Sinai Expert Guides» и просто собственные мнения читателей. Оставьте ваши комментарии, напишите, что Вы думаете о произведении, его смысле или главных героях. Укажите что конкретно понравилось, а что нет, и почему Вы так считаете.