Elaine Marmel - QuickBooks Online For Dummies
Здесь есть возможность читать онлайн «Elaine Marmel - QuickBooks Online For Dummies» — ознакомительный отрывок электронной книги совершенно бесплатно, а после прочтения отрывка купить полную версию. В некоторых случаях можно слушать аудио, скачать через торрент в формате fb2 и присутствует краткое содержание. Жанр: unrecognised, на английском языке. Описание произведения, (предисловие) а так же отзывы посетителей доступны на портале библиотеки ЛибКат.
- Название:QuickBooks Online For Dummies
- Автор:
- Жанр:
- Год:неизвестен
- ISBN:нет данных
- Рейтинг книги:3 / 5. Голосов: 1
-
Избранное:Добавить в избранное
- Отзывы:
-
Ваша оценка:
QuickBooks Online For Dummies: краткое содержание, описание и аннотация
Предлагаем к чтению аннотацию, описание, краткое содержание или предисловие (зависит от того, что написал сам автор книги «QuickBooks Online For Dummies»). Если вы не нашли необходимую информацию о книге — напишите в комментариях, мы постараемся отыскать её.
QuickBooks Online For Dummies
6
th
Edition
Whether you’re a QuickBooks Online newbie or seasoned pro, you’ll find actionable and accessible advice in this new edition. Get tips on:
· Creating invoices and credit memos
· Recording sales receipts
· Recording and paying bills
· Setting up inventory items
· Tracking business checkbook and credit cards
· And more
No longer will you have to struggle through your interactions with the most used bookkeeping and accounting software in the world. Master this technology with the straightforward and accessible approach made famous by the
series.
QuickBooks Online For Dummies — читать онлайн ознакомительный отрывок
Ниже представлен текст книги, разбитый по страницам. Система сохранения места последней прочитанной страницы, позволяет с удобством читать онлайн бесплатно книгу «QuickBooks Online For Dummies», без необходимости каждый раз заново искать на чём Вы остановились. Поставьте закладку, и сможете в любой момент перейти на страницу, на которой закончили чтение.
Интервал:
Закладка:
In the center of Figure 3-6, using most of the Dashboard page real estate, you find information that changes depending on what you have clicked while using QBO. For example, when you initially open QBO, the information is overview company information. If you click an entry in the Navigation bar (on the left side of the screen), the information in the center of the Dashboard page changes to information related to the entry you clicked. If you select an option on the Gear menu (discussed later in this section), the information you see relates to the option you select.
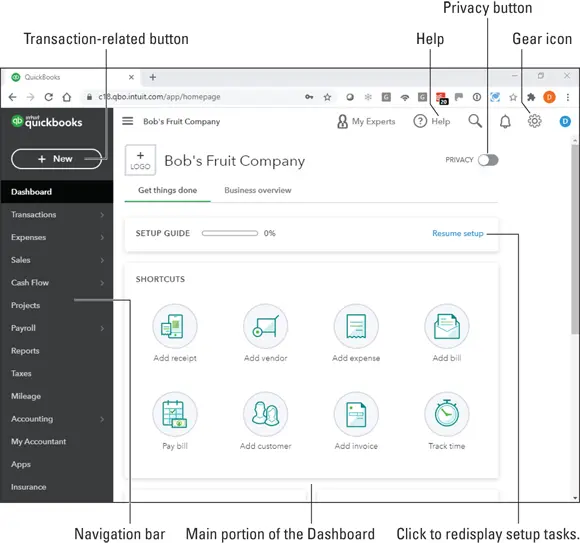
FIGURE 3-6:The QBO Dashboard page after closing the additional setup box.
 You might have noticed the Privacy button in Figure 3-6. You can use this button to temporarily hide financial information on your Dashboard page. For example, you might want to turn Privacy on if you’re using QuickBooks in a public place or even in your office when you’re not alone. Once you turn Privacy on, it remains on until you turn it off again.
As we just mentioned, the Navigation bar runs down the left side of the screen. You use the Navigation bar the same way you’d use a menu; click an item in the Navigation bar to, well, navigate to that part of QBO. For example, you can click Sales in the Navigation bar to see existing sales transactions in QBO and to create a new Sales transaction.
The highlighted entry in the Navigation bar helps you identify the section of QBO that you are using.
On the right side of the Dashboard page, you find a list of the bank accounts you’ve set up; if you scroll to the bottom of the list, you find options to connect your accounts to their banks, select an account and open its register, and view all activity, which is the audit log in QBO. The audit log lists every transaction created, changed, or deleted in QBO, as well as every instance of someone logging in to and out of QBO.
When you click the Help button, you see a menu of common topics QBO thinks might be of interest to you, and you can type in the Search box to find help on a particular topic (see Figure 3-7).
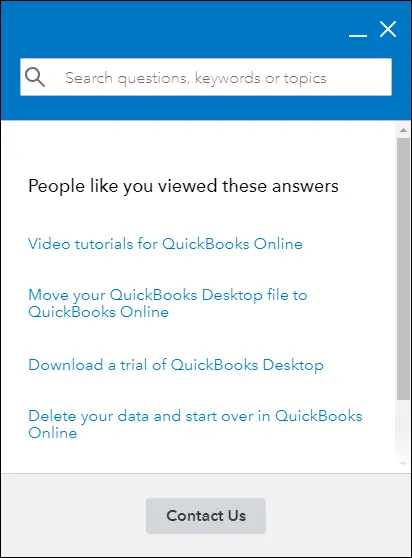
FIGURE 3-7:The Help menu.
For example, when you click the Create a New QuickBooks Online Company or Companies (US Only) link, QBO displays the How to Create a New QuickBooks Online Company or Companies page, which provides instructions for that topic (see Figure 3-8).
At the top-left corner of the screen, you see the New button you can use to work with transactions. Figure 3-9 shows the New menu that appears when you click the New button.
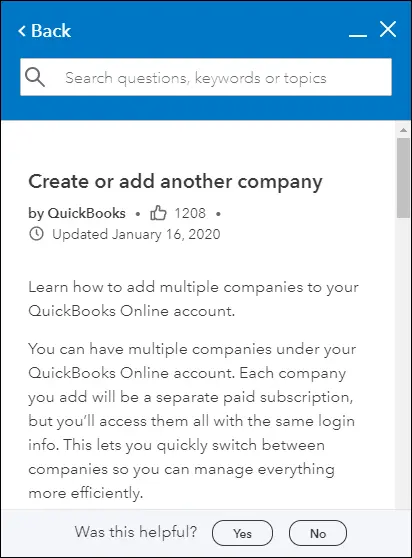
FIGURE 3-8:A sample Help topic.
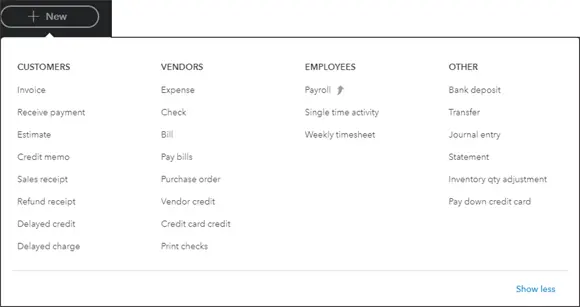
FIGURE 3-9:Click the New button to create a new transaction.
Figure 3-10 shows what you see when you click the Search button, which appears as a magnifying glass to the right of the Help button. You see a list of recently entered transactions; you can click any transaction in the list to open that transaction. Or, you can use the Search Transactions box to search for a transaction.
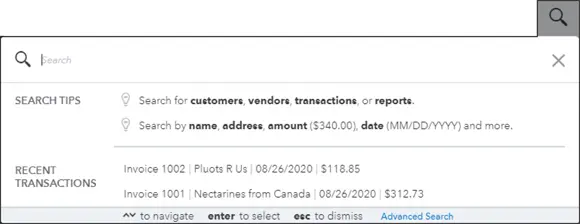
FIGURE 3-10:Click the Search button to search for previously entered transactions.
Click the second button from the top-right corner, the Gear button, to display the menu shown in Figure 3-11. From here, you can look at and change QBO company settings; view lists; work with tools such as import and export, reconciliation, and budgeting tools; and view information about your QBO account. Note that the Gear menu is divided into four columns that organize related commands.
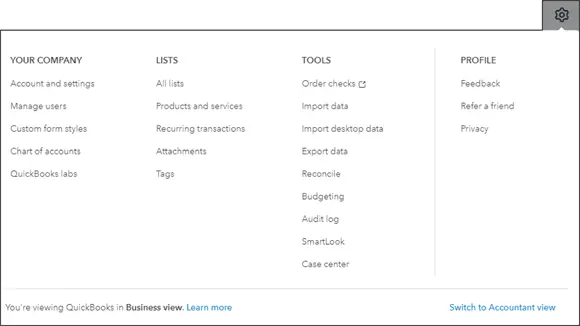
FIGURE 3-11:Use the Gear menu to work with settings, lists, tools, and your QBO account.
Establishing Company Settings
After you set up your company, you should review the default settings Intuit established and make changes as appropriate. To examine and make changes to payroll settings, see Chapter 9.
Examining company preferences
Choose Gear ⇒ Account and Settings to display the Company tab of the Account and Settings dialog box (see Figure 3-12).
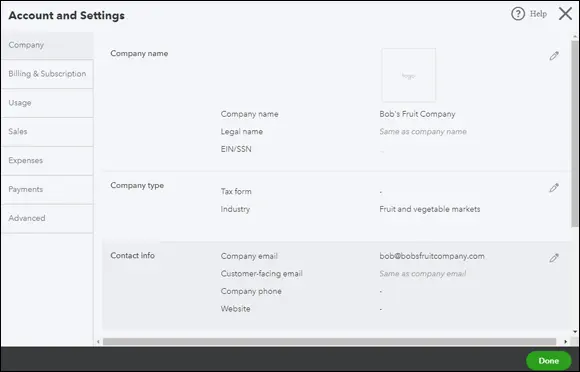
FIGURE 3-12:Review company settings.
On this tab, you can make changes to your company name, address, and contact information and your preferences for communication with Intuit.
To change any setting, click anywhere in the group where the setting appears. When you finish making changes, click the Save button that appears in the group of settings. You can then move on to other settings on the page.
When you finish working with Account and Settings, click Done in the lower-right corner of the screen.
Examining billing and subscription settings and usage limits
To review the settings related to your QBO billing and subscription, click the Gear icon and select the appropriate option. QBO users, choose Gear ⇒ Account and Settings to display the Account and Settings dialog box. Then, click Billing & Subscription in the pane on the left. QBOA users choose Gear ⇒ Your Account.
 You won’t see the Billing & Subscription pane if the QBO company is being managed by an accountant who is part of the Wholesale Billing program.
This page, shown in Figure 3-13, shows you the status of your QBO, Payroll, and Payments subscriptions. From this page, you can convert your trial version of QBO and of the QBO Payroll product to a regular subscription; converting cancels your trial. You also can use this page to order checks and supplies, should you need them.
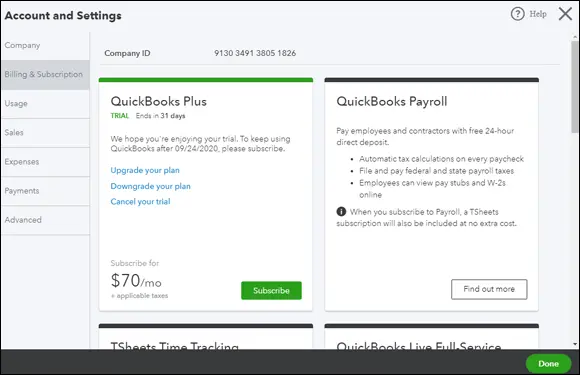
FIGURE 3-13:Review QBO billing and subscription settings.
The subscription-based Payments product that Intuit offers enables you to receive online payments from your customers. If you already have a subscription to the Payments product, you can connect it to QBO from the Billing & Subscription page of the Account and Settings dialog box. If you don’t have a subscription, you can subscribe from the Apps page on the Navigation bar or from the Payments page of the Account and Settings dialog box.
Интервал:
Закладка:
Похожие книги на «QuickBooks Online For Dummies»
Представляем Вашему вниманию похожие книги на «QuickBooks Online For Dummies» списком для выбора. Мы отобрали схожую по названию и смыслу литературу в надежде предоставить читателям больше вариантов отыскать новые, интересные, ещё непрочитанные произведения.


Обсуждение, отзывы о книге «QuickBooks Online For Dummies» и просто собственные мнения читателей. Оставьте ваши комментарии, напишите, что Вы думаете о произведении, его смысле или главных героях. Укажите что конкретно понравилось, а что нет, и почему Вы так считаете.