Elaine Marmel - QuickBooks Online For Dummies
Здесь есть возможность читать онлайн «Elaine Marmel - QuickBooks Online For Dummies» — ознакомительный отрывок электронной книги совершенно бесплатно, а после прочтения отрывка купить полную версию. В некоторых случаях можно слушать аудио, скачать через торрент в формате fb2 и присутствует краткое содержание. Жанр: unrecognised, на английском языке. Описание произведения, (предисловие) а так же отзывы посетителей доступны на портале библиотеки ЛибКат.
- Название:QuickBooks Online For Dummies
- Автор:
- Жанр:
- Год:неизвестен
- ISBN:нет данных
- Рейтинг книги:3 / 5. Голосов: 1
-
Избранное:Добавить в избранное
- Отзывы:
-
Ваша оценка:
QuickBooks Online For Dummies: краткое содержание, описание и аннотация
Предлагаем к чтению аннотацию, описание, краткое содержание или предисловие (зависит от того, что написал сам автор книги «QuickBooks Online For Dummies»). Если вы не нашли необходимую информацию о книге — напишите в комментариях, мы постараемся отыскать её.
QuickBooks Online For Dummies
6
th
Edition
Whether you’re a QuickBooks Online newbie or seasoned pro, you’ll find actionable and accessible advice in this new edition. Get tips on:
· Creating invoices and credit memos
· Recording sales receipts
· Recording and paying bills
· Setting up inventory items
· Tracking business checkbook and credit cards
· And more
No longer will you have to struggle through your interactions with the most used bookkeeping and accounting software in the world. Master this technology with the straightforward and accessible approach made famous by the
series.
QuickBooks Online For Dummies — читать онлайн ознакомительный отрывок
Ниже представлен текст книги, разбитый по страницам. Система сохранения места последней прочитанной страницы, позволяет с удобством читать онлайн бесплатно книгу «QuickBooks Online For Dummies», без необходимости каждый раз заново искать на чём Вы остановились. Поставьте закладку, и сможете в любой момент перейти на страницу, на которой закончили чтение.
Интервал:
Закладка:
After you complete the sign-up process for a QBO account, Intuit, by default, logs you in to your account and walks you through the process of setting up your QBO company. The process is short — much shorter than the one you go through when setting up a QuickBooks Desktop product company — and you will need the following information:
Your company’s name and address
The industry in which your company operates
Whether you want to import company information from a QuickBooks Desktop product
The way you want to handle payroll
To sign up for a QBO account, follow these steps:
1 Visit http://quickbooks.intuit.com/pricing .You might get redirected; double-check the address in the browser’s address bar to make sure you’re on the “pricing” page.
2 Scroll down the page to find three boxes describing each version of QBO —Essentials, Plus, and Advanced. Intuit offers QBO Advanced, a version aimed at users who have outgrown QBO Plus. QBO Advanced is not available as a free trial. For more information, see Chapter 2and https://quickbooks.intuit.com/accounting/advanced .
3 To use QBO as a free trial, click the slider button above the versions of QBO to change the slider’s position from Buy Now for the current promotional price to Free Trial for 30 Days (see Figure 3-1). Be aware that the price you ultimately pay for QBO depends on whether you choose the Buy Now option or the Free Trial for 30 Days option. If you opt to “buy now,” you pay less for your subscription because discounts don’t apply to the free trials. And, be aware that promotional pricing usually ends after 3 to 6 months.
4 In the version of QBO that you want to try, click Try It Free.The page in Figure 3-2 appears.
5 Fill in your email address (and confirm it), a mobile number if you want (it’s optional, but Intuit uses it as a way to verify your identity if you need help recovering your account), and a password.Your password must be between 6 and 32 characters and consist of a mix of letters and numbers. The password can also contain some special characters; we included an exclamation point (!) in our password and it was accepted. The user ID and password you supply are the ones you use each time you log in to QBO. If you’ve previously created an Intuit login, you can use the same one again.
6 Click the Sign Up with Email button below the boxes you completed in Step 5.At the time that we wrote this, a window appeared that offered the option to skip the free trial and buy the product at a discounted rate. You can buy, but we opted to click the Continue to Trial button.
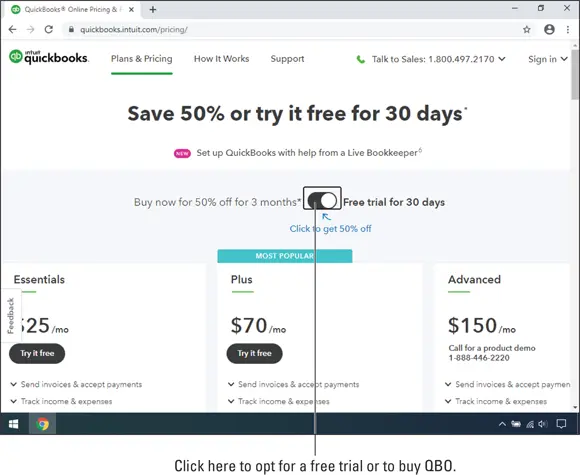
FIGURE 3-1:Use the slider to toggle between a short-term discount or a free trial.
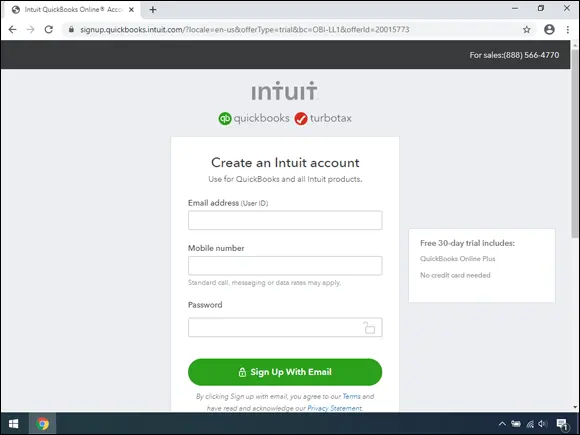
FIGURE 3-2:Fill in the information needed to start the free trial.
QBO sets up your free trial, logs you in to QBO, and displays the Set Up wizard … read on.
 If, at any time, you find you need help from a real person, you can take advantage of QBO’s SmartLook feature to work with Intuit in your QBO company. Phone or chat with QBO technical support and, in your QBO company, click Gear ⇒ SmartLook (you’ll find it at the bottom of the Tools list on the Gear menu). QBO will display a number that you supply to your technical support representative, giving permission to share your QBO screen (and only your QBO screen). And, just so you know, we first thought the SmartLook feature functioned like a bat signal, and that an agent would just show up. But, our highly qualified and competent technical editor set us straight.
Setting Up a New Company
When you first sign up for a QBO account, Intuit logs you in to your QBO account and, by default, displays the Set Up wizard. The first screen of the wizard, shown in Figure 3-3, asks for basic company information.
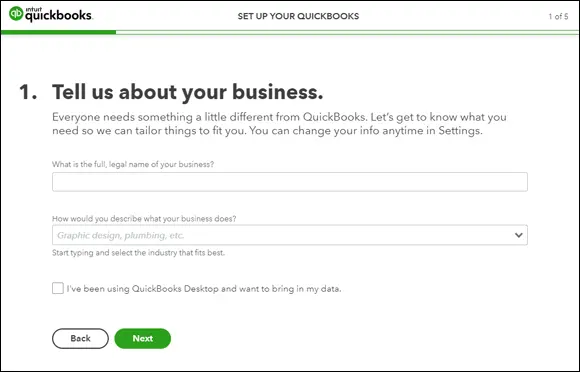
FIGURE 3-3:Provide basic company information.
Notice that you can opt to bring in QuickBooks Desktop data. For this exercise, we didn’t check that box. Be aware that you can later import QuickBooks Desktop data; the decision you make here isn’t your last chance.
Click Next in the lower-right corner, and QBO displays the screen shown in Figure 3-4, where you select activities for which you intend to use QBO. Don’t worry about making a mistake here; this is just a “get up and running” page. You don’t need to select all activities. If you don’t select an activity now, you can always add it later. As you select a particular activity, QBO displays a check in the box for that activity. You can choose any or all of the following that apply to you:
Send and track invoices.
Organize your expenses.
Manage your inventory.
Track your retail sales.
Track your bills.
Track your sales tax.
Pay your employees.
Track billable hours.
When you finish selecting activities, click All Set.
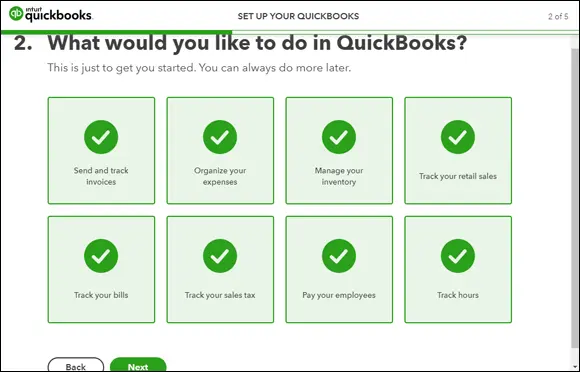
FIGURE 3-4:Select activities for which you expect to use QBO.
If you choose the option to pay your employees, QBO assumes you want to use QBOP — and that’s fine; you can read more about payroll and using QBOP in Chapter 9. But, if you have any future expectation of importing any QuickBooks Desktop data into your QBO company, don’t turn on payroll or plan to start another QBO company when you’re ready to import. Turning on payroll in a QBO company before you import QuickBooks Desktop data effectively nullifies your ability to successfully import the data. So, turn on payroll with the expectation that you’re using this QBO company to play around and see how QBO works, but that you won’t be keeping any data you store in it once you get around to importing QuickBooks Desktop data (described in detail in Chapter 12).
QBO displays a short tour and then your company’s Dashboard page (formerly called the Home page) as well as links to options you might want to set up to get started (see Figure 3-5).
We examine the Dashboard page in the next section, but essentially you’ve just completed most of the initial setup work; we cover other program settings later in this chapter.
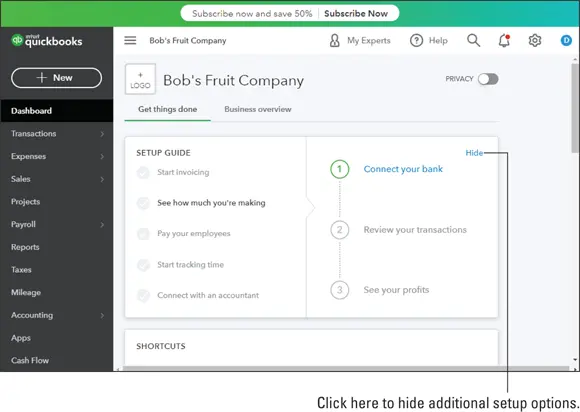
FIGURE 3-5:Your QBO Dashboard page just after creating your company.
Understanding the Dashboard Page
When you first see your QBO company, your Dashboard page contains boxes with links to options you can use to set up features in QBO that are important to you (refer to Figure 3-5). You can use those links and set up those options now, or you can wait until later. To hide the options, click Hide in the upper-right corner of the box. Don’t worry, you can still set up the options associated with any of these boxes; in Figure 3-6, notice the Resume Setup link in the upper-right corner of the Dashboard. Click it to redisplay the setup options. And, once you close the boxes, your Dashboard page displays information specific to your company.
Читать дальшеИнтервал:
Закладка:
Похожие книги на «QuickBooks Online For Dummies»
Представляем Вашему вниманию похожие книги на «QuickBooks Online For Dummies» списком для выбора. Мы отобрали схожую по названию и смыслу литературу в надежде предоставить читателям больше вариантов отыскать новые, интересные, ещё непрочитанные произведения.


Обсуждение, отзывы о книге «QuickBooks Online For Dummies» и просто собственные мнения читателей. Оставьте ваши комментарии, напишите, что Вы думаете о произведении, его смысле или главных героях. Укажите что конкретно понравилось, а что нет, и почему Вы так считаете.