Point-of-Care Ultrasound Techniques for the Small Animal Practitioner
Здесь есть возможность читать онлайн «Point-of-Care Ultrasound Techniques for the Small Animal Practitioner» — ознакомительный отрывок электронной книги совершенно бесплатно, а после прочтения отрывка купить полную версию. В некоторых случаях можно слушать аудио, скачать через торрент в формате fb2 и присутствует краткое содержание. Жанр: unrecognised, на английском языке. Описание произведения, (предисловие) а так же отзывы посетителей доступны на портале библиотеки ЛибКат.
- Название:Point-of-Care Ultrasound Techniques for the Small Animal Practitioner
- Автор:
- Жанр:
- Год:неизвестен
- ISBN:нет данных
- Рейтинг книги:5 / 5. Голосов: 1
-
Избранное:Добавить в избранное
- Отзывы:
-
Ваша оценка:
Point-of-Care Ultrasound Techniques for the Small Animal Practitioner: краткое содержание, описание и аннотация
Предлагаем к чтению аннотацию, описание, краткое содержание или предисловие (зависит от того, что написал сам автор книги «Point-of-Care Ultrasound Techniques for the Small Animal Practitioner»). Если вы не нашли необходимую информацию о книге — напишите в комментариях, мы постараемся отыскать её.
New chapters in
cover ultrasound-guided nerve blocks, musculoskeletal, brain imaging, and applications of focused ultrasound techniques in cats, exotics and marine mammals—making it an essential purchase for veterinarians wanting to incorporate point-of-care ultrasound techniques into their veterinary practices.
Presents a standardized approach to point-of-care ultrasound as an extension of the physical exam, including trauma, non-trauma, and monitoring applications Includes coverage of new techniques for focused ultrasound exams, including lung, anesthesia and ultrasound guided nerve blocks, transcranial brain imaging, musculoskeletal, volume status evaluation, and rapid assessment for treatable forms of shock Adds cats, exotic and wildlife mammals, and marine mammals to the existing canine coverage Emphasizes the integration of point-of-care ultrasound techniques for optimizing patient care and accurate patient assessment Offers access to a companion website with supplementary video clips showing many clinically relevant didactic examples The second edition of
is an excellent resource for veterinary practitioners, ranging from the general practitioner to nearly all clinical specialists, including internal medicine, oncology, cardiology, emergency and critical care, anesthesiology, ophthalmology, exotics, and zoo medicine specialists, and veterinary students.
Point-of-Care Ultrasound Techniques for the Small Animal Practitioner — читать онлайн ознакомительный отрывок
Ниже представлен текст книги, разбитый по страницам. Система сохранения места последней прочитанной страницы, позволяет с удобством читать онлайн бесплатно книгу «Point-of-Care Ultrasound Techniques for the Small Animal Practitioner», без необходимости каждый раз заново искать на чём Вы остановились. Поставьте закладку, и сможете в любой момент перейти на страницу, на которой закончили чтение.
Интервал:
Закладка:
Pearl:There are three major reasons to use probe pressure knowing that your patient may not like the maneuver: reduce contact and air‐trapping artifact, push structures out of the way, such as gas‐filled small intestine, and gain more depth by moving the transducer closer to the area of interest.
Sweeping ( Figure 4.10)
Like sliding, during sweeping the angle of insonation in relation to the patient’s body is not changed as the probe is moved in the transverse axis of the patient (Bahner et al. 2016).
Pressure/Compression ( Figure 4.11)
During pressure/compression, the probe is pressed or pushed into the body, causing compression of body tissues. The pressure/compression maneuver may help to reduce contact and air‐trapping artifact, push structures out of the way, such as gas‐filled small intestine, and gain more depth by moving the transducer closer to the area of interest. Uncontrolled pressure may result in moving the intended target (area of interest) out of the field of view. This effect commonly occurs with the feline spleen and kidney and at the AFAST spleno‐renal (SR) view.
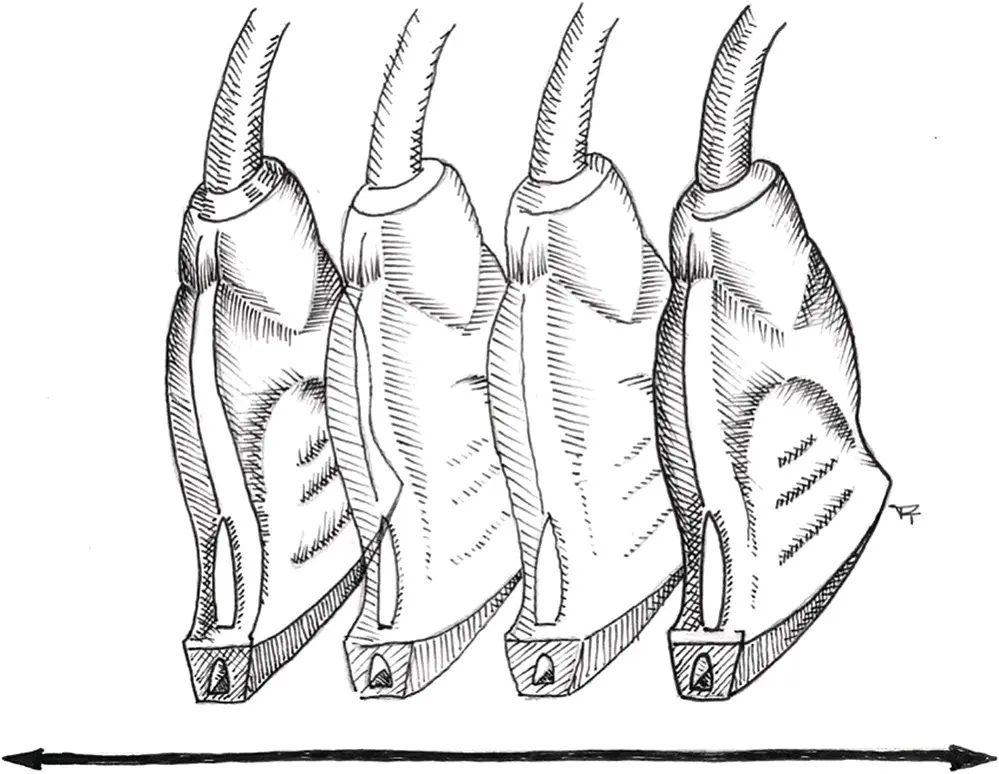
Figure 4.10. Sweeping. The probe is moved across the body in the transverse axis of the patient, and the angle of insonation in relation to the patient’s body is not changed.
Source: Illustration courtesy of Randi Taggart, Richmond, VA.
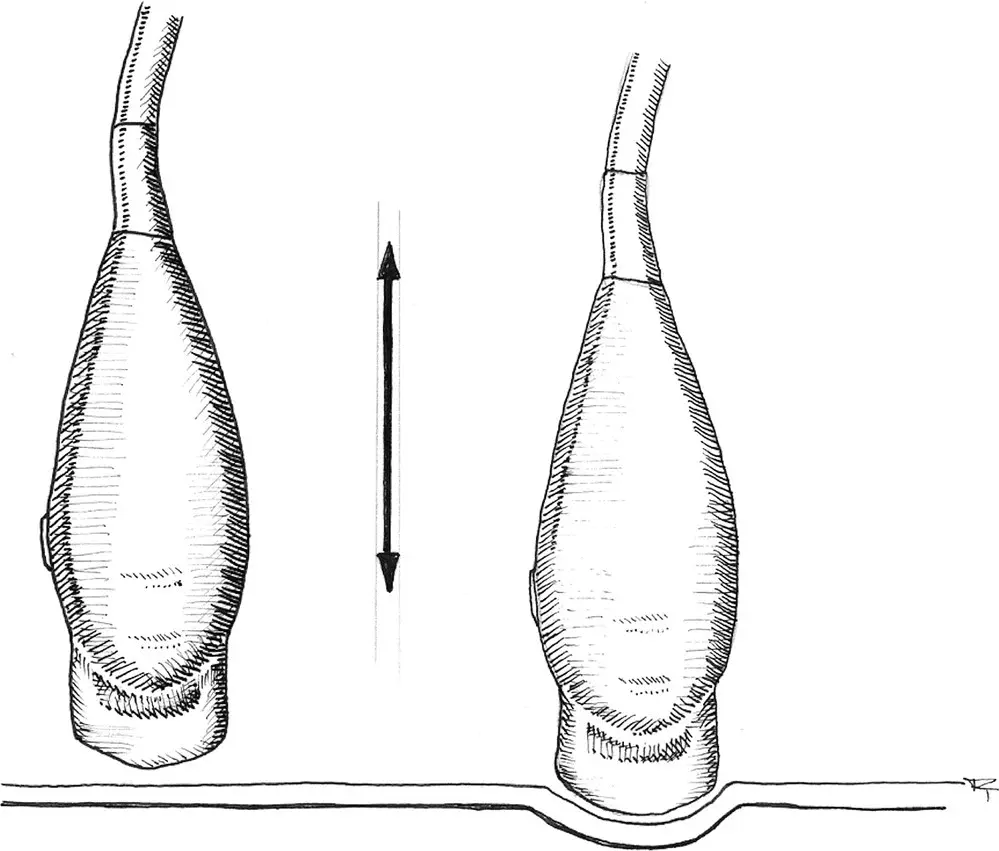
Figure 4.11. Pressure/Compression. Neither the probe position on the body nor its angle of insonation is changed. Rather, the probe is pushed into the body, compressing the underlying tissues.
Source: Illustration courtesy of Randi Taggart, Richmond, VA.
Cardiac Orientation
See Chapters 17– 21for detailed information on cardiac orientation.
Pearl:For the POCUS and FAST ultrasound scans, begin with an intermediate setting of 8 MHz as a general rule of thumb. That being said, most chapters in this textbook provide probe frequency recommendations.
Image Optimization: Using the “Big 4” Knobs of Depth, Gain, Frequency, and Focus
For an ultrasound image to have meaning, it must have adequate detail. The best rule of thumb is that the image should simply look “nice.” This idea may be a little different from one person to another but they should all be relatively similar. Always keep in mind the angle of insonation. The ideal angle of ultrasound reflection for generating the best image is 90° on the surface of the organ of interest (see Figure 4.5). In fact, this is why linear probes, while not used by most small animal practitioners, provide superior detail when compared to curvilinear probes, which are more commonly used among small animal practitioners.
Although there are numerous buttons and knobs on the ultrasound machine that can be used to improve, or worsen, the image, the “Big 4” are depth, gain, frequency, and focus position and number. See also Chapter 5for additional examples.
Pearl:Know the “Big 4” knobs: depth, gain, frequency, and focus position and number.
Depth
When reviewing a radiograph, the clinician can become narrow‐sighted by focusing on one area and not looking at the rest of the film. With ultrasound, however, the goal is to focus on one area. Adjust the depth to the area of interest. Filling up the screen with the area of interest will result in a better diagnostic ultrasound image and this strategy is used for detailed parenchymal assessment. However, during AFAST and TFAST target organs are usually reduced to 25–33% of the screen, depending on the target organ and the respective view.
Every sonographer performing ultrasound has a responsibility to know where the ultrasound scale is located; usually values are in centimeters and are displayed along the side of the machine's screen. The awareness of depth within the image is often overlooked by beginning sonographers. However, recognizing depth is of the utmost importance because what looks large on ultrasound may in fact be small. Attention to the centimeter scale on the screen also allows for eyeballing not only the depth but also the dimensions of structures in view.
Gain
Gain is the overall brightness of the image. The ideal is not too bright and not too dark. The gain knob is the one that will adjust the overall gain setting. After first setting the overall gain, minimize dark or light bands across the screen by using the time gain compensation (TGC) knobs. These are usually sliders that adjust brightness along discrete bands across the image, although some machines have reduced the numbers of sliders to near‐ and far‐field. The goal is to have a consistent brightness from top to bottom of the screen, in other words, gain extending through the far‐field.
Frequency
Find a happy medium between penetration and resolution. Use the highest frequency (MHz) possible yet still see as deeply as needed. The smaller the patient, the higher the frequency and the larger the patient, the lower the frequency. High MHz provides detail at the expense of penetration and low MHz provides penetration at the expense of detail. In addition to the frequency, the focus position and focus number also have a major impact on the image. Frequency is also affected by presets. Smaller parts, pediatric and smaller abdominal and cardiac presets generally increase the frequency automatically and adult and larger abdominal and cardiac presets decrease the frequency automatically.
Focal Position and Number
The ultrasound beam has a focus position where the beams narrow to give a more detailed image at a certain depth. The beams do not converge, as we may think of light focusing on the retina, because they will again diverge beyond the focal position. The physics of this can be found in additional references (Nyland et al. 2002). Both the focus position and number of focal points can be set and adjusted by the sonographer. However, the processor can only handle a certain amount of information and by asking it to do more, it will reduce other items, normally the frame rate or how many times/second the image is refreshed. High frame rates make for a smooth image but take a lot of processing power. Low frame rates give a choppy image. Ask the processor to do more and it will respond by giving you a lower frame rate, a choppier image.
Pearl:For the POCUS and FAST scans, generally keep the focal point number at 1, and set the focal point's position at, or just deep to, the area of interest.
Presets, Abdominal, Cardiac, Small Parts, etc.
Even with just these four settings, that's still a lot of knobs to be adjusting in the emergent situation. Modern ultrasound machines have a collection of imaging settings which the user may select, based upon the area of interest, such as cardiac vs abdomen vs small parts and others, and patient size, adult versus pediatric. Trying to image an abdominal structure if the machine is on the small parts preset will lead to frustration until the sonographer realizes that the preset must be changed first to be able to adjust and manipulate the Big 4 knobs.
Alternate Imaging Tools
Интервал:
Закладка:
Похожие книги на «Point-of-Care Ultrasound Techniques for the Small Animal Practitioner»
Представляем Вашему вниманию похожие книги на «Point-of-Care Ultrasound Techniques for the Small Animal Practitioner» списком для выбора. Мы отобрали схожую по названию и смыслу литературу в надежде предоставить читателям больше вариантов отыскать новые, интересные, ещё непрочитанные произведения.


Обсуждение, отзывы о книге «Point-of-Care Ultrasound Techniques for the Small Animal Practitioner» и просто собственные мнения читателей. Оставьте ваши комментарии, напишите, что Вы думаете о произведении, его смысле или главных героях. Укажите что конкретно понравилось, а что нет, и почему Вы так считаете.