2 Slide your finger along the text toward the point where the typo appears. As you slide your finger, the cursor moves along with it.
3 When the cursor is immediately to the right of where you want to begin your edits, remove your finger.
4 Make your changes to the text.
5 (Optional) Tap at the end of the existing text to resume your text entry.
Selecting, copying, and pasting text
Your iPad has options for selecting, cutting, copying, and pasting text. However, which of these features is available depends on whether the text you’re working with is editable:
Noneditable text. This type of text (for example, the text you see on a web page) can’t be edited, and therefore it can’t be cut. However, it can still be selected, copied, and pasted:Tap and hold anywhere inside the text. After a second or two, your iPad selects the text and displays blue selection handles around it, as shown in Figure 1.6. 1.6For noneditable text, select it and then tap Copy to copy it.If necessary, tap and drag the selection handles to select more or less of the text.Tap Copy.If you want to paste the text into a different app, open that app.Position the cursor where you want the text to appear.Tap the cursor and then tap Paste. iPadOS inserts the copied text.
Editable text. This type of text (for example, the text in a note, an email message you’re writing, or a text box) can be edited; therefore, it can be cut or copied and then pasted:Tap and hold anywhere inside the text. After a short pause, your iPad displays a several buttons above the text, as shown in Figure 1.7. 1.7Tap and hold editable text to see these options.Tap one of the following options:Select. Tap to select some of the text. Selection handles appear around the word you tapped.Select All. Tap to select all the text. iPadOS displays the buttons shown in Figure 1.8; if you don’t need to modify the selection, skip to Step 4. 1.8Select your text and then choose what you want to do with it.Drag the selection handles to select the text you want to cut or copy. iPadOS displays a new set of buttons above the text, as well as above the keyboard (see Figure 1.8).Tap what you want to do with the text:Cut. Removes the text and stores it in memory.Copy. Stores a copy of the text in memory.If you want to paste the cut or copied text into a different app, open that app.Position the cursor where you want the text to appear.Tap the cursor and then tap Paste (see Figure 1.8). iPadOS inserts the cut or copied text.
Copying and pasting an image
To make a copy of an image, such as a photo or illustration in a web page, follow these steps:
1 Long press the image. iPadOS displays a menu of options.
2 Tap Copy. iPadOS copies the image to memory.
3 Open the app to which you want to paste the copy of the image.
4 Position the cursor where you want the image inserted.
5 Tap the cursor.
6 Tap Paste. iPadOS pastes the image.
The iPad’s many editing features give it an almost computer-like feel, but there’s another feature that takes it a step closer to computer-hood: Undo. That’s right, just like on your regular computer, iPadOS offers an Undo command that can reverse your most recent action, whether it’s typing something, deleting some text, or pasting an object you cut or copied. If that typing, deletion, or paste was a mistake, Undo is happy to reverse it for you.
To use Undo, you have two choices:
Above the keyboard, tap the Undo icon (the left-pointing arrow pointed out earlier in Figure 1.5). Note that the keyboard also offers a Redo icon that undoes the Undo.
Give your iPad a vigorous shake and you see a dialog similar to the one shown in Figure 1.9. Tap Undo Action (where Action is whatever type of edit you’re reversing, such as Paste or Typing) to reverse your most recent edit.

1.9Shake your iPad to display the Undo dialog.
If you shake your iPad and nothing happens, it means the Shake to Undo feature is turned off. Open the Settings app, tap Accessibility, tap Touch, and then tap the Shake to Undo switch to On.
Configuring iPad from the Control Center
Your iPad is jammed to the hilt with useful tools and features. That’s a good thing, but most of the time those tools require several swipes and a few taps to access. This isn’t a big deal for tools you use only every now and then, but it can become tedious if you have one or more tools that you use constantly.
That tedium is likely why the iPadOS programmers decided to fix the problem by creating the Control Center. This is a special screen that offers quick and easy access to no less than 15 of the most useful iPad tools. And when I say “quick and easy,” what I really mean is a flick. That is, you flick down from the top right corner of the screen to open the Control Center, as shown in Figure 1.10.
Figure 1.10 points out what each Control Center icon represents, but note that your version of Control Center might display more or fewer icons depending on your iPad model and iPadOS version. I cover most of the Control Center tools elsewhere in the book, so I won’t go through each one here. To close the Control Center, tap outside of it.
You can make the Control Center even more useful by customizing the bottom rows. Open the Settings app, tap Control Center, and then add the controls you want to use and remove those you don’t.
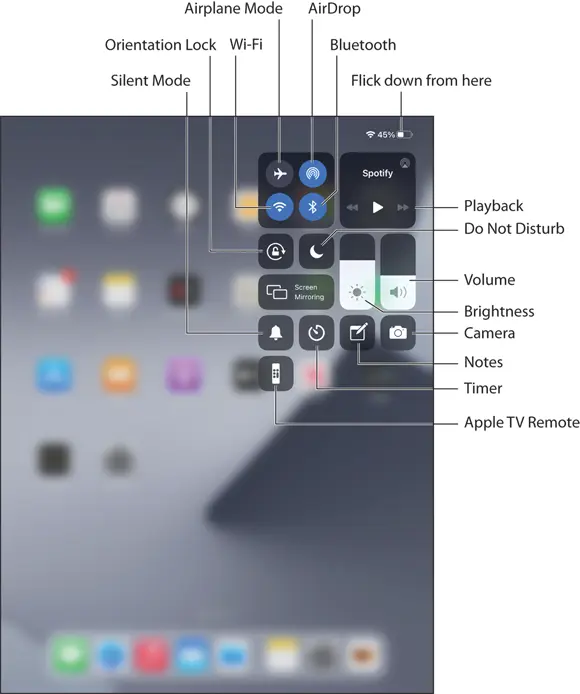
1.10The Control Center offers “one-flick” access to some important iPad tools.
Chapter 2: How Do I Connect to a Network?
You can do plenty of things on your iPad without having to reach out and touch some remote website or service. You can jot some notes, add appointments, edit contacts, or just play around with the settings. However, I’m willing to bet you didn’t fork over the big bucks for your tablet just so you could use the Notes app. Whether you want to go on a web surfin’ Safari, visit the App Store or iTunes Store to grab some content, or use Maps to find your way, the iPad comes alive when it’s connected to a Wi-Fi or cellular network.
Making Wi-Fi Network Connections
Working with Wi-Fi Connections
Tethering to an iPhone Internet Connection
Working with Cellular-Enabled iPads
Activating Airplane Mode
Connecting Bluetooth Devices
Making Wi-Fi Network Connections
Unless you have an iPad with a cellular antenna (more on that a bit later in this chapter), the only way to get your iPad online is to connect to a nearby Wi-Fi network. Connecting to Wi-Fi is one of the iPad’s setup steps, so you might already be good to go. However, if you have multiple Wi-Fi networks or if you take your tablet to a different Wi-Fi location, then you need to know how to connect to another network.
You begin by displaying the list of available Wi-Fi networks using either of the following techniques:
Читать дальше
