James C. Kessler - Fundamentals of Fixed Prosthodontics
Здесь есть возможность читать онлайн «James C. Kessler - Fundamentals of Fixed Prosthodontics» — ознакомительный отрывок электронной книги совершенно бесплатно, а после прочтения отрывка купить полную версию. В некоторых случаях можно слушать аудио, скачать через торрент в формате fb2 и присутствует краткое содержание. Жанр: unrecognised, на английском языке. Описание произведения, (предисловие) а так же отзывы посетителей доступны на портале библиотеки ЛибКат.
- Название:Fundamentals of Fixed Prosthodontics
- Автор:
- Жанр:
- Год:неизвестен
- ISBN:нет данных
- Рейтинг книги:3 / 5. Голосов: 1
-
Избранное:Добавить в избранное
- Отзывы:
-
Ваша оценка:
Fundamentals of Fixed Prosthodontics: краткое содержание, описание и аннотация
Предлагаем к чтению аннотацию, описание, краткое содержание или предисловие (зависит от того, что написал сам автор книги «Fundamentals of Fixed Prosthodontics»). Если вы не нашли необходимую информацию о книге — напишите в комментариях, мы постараемся отыскать её.
Fundamentals of Fixed Prosthodontics — читать онлайн ознакомительный отрывок
Ниже представлен текст книги, разбитый по страницам. Система сохранения места последней прочитанной страницы, позволяет с удобством читать онлайн бесплатно книгу «Fundamentals of Fixed Prosthodontics», без необходимости каждый раз заново искать на чём Вы остановились. Поставьте закладку, и сможете в любой момент перейти на страницу, на которой закончили чтение.
Интервал:
Закладка:

Fig 5-39The components of a Slidematic facebow are (top to bottom) a reference plane indicator, the bite fork assembly, and the facebow with pointer.
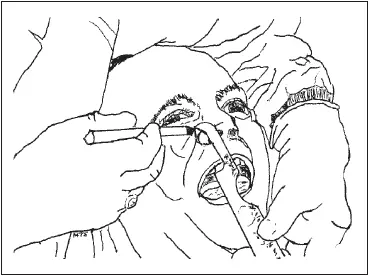
Fig 5-40A reference point is marked 43 mm above the incisal edges of the maxillary teeth.
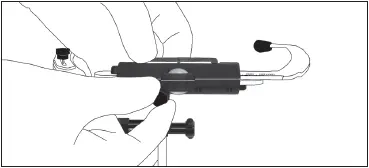
Fig 5-41The thumbscrew is tightened to attach the bite fork assembly to the underside of the facebow.
Denar Facebow and Articulator
The Denar Slidematic facebow (Whip Mix) is another self-centering ear facebow that is easy to use ( Fig 5-39). The technique for its use is described with the Denar Mark II articulator (Whip Mix), an arcon semi-adjustable articulator. This articulator also allows interchangeability of articulated casts with other Mark II articulators without a loss of accuracy.
Facebow armamentarium
Denar Slidematic facebow (with bite fork, articulator index, reference pin, and reference plane indicator)
Felt-tip marker
Denar Mark II articulator
Plaster bowl
Spatula
Laboratory knife with no. 25 blade
Trimmed maxillary cast
Horseshoe wax wafers
Mounting stone (Whip Mix)
Facebow record technique
The reference plane indicator is used to measure a point 43 mm above the incisal edges of the maxillary incisors on the right side. This point is marked with a felt-tip marker ( Fig 5-40). This will form the anterior, or third, reference point for the facebow transfer.
Two horseshoe wax wafers (Surgident Coprwax Bite Wafer) are heated in warm tap water until they become soft and flexible. A wafer is adapted to each side of the bite fork so that it is uniformly covered. The wax-covered bite fork is placed between the teeth, with the bite fork shaft to the patient’s right. The fork is centered by aligning the index ring on the fork with the patient’s midline. The patient is instructed to bite lightly into the wax to produce shallow indentations of the cusp tips in the wax. The wax is cooled, and the bite fork is removed from the mouth. Any excess wax is trimmed off the bite fork.
The maxillary cast is tried in the wax record to ensure that it will seat without rocking. If the cast fails to seat, the occlusal surfaces of the cast are checked for nodules of stone. If none are evident, there is a distortion in the registration or the cast.
The reference pin is fastened to the underside of the face-bow by tightening the thumbscrew ( Fig 5-41). The clamp marked with a 2 should be on the patient’s right (with the left side of the instrument viewed from the front).
Fig 5-42The dentist places the clamp over the bite fork shaft while the patient inserts the earpieces.
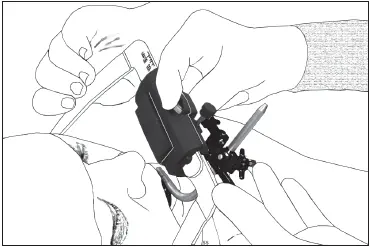
Fig 5-43The thumbscrew on the front of the facebow is tightened.
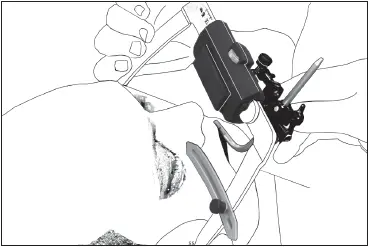
Fig 5-44The reference pointer is aligned with the reference mark.
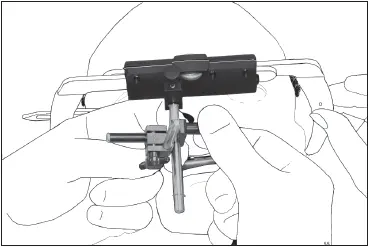
Fig 5-45The clamps in the facebow assembly are tightened.
The bite fork is placed in the mouth, and the patient is instructed to hold it securely between the maxillary and mandibular teeth. The patient should grip both arms of the facebow to guide the plastic earpieces into the external auditory meati, in the same manner as one would place a stethoscope into the ears ( Fig 5-42). While the patient is inserting the earpieces, the operator should slide the clamp marked with a 2 onto the shaft of the bite fork. The clamp should be positioned above the shaft. The single thumbscrew on the front of the facebow is tightened ( Fig 5-43).
The anterior reference pointer is extended while the facebow is moved up or down. When the pointer is properly aligned with the anterior reference point, the thumbscrew is tightened ( Fig 5-44). With the facebow still supported, the set screw on clamp 1 is tightened on the vertical reference pin ( Fig 5-45). Then clamp 2 is tightened on the horizontal reference pin. For added stability and peace of mind, the patient can continue to support the facebow by holding the side arms. The facebow should not be allowed to torque or tilt during the tightening procedure.
The thumbscrew on the front of the facebow is loosened by a quarter turn. As the patient opens the mouth, the assembly is removed from the head. The clamps are rechecked and tightened. The bite fork assembly is removed from the underside of the facebow by loosening the set screw on the clamp by a quarter turn. Only the bite fork assembly needs to be used for mounting the maxillary cast and should be disinfected at this time. The facebow, after being disinfected with a hospital-grade disinfectant, is ready for use on another patient.
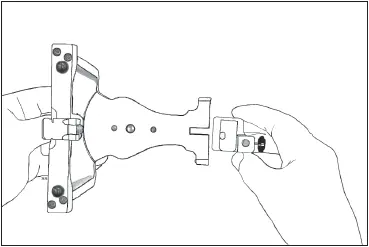
Fig 5-46The articulator index is placed on the lower member of the articulator.
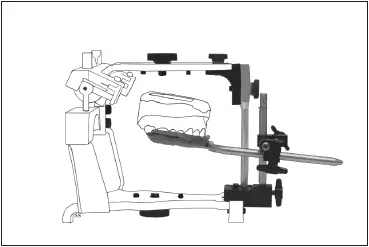
Fig 5-47The maxillary cast in the bite fork is positioned by the articulator index.
Mounting the maxillary cast
The incisal guide block is removed from the articulator and replaced with the articulator index ( Fig 5-46). The vertical reference pin of the bite fork assembly is inserted into the hole on the top of the articulator index. The reference pin has a flat side, which will match a flat side on the hole. The numbers 1 and 2 on the clamps of the bite fork assembly should be upright. The set screw at the front of the index is tightened.
Clean mounting plates are secured to the upper and lower members of the articulator. The articulator is assembled by placing the fossae over the condyles. The incisal pin is placed at the zero position. The long incisal pin for the dimpled guide block will rest in the recessed center of the index. The short pin used for flat guide blocks will contact the sliding metal piece in the middle of the index. The incisal pin with the adjustable foot sits on the posterior section of the index. The upper member of the articulator is removed and set on the top of the bench with the mounting plate up.
The maxillary cast is soaked, tooth side up, in a plaster bowl containing only enough water to wet the sides and bottom of the cast. The cast is seated into the wax registration on the bite fork ( Fig 5-47). Mounting stone is mixed to the consistency of thick cream. A golf ball–sized mound of stone is applied to the base of the cast and the mounting plate. The articulator is assembled by placing the fossae over the condyles. The upper member of the articulator is closed into the soft mounting stone until the incisal guide pin contacts the appropriate spot on the articulator index. The centric latch is locked by pushing it into the down position.
Читать дальшеИнтервал:
Закладка:
Похожие книги на «Fundamentals of Fixed Prosthodontics»
Представляем Вашему вниманию похожие книги на «Fundamentals of Fixed Prosthodontics» списком для выбора. Мы отобрали схожую по названию и смыслу литературу в надежде предоставить читателям больше вариантов отыскать новые, интересные, ещё непрочитанные произведения.


Обсуждение, отзывы о книге «Fundamentals of Fixed Prosthodontics» и просто собственные мнения читателей. Оставьте ваши комментарии, напишите, что Вы думаете о произведении, его смысле или главных героях. Укажите что конкретно понравилось, а что нет, и почему Вы так считаете.