Using the Frame tool to create cropped images
 Frames allow you to build quick and easy placeholders for images. By defining the size and position of a frame, you essentially allow yourself the ability to hide or show parts of your image by simply pushing the image around within the frame you created.
There are several ways you can create a frame; in this chapter, the first two methods are covered.
Use the Frame Tool to draw an empty rectangular or elliptical frame in your image, and then add an image inside the frame.
Click and drag a frame over an existing image to define the masked area.
Convert any existing shape or text to a frame. This method is discussed in Chapter 8of this minibook.
Creating an empty frame with the Frame tool
Creating an empty frame offers the functionality of an image placeholder. The empty frame essentially determines the position and size of the image before it has been selected and placed.
1 Open an image.
2 Choose Window⇒ Layers to show the Layers panel if it is not visible.
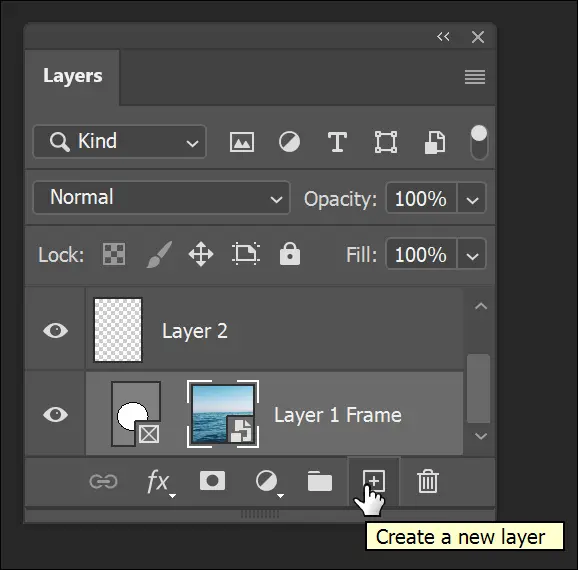
3 Click on the Create new layer icon at the bottom of the Layers panel, as shown in Figure 1-13.
4 Select the Frame tool.
5 In the Tool Options bar, choose a rectangular frame or an elliptical frame, as shown in Figure 1-14.
6 Click and drag to create a new frame on the canvas.
7 With the frame selected, choose File⇒ Place Linked or Place Embedded. In the dialog box that appears, select an image that you want to place in the selected frame.The image is placed as Linked or Embedded Smart Object, as shown in Figure 1-14.

FIGURE 1-13:Add a new empty layer to your image.

FIGURE 1-14:Select the Frame tool, and the select the shape you want to use from the Options bar.
 You can drag an image from your local disk, Library, or Adobe Stock asset right into a frame.
Creating a frame by clicking and dragging over an existing image
Open an image in Photoshop. Clicking and dragging a frame works with any layer in Photoshop. Here’s how:
1 The first step is to verify that you have a pixel layer to work with and not a Background layer. Choose Window⇒ Layers and check to see whether your image has a Background layer. If it shows Background layer, as shown in Figure 1-15, double-click on the layer to open the New Layer dialog box and press OK. FIGURE 1-15:Make sure to convert a Background layer to a regular layer by double-clicking on it.
2 Select the Frame tool. In the Tool Options bar, choose a rectangular frame or an elliptical frame.
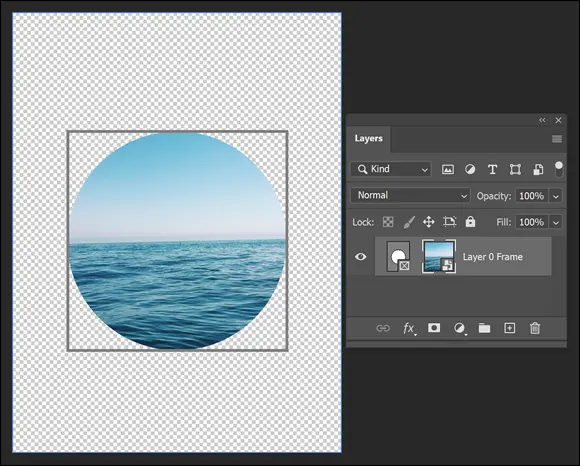
3 Click and drag the frame over the image to create a mask with your frame, as you see in Figure 1-16.
4 Using the Layers panel, reposition the image within the frame.For more about moving frames and images around using the Layers panel, see Chapter 8of this minibook.

FIGURE 1-16:A frame allows you to mask an image into a shape.
Save an image file by choosing File ⇒ Save. If you’re saving the file for the first time, the Save As dialog box appears. Notice in the Format drop-down list that you have plenty of choices for file formats. (File formats are discussed in more detail in Chapter 9of this minibook.) You can always play it safe by choosing the native Photoshop (PSD) file format, which supports all Photoshop features, such as channels, layers, text, and other vector objects that are discussed throughout this minibook. Choosing certain other formats may eliminate layers, channels, and other special features.
Many users choose to save a native Photoshop file as a backup to any other file format. Be sure to have a backup or an original file saved as a native Photoshop (PSD) file when you start taking advantage of layers and other outstanding Photoshop elements. As a Creative Cloud user, keep in mind that you can use the native file format for Photoshop in all other Creative Cloud applications.
Chapter 2
Messing with Mode Matters
IN THIS CHAPTER
 Editing pixels in bitmap images
 Understanding Photoshop image modes
 Working in black and white, RGB, or CMYK
Before taking on working with any imagery in Photoshop, you should understand color modes and the importance of setting up the most optimum color settings. A strong foundation in the use of color plays into the production and editing of all imagery, grayscale, color image, content for websites, movies, and more. Read through this chapter to help you to feel confident in the choices you make.
Working with Bitmap Images
You may wonder how images in Photoshop show subtle changes in color values. To create those smooth gradations from one color to the next, Photoshop takes advantage of pixels and anti-aliasing. Bitmap images (or raster images) are based on a grid of pixels, as shown in Figure 2-1. The grid is smaller or larger depending on the resolution of your image. The number of pixels along the height and width of a bitmap image are the pixel dimensions of an image, measured in pixels per inch (ppi). The more pixels per inch, the more detail in the image.

FIGURE 2-1:You can see the grid that makes up the pixel resolution of an image when you zoom in.
Unlike vector graphics (mathematically created paths), bitmap images can’t be scaled without losing detail. (See Figure 2-2 for an example of a bitmap image and a vector graphic.) Generally, you should use bitmap images at or close to the size you need. If you resize a bitmap image, it can become jagged on the edges of sharp objects. On the other hand, you can scale vector graphics and edit them without degrading sharp edges.

FIGURE 2-2:Bitmap versus vector.
Photoshop can work on both bitmap and vector art. (In the path line around the vector shape layer, notice that the path isn’t pixelated or broken down into a step pattern created by the pixels.) Combining the two technologies gives you, as a designer, incredible opportunities.
Читать дальше

 Frames allow you to build quick and easy placeholders for images. By defining the size and position of a frame, you essentially allow yourself the ability to hide or show parts of your image by simply pushing the image around within the frame you created.

 You can drag an image from your local disk, Library, or Adobe Stock asset right into a frame.
 Editing pixels in bitmap images


