Christopher Smith - Adobe Creative Cloud All-in-One For Dummies
Здесь есть возможность читать онлайн «Christopher Smith - Adobe Creative Cloud All-in-One For Dummies» — ознакомительный отрывок электронной книги совершенно бесплатно, а после прочтения отрывка купить полную версию. В некоторых случаях можно слушать аудио, скачать через торрент в формате fb2 и присутствует краткое содержание. Жанр: unrecognised, на английском языке. Описание произведения, (предисловие) а так же отзывы посетителей доступны на портале библиотеки ЛибКат.
- Название:Adobe Creative Cloud All-in-One For Dummies
- Автор:
- Жанр:
- Год:неизвестен
- ISBN:нет данных
- Рейтинг книги:4 / 5. Голосов: 1
-
Избранное:Добавить в избранное
- Отзывы:
-
Ваша оценка:
Adobe Creative Cloud All-in-One For Dummies: краткое содержание, описание и аннотация
Предлагаем к чтению аннотацию, описание, краткое содержание или предисловие (зависит от того, что написал сам автор книги «Adobe Creative Cloud All-in-One For Dummies»). Если вы не нашли необходимую информацию о книге — напишите в комментариях, мы постараемся отыскать её.
is the ultimate one-stop reference guide for how to use them all. Whatever gets your creative juices flowing, you'll find the in-depth guidance required to deliver the results you want, from polishing-up photos and images to creating illustrations and designs. And once your assets are just how you want them, you can pick up best practices for managing and publishing via the amazing Adobe Bridge.
Written by pro designers for those getting started with this powerful set of tools, this book gives you an overview of Creative Cloud and step-by-step coverage of the major applications—InDesign, Illustrator, Photoshop, Acrobat Pro, and Adobe XD, and Adobe Bridge—in seven mini-books that take you from the basics to more advanced topics. You'll also discover how to get your work noticed by building personal galleries and displaying your creative wares.
Find the essentials on the top tools in Adobe Creative Cloud Build and enhance your design skills Protect your documents with Acrobat Pro Get the most out of each program with insider tips Whatever your skill level and project needs, you'll find the essentials you need to demystify these complex programs and the knowledge to make your work shine even more brightly through the Cloud!
Adobe Creative Cloud All-in-One For Dummies — читать онлайн ознакомительный отрывок
Ниже представлен текст книги, разбитый по страницам. Система сохранения места последней прочитанной страницы, позволяет с удобством читать онлайн бесплатно книгу «Adobe Creative Cloud All-in-One For Dummies», без необходимости каждый раз заново искать на чём Вы остановились. Поставьте закладку, и сможете в любой момент перейти на страницу, на которой закончили чтение.
Интервал:
Закладка:
2 Choose Tools ⇒ Photoshop ⇒ Contact Sheet II.Photoshop is launched and the Contact Sheet II dialog box appears, as shown in Figure 3-5.
3 Choose your paper size and resolution. The default is 8 inches x 10 inches and 300 dpi, which works fine for reliable results.Choose how many thumbnails you want across and down using the rows and columns. The fewer rows and columns, the larger the thumbnail images will be.Check Use Filename as Caption if you want to see the filename listed underneath the thumbnail.
4 Press OK to see the final Contact Sheet created, as shown in Figure 3-6.
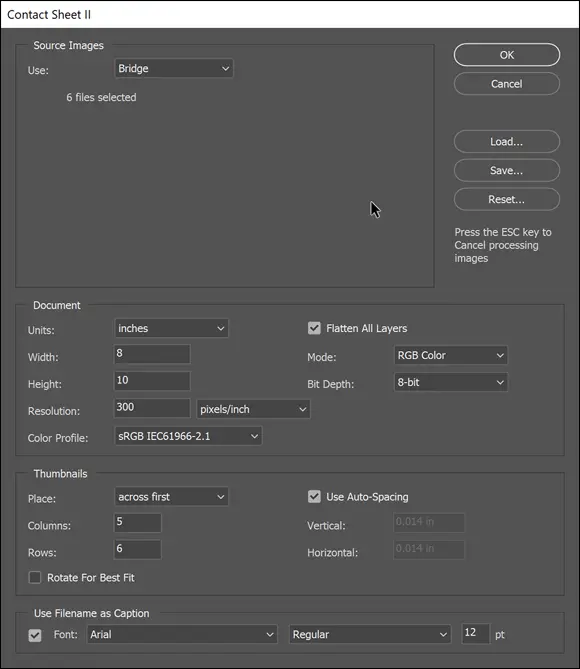
FIGURE 3-5:The Contact Sheet II dialog box offers size and resolution options.
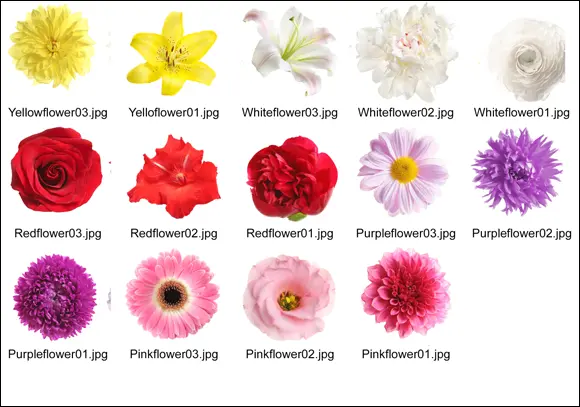
FIGURE 3-6:The resulting contact sheet.
Book 3
Photoshop CC
Contents at a Glance
1 Chapter 1: Getting into Photoshop CC Basics The Start Screen The New Document Window Sample Images Can Help You Investigate More Features Opening an Image Getting to Know the Tools Navigating the Work Area Choosing Your Screen Mode Getting Started with Basic Tasks in Photoshop CC
2 Chapter 2: Messing with Mode Matters Working with Bitmap Images Choosing the Correct Photoshop Mode
3 Chapter 3: Making Selective Changes Getting to Know the Selection Tools Manipulating Selections with Refine Selection Selecting the Subject Saving Selections
4 Chapter 4: Using the Photoshop Pen Tool Selecting the Right Pen Tool for the Task Using a Path as a Selection Creating Curved Paths Clipping Paths Using Shape Layers
5 Chapter 5: Creating Images in the Right Resolution for Print and the Web Creating Images for Print Determining the Resolution for Web Images Applying the Unsharp Mask Filter to an Image
6 Chapter 6: Creating a Good Image Reading a Histogram Creating a Good Tone Curve Editing an Adjustment Layer Testing a Printer
7 Chapter 7: Working with Painting and Retouching Tools Using the Swatches Panel Choosing Foreground and Background Colors The Painting and Retouching Tools Blending Modes Saving Presets
8 Chapter 8: Using Layers Creating and Working with Layers Duplicating a Layer Selecting a Layer Creating a Text Layer Using Layer Masks Organizing Your Layers Filter Capabilities in the Layers Panel Merging and Flattening Images
9 Chapter 9: Going Beyond the Basics with Layers Using Layer Styles Smart, Really Smart! Smart Objects Finding Tools and Features That Are Hidden Using the Frame Tool Working with Artboards in Photoshop Experimenting with 3D Files Preserving Corrective Perspective with the Vanishing Point Feature
10 Chapter 10: Saving Photoshop Images for Print and the Web Backing Up with a Save Choosing a File Format for Saving Saving Images for the Web Saving Settings
Chapter 1
Getting into Photoshop CC Basics
IN THIS CHAPTER
 Discovering the Photoshop tools
Navigating your work area
Changing screen modes in Adobe Photoshop CC
In this chapter, you are introduced to the Photoshop CC work area and tools. You’ll also find out how to neatly organize and hide panels. You will also find out how to do basic tasks, such as open an image, crop it to a different size, and then resave it.
The Start Screen
When you launch Photoshop, unless you have changed your preferences, you see a start screen, as shown in Figure 1-1. This start screen can making it easier for you to find files that you have recently worked on or jump right into a new document.
If you would rather not have this screen every time you launch Photoshop, you can choose Edit ⇒ Preferences ⇒ General and uncheck Auto show the Home Screen. On the Mac you would choose Photoshop ⇒ Preferences ⇒ General and uncheck Auto show the Home Screen.

FIGURE 1-1:The Start screen in Adobe Photoshop appears as a default.
The New Document Window
If you are still using Photoshop at its default settings, you can click the New button in the start screen, or choose File ⇒ New. The initial New Document dialog window appears. Just like the start screen, the default New Document window may be more than you have asked for, but it is meant to offer you more control and options when creating new files. Note in Figure 1-2 that you can choose the type of document that you are working on, such as Photo, Print, Art & Illustration, Web, Mobile, Film, and Video.
Each one of these selections offers standard size and resolution defaults for the medium selected in addition to templates that you are able to open and customize for your own needs.
If this is a little much for you and you want the standard, smaller, more compact New Document dialog box, choose the Close button in this window and then select Edit ⇒ Preferences ⇒ General and check Use Legacy “New Document” Interface. (On the Mac, choose Photoshop ⇒ Preferences ⇒ General and check Use Legacy “New Document” Interface.)
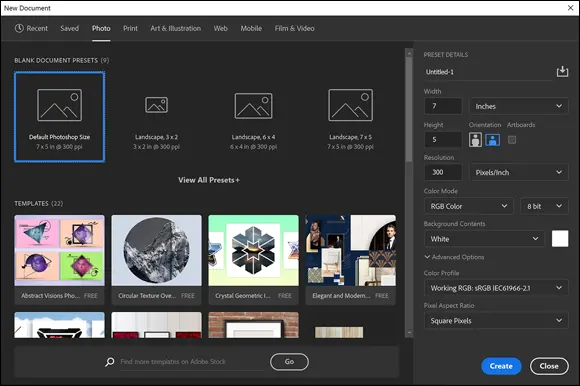
FIGURE 1-2:The updated New Document dialog box has many options from which to choose. In this example the Photo category was selected.
Sample Images Can Help You Investigate More Features
Of course it helps to have an image open while exploring Adobe Photoshop. You are free to use your own or use the samples image files located here: https://www.agitraining.com/dummies . This downloadable file includes files that can be used throughout the entire Adobe Creative Cloud All-in-One For Dummies book.
1 Go to https://www.agitraining.com/dummies .
2 Click on the DummiesCCFiles folder to download the compressed folder.
3 After the folder is downloaded, right-click (PC) to access the contextual menu and choose Extract All and locate an easy-to-find location or Control-click (Mac) and choose Open.Inside the DummiesCCFiles folder, you find separate folders for each minibook. Images are available for you to use in the Book03_Photoshop folder. There are also additional miscellaneous images in the Images folder at the top level of this folder.
Opening an Image
You can open an existing Photoshop image in one of several ways:
If you see the start screen, you can click on the Open button and navigate to the folder that contains the image you would like to open.
Choose File ⇒ Open, select the file in the Open dialog box, and then click the Open button.
Choose File ⇒ Browse in Bridge. By selecting Browse in Bridge instead of Open, you launch the Adobe Bridge application. Read more about Adobe Bridge later in this section and also in Book 2.
Читать дальшеИнтервал:
Закладка:
Похожие книги на «Adobe Creative Cloud All-in-One For Dummies»
Представляем Вашему вниманию похожие книги на «Adobe Creative Cloud All-in-One For Dummies» списком для выбора. Мы отобрали схожую по названию и смыслу литературу в надежде предоставить читателям больше вариантов отыскать новые, интересные, ещё непрочитанные произведения.


Обсуждение, отзывы о книге «Adobe Creative Cloud All-in-One For Dummies» и просто собственные мнения читателей. Оставьте ваши комментарии, напишите, что Вы думаете о произведении, его смысле или главных героях. Укажите что конкретно понравилось, а что нет, и почему Вы так считаете.