Amelia Jeanroy - Canning & Preserving For Dummies
Здесь есть возможность читать онлайн «Amelia Jeanroy - Canning & Preserving For Dummies» — ознакомительный отрывок электронной книги совершенно бесплатно, а после прочтения отрывка купить полную версию. В некоторых случаях можно слушать аудио, скачать через торрент в формате fb2 и присутствует краткое содержание. Жанр: unrecognised, на английском языке. Описание произведения, (предисловие) а так же отзывы посетителей доступны на портале библиотеки ЛибКат.
- Название:Canning & Preserving For Dummies
- Автор:
- Жанр:
- Год:неизвестен
- ISBN:нет данных
- Рейтинг книги:3 / 5. Голосов: 1
-
Избранное:Добавить в избранное
- Отзывы:
-
Ваша оценка:
Canning & Preserving For Dummies: краткое содержание, описание и аннотация
Предлагаем к чтению аннотацию, описание, краткое содержание или предисловие (зависит от того, что написал сам автор книги «Canning & Preserving For Dummies»). Если вы не нашли необходимую информацию о книге — напишите в комментариях, мы постараемся отыскать её.
shows you how to do it all, helping you explore hundreds-of-years-old traditions of food preservation in the comfort of your own home.
In a friendly and step-by-step style, longtime canner and owner of TheFarmingWife.com Amy Jeanroy takes you inside the canning world to show how modern technology and techniques have made it easy to use the four main methods of preservation—water-bath and pressure canning, freezing, and dehydrating—to keep your pantry packed with delicious, out-of-season delights. She also clues you in on how to match preservation technique to food for the most flavorful results—and what supplies to keep on hand for your next canning adventure.
Know the benefits, from healthier eating to self-reliance Follow the latest food safety guidelines Get guidance on food storage in urban living Cook up tasty recipes with your preserved delights Whatever draws you to canning—saving money on groceries, healthy living, or the sheer fun of doing it—this book is stuffed with all the goodness you need to keep your palate happy whatever the season is!
Canning & Preserving For Dummies — читать онлайн ознакомительный отрывок
Ниже представлен текст книги, разбитый по страницам. Система сохранения места последней прочитанной страницы, позволяет с удобством читать онлайн бесплатно книгу «Canning & Preserving For Dummies», без необходимости каждый раз заново искать на чём Вы остановились. Поставьте закладку, и сможете в любой момент перейти на страницу, на которой закончили чтение.
Интервал:
Закладка:
Leaving too much headspace may cause discoloration in the top portion of your food. Excess headspace can keep your jar from producing a vacuum seal if the processing time isn’t long enough to exhaust the excess air in the jar.
Always use the headspace stated in your recipe. If your recipe doesn’t give you a headspace allowance, use these guidelines:
For juice, jam, jelly, pickles, relish, chutney, sauces, and condiments, leave a headspace of ¼ inch.
For high-acid foods (fruits and tomatoes), leave a headspace of ½ inch.
For low-acid foods (vegetables, meats, fish, and poultry), leave a headspace of 1 inch.
 Headspace is also important when you’re freezing food because frozen food expands during the freezing process. If you fail to leave the proper headspace in your freezer container, the lid may be forced off the container, or the container may crack or break. When your frozen food comes in direct contact with the air in your freezer, the quality of your food deteriorates, and the food develops freezer burn (go to Chapter 13for more on freezing food). On the other hand, too much air space allows excess air in your container. Even though your food doesn’t come in direct contact with the air in the freezer, the excess space in the top of the container develops ice crystals. When your food thaws, the excess liquid reduces the food’s quality.
 If you don’t trust yourself to eyeball the headspace, use a small plastic ruler (about 6 inches long) to measure the correct headspace in the jar.
Releasing air bubbles from your jars
The most important thing to do when you’re filling your jars is to release trapped air bubbles between the food pieces. This may seem unimportant, but air bubbles can play havoc with your final product.
Jar seals: Too much air in the jar from trapped air bubbles produces excessive pressure in the jar during processing. The pressure in the jar is greater than the pressure outside the jar during cooling. This imbalance interferes with the sealing process.
Liquid levels: Air bubbles take up space. When there’s trapped air between your food pieces before you seal the jar, the liquid level in the jar drops when the food is heated. (For releasing air bubbles, see Figure 3-3.) In addition, floating and discolored food results from packing your food without the proper amount of liquid in the jars. Snuggly packed food eliminates air and allows enough liquid to completely cover the food with a proper headspace (refer to Figure 3-2).
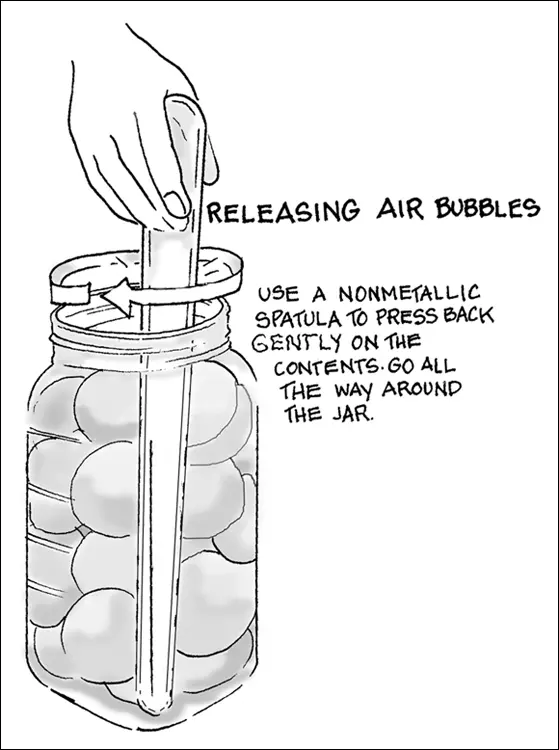
FIGURE 3-3:Releasing air bubbles from your filled jars.
Repeat after us: Never skip the step of releasing air bubbles.
Choosing the right canning method and following proper procedures
Always use the correct processing method for your food. Process all high-acid and pickled food in a water-bath canner. Process all low-acid food in a pressure canner. To find out how to determine whether a food has a low or high acidity level, head to the next section. (You can find out about the different canning methods in Chapters 4and 9.)
In addition to choosing the right canning method, follow these guidelines to guard against food spoilage:
Never use a pressure cooker as a presser canner. They are two different appliances.
Don’t experiment or take shortcuts. Use only tested, approved methods.
Never use an outdated recipe. Look for a newer version. Do not update the directions yourself. Check the publishing date at the beginning of the recipe book. If it is more than 5 years old, find a newer version.
Safe recipes are based on science, not hearsay. If you truly want to use a recipe you find online with no science to back it up, look for an approved version elsewhere.
If your elevation is higher than 1,000 feet above sea level, make the proper adjustments in processing time and pressure for your altitude. See the section, “ Adjusting for Your Altitude,” for information on altitudes and processing times.
If you’re pressure canning, allow your pressure canner to depressurize to 0 pounds pressure naturally; don’t take the lid off to accelerate the process.
Allow your processed jars to cool undisturbed at room temperature.
Process your filled jars for the correct amount of time and, if you’re pressure canning, at the correct pressure (both will be stated in your recipe). Make adjustments to your processing time and pressure for altitudes over 1,000 feet above sea level.
Test each jar’s seal and remove the screw band before storing your food.
Checking your equipment
To prevent spoilage, your equipment must be in good shape and working properly:
Have the pressure gauge and seal on your pressure canner tested every year for accuracy. (Weighted gauges don’t require testing.) This service is often offered for free at your local cooperative extension office.
Use jars and two-piece caps that are made for home-canning. Discard any jars that are cracked or nicked.
Never use single-use sealing lids a second time. Always use new lids. The sealant on the underside of the lid is good for only one processing. If your jars do not seal the first time, always replace the lid with a fresh one. There may be a problem with the sealant, despite starting with a new lid.
Check the rubber gasket on reusable lids for signs of wear. With proper care, gaskets can be reused up to eight times before needing to be replaced, depending on whether you are pressure canning or water-bath canning.
Knowing the Acidity Level of Your Food
Knowing the acidity level of the food you’re processing is important because the pH, the measure of acidity, determines which canning method you use: water-bath or pressure canning.
For canning purposes, food is divided into two categories based on the amount of acid the food registers:
High-acid foods include fruits and pickled foods. (For detailed information on identifying and processing high-acid food, refer to Chapter 4.) Foods in this group have a pH of 4.6 or lower. Processing them in a water-bath canner destroys harmful microorganisms.Tomatoes are considered a low-high acid food (or in the low range of high-acid foods). With all of the new varieties of tomatoes, it is now recommended that the home canner add an acid to the canning process, to ensure that the proper acidity is reached every time.
Low-acid foods, primarily vegetables, meat, poultry, and fish, contain little natural acid. Their pH level is higher than 4.6. (Check out Chapter 9for detailed information on identifying and processing low-acid food.) Process these foods in a pressure canner, which superheats your food and destroys the more heat-resistant bacteria, like botulism.
If you want to feel like you’re back in science class all over again, you can buy litmus paper at teacher- or scientific-supply stores, or online, and test the acidity level of your food yourself. Also referred to as pH paper, litmus paper is an acid-sensitive paper that measures the acid in food. When you insert a strip of pH paper into your prepared food, the paper changes color. You then compare the wet strip to the pH chart of colors that accompanies the litmus paper.
Интервал:
Закладка:
Похожие книги на «Canning & Preserving For Dummies»
Представляем Вашему вниманию похожие книги на «Canning & Preserving For Dummies» списком для выбора. Мы отобрали схожую по названию и смыслу литературу в надежде предоставить читателям больше вариантов отыскать новые, интересные, ещё непрочитанные произведения.


Обсуждение, отзывы о книге «Canning & Preserving For Dummies» и просто собственные мнения читателей. Оставьте ваши комментарии, напишите, что Вы думаете о произведении, его смысле или главных героях. Укажите что конкретно понравилось, а что нет, и почему Вы так считаете.