Amelia Jeanroy - Canning & Preserving For Dummies
Здесь есть возможность читать онлайн «Amelia Jeanroy - Canning & Preserving For Dummies» — ознакомительный отрывок электронной книги совершенно бесплатно, а после прочтения отрывка купить полную версию. В некоторых случаях можно слушать аудио, скачать через торрент в формате fb2 и присутствует краткое содержание. Жанр: unrecognised, на английском языке. Описание произведения, (предисловие) а так же отзывы посетителей доступны на портале библиотеки ЛибКат.
- Название:Canning & Preserving For Dummies
- Автор:
- Жанр:
- Год:неизвестен
- ISBN:нет данных
- Рейтинг книги:3 / 5. Голосов: 1
-
Избранное:Добавить в избранное
- Отзывы:
-
Ваша оценка:
Canning & Preserving For Dummies: краткое содержание, описание и аннотация
Предлагаем к чтению аннотацию, описание, краткое содержание или предисловие (зависит от того, что написал сам автор книги «Canning & Preserving For Dummies»). Если вы не нашли необходимую информацию о книге — напишите в комментариях, мы постараемся отыскать её.
shows you how to do it all, helping you explore hundreds-of-years-old traditions of food preservation in the comfort of your own home.
In a friendly and step-by-step style, longtime canner and owner of TheFarmingWife.com Amy Jeanroy takes you inside the canning world to show how modern technology and techniques have made it easy to use the four main methods of preservation—water-bath and pressure canning, freezing, and dehydrating—to keep your pantry packed with delicious, out-of-season delights. She also clues you in on how to match preservation technique to food for the most flavorful results—and what supplies to keep on hand for your next canning adventure.
Know the benefits, from healthier eating to self-reliance Follow the latest food safety guidelines Get guidance on food storage in urban living Cook up tasty recipes with your preserved delights Whatever draws you to canning—saving money on groceries, healthy living, or the sheer fun of doing it—this book is stuffed with all the goodness you need to keep your palate happy whatever the season is!
Canning & Preserving For Dummies — читать онлайн ознакомительный отрывок
Ниже представлен текст книги, разбитый по страницам. Система сохранения места последней прочитанной страницы, позволяет с удобством читать онлайн бесплатно книгу «Canning & Preserving For Dummies», без необходимости каждый раз заново искать на чём Вы остановились. Поставьте закладку, и сможете в любой момент перейти на страницу, на которой закончили чтение.
Интервал:
Закладка:
Rigid containers: These can be made of plastic or glass. Use only containers approved for the cold temperatures of a freezer. Plastic containers should be nonporous and thick enough to keep out odors and dry air in the freezer. Glass containers need to be treated to endure the low temperature of a freezer and strong enough to resist cracking under the pressure of expanding food during the freezing process. If you choose one of these containers, look for “freezer safe” on the label.
Freezer bags: Use bags made for freezing (says so there on the box) in sizes compatible with the amount of your food.
Freezer paper and wraps: This laminated paper protects your food from freezer burn, which results when air comes in contact with your food while it’s in the freezer. Tape this paper to keep the wrap tightly sealed. Heavy-duty aluminum foil is another great freezer wrap and requires no taping.
 For extra protection against freezer damage, wrap food items in foil and place them in a freezer bag.
Necessary Tools and Equipment for Dehydrating Food
Dehydrating or drying food is a long, slow process of removing moisture from your food while exposing it to low heat. While nowhere near as glamorous as creating shiny jars of canned food, it’s a super way to preserve a lot of food in a small space. If you’re interested in taking the slow boat to delicious, here are some items you’ll want to have for this process, which is explained in Chapter 16.
An electric dehydrator: This machine dries your food in an enclosed chamber while it circulates warm air around your food. All that comfy, warm air turns your food into beautifully dehydrated and perfectly preserved bounty.
A conventional oven: If your oven maintains a low temperature (under 200 degrees Fahrenheit or 93.3 degrees Celsius) and you can stand to be without it for up to 24 hours, use it for drying before making the investment in an electric food dehydrator.
Oven thermometer: An oven thermometer tells you if your oven temperature is low enough to dry your food without cooking it (see Chapter 16for detailed instructions for checking your oven’s temperature).
Trays and racks: These are used for holding your food while it’s drying. They’re included with an electric dehydrator. For oven-drying, use mesh-covered frames or baking sheets. For sun-drying, clean screens are necessary, along with clean cheesecloth to keep hungry bugs off the food as it dries.
Chapter 3
On Your Mark, Get Set, Whoa! The Road to Safe Canning and Preserving
IN THIS CHAPTER
 Putting your fears of home-canned food to rest
Determining your processing method by your food’s acidity
Making the acquaintance of food-spoiling microorganisms and enzymes
Recognizing the signs of food spoilage
The desire and determination to produce a delicious, safe-to-eat product without the risk of food poisoning is one thing longtime canners and people new to canning have in common. The canning and preserving techniques used today provide you with these results as long as you follow the proper steps and procedures for preparing, processing, and storing your food.
Before you begin your canning and preserving journey, take a stroll through this chapter, which introduces you to microorganisms, enzymes, and other potentially dangerous situations that cause food spoilage. You can also find information on how to prevent and identify food spoilage. The technical portion of this chapter shouldn’t deter you from canning. Rest assured, after reading this information, you’ll have no fear about preparing and serving your home-canned and home-preserved food.
Dispelling Your Fears of Home-Canned and Home-Preserved Food
Preventing food spoilage is the key to safe canning. Over the years, home-canning has become safer and better. Scientists have standardized processing methods, and home-canners know more about using these methods. When you follow up-to-date guidelines exactly, you’ll experience little concern about the quality and safety of your home-canned and home-preserved food.
The following sections offer some tips for safely handling, preparing, and processing your food.
Preparing your food properly
Prepping to start canning and preserving can sometimes feel daunting and keep you from starting. The truth is, getting your food ready is only a matter of basic science and common sense. None of these steps are difficult. For example, use fresh, firm (not overripe) food. Wash and prepare your food well to remove any dirt and bacteria: Wash it in a large bowl filled with room temperature water and a few drops of dish detergent, and then rinse it in a separate bowl of fresh water (see Figure 3-1). Can your fruit and vegetables as soon as possible after they’re picked. Wash only the type of food you are going to be preserving each time. To avoid cross contamination, do not mix different foods during this step.
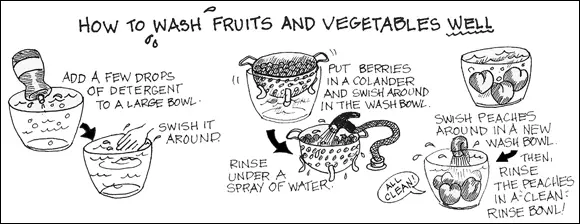
FIGURE 3-1:How to wash fruit and vegetables well.
No, you don’t have to wash berries individually: Put them in a colander and submerge the colander, berries and all, in the wash bowl; then rinse them off with a running spray of water.
Packing your jars with care
You have picked your food and washed it carefully. Now, you are in the home stretch, and the way you fill the canning jars is super important:
Don’t overpack foods. Trying to cram too much food into a jar may result in under-processing because the heat can’t evenly penetrate the food.
Make sure your jars have the proper headspace. Headspace is the air space between the inside of the lid and the top of the food or liquid in your jar or container (see Figure 3-2). Proper headspace is important to the safety of your preserved food because of the expansion that occurs as your jars are processed or your food freezes.
Make sure you release the air bubbles from the jar before sealing the lid. No matter how carefully you pack and fill your jars, you’ll always have some hidden bubbles.
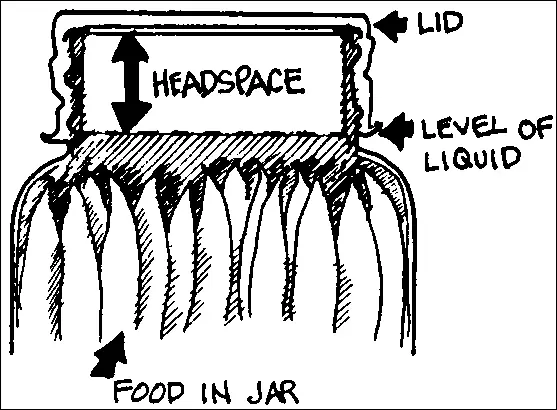
FIGURE 3-2:Headspace.
Taking a closer look at the all-important headspace
When you’re canning food, too little headspace in your canning jars restricts your food from expanding as it boils. Inadequate space for the expanding food may force some of it out of the jar and under the lid, leaving particles of food between the seal and the jar rim. If this occurs, your jar won’t produce a vacuum seal.
Читать дальшеИнтервал:
Закладка:
Похожие книги на «Canning & Preserving For Dummies»
Представляем Вашему вниманию похожие книги на «Canning & Preserving For Dummies» списком для выбора. Мы отобрали схожую по названию и смыслу литературу в надежде предоставить читателям больше вариантов отыскать новые, интересные, ещё непрочитанные произведения.


Обсуждение, отзывы о книге «Canning & Preserving For Dummies» и просто собственные мнения читателей. Оставьте ваши комментарии, напишите, что Вы думаете о произведении, его смысле или главных героях. Укажите что конкретно понравилось, а что нет, и почему Вы так считаете.