Guy Hart-Davis - Teach Yourself VISUALLY Google Workspace
Здесь есть возможность читать онлайн «Guy Hart-Davis - Teach Yourself VISUALLY Google Workspace» — ознакомительный отрывок электронной книги совершенно бесплатно, а после прочтения отрывка купить полную версию. В некоторых случаях можно слушать аудио, скачать через торрент в формате fb2 и присутствует краткое содержание. Жанр: unrecognised, на английском языке. Описание произведения, (предисловие) а так же отзывы посетителей доступны на портале библиотеки ЛибКат.

- Название:Teach Yourself VISUALLY Google Workspace
- Автор:
- Жанр:
- Год:неизвестен
- ISBN:нет данных
- Рейтинг книги:5 / 5. Голосов: 1
-
Избранное:Добавить в избранное
- Отзывы:
-
Ваша оценка:
Teach Yourself VISUALLY Google Workspace: краткое содержание, описание и аннотация
Предлагаем к чтению аннотацию, описание, краткое содержание или предисловие (зависит от того, что написал сам автор книги «Teach Yourself VISUALLY Google Workspace»). Если вы не нашли необходимую информацию о книге — напишите в комментариях, мы постараемся отыскать её.
Teach Yourself VISUALLY Google Workspace — читать онлайн ознакомительный отрывок
Ниже представлен текст книги, разбитый по страницам. Система сохранения места последней прочитанной страницы, позволяет с удобством читать онлайн бесплатно книгу «Teach Yourself VISUALLY Google Workspace», без необходимости каждый раз заново искать на чём Вы остановились. Поставьте закладку, и сможете в любой момент перейти на страницу, на которой закончили чтение.
Интервал:
Закладка:
Depending on how your organization’s administrator has configured Google Workspace, you may be able to edit only some profile information, or even none. If you cannot edit certain information, you may need to ask the administrator to edit it.
Set Your Profile Information and Photo
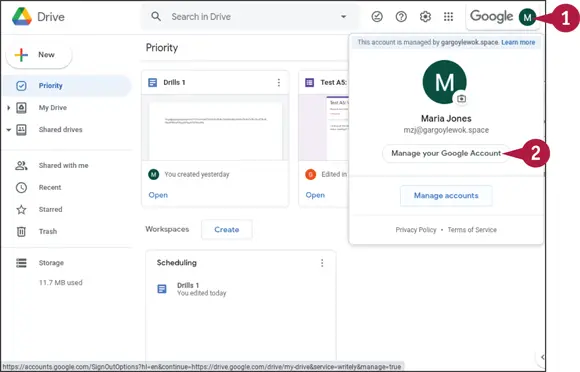
 In Google Drive, or in any of the Google Workspace apps that display your Account icon, click Google Account(such as
  ).
).
The Google Account panel opens.
 Click Manage your Google Account.
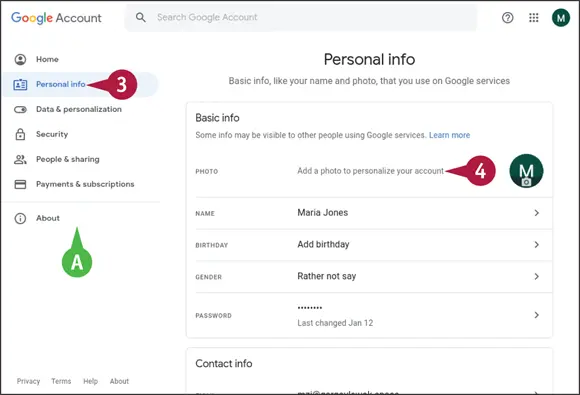
The Google Account screen opens in a new browser tab.
 The Google Account screen contains seven tabs: Home (
  ), Personal Info (
  ), Data & Personalization (
  ), Security (
  ), People & Sharing (
  ), Payments & Subscriptions (
  ), and About (
  ).
).
The Home tab appears at first.
Note: If the browser window is narrow, the tabs appear across the top of the screen without their icons.
 Click Personal info( ).
The Personal Info screen appears.
 Click Add a photo to personalize your account.
Note: You can click anywhere on the Photo row of the Basic Info table, including your account icon.
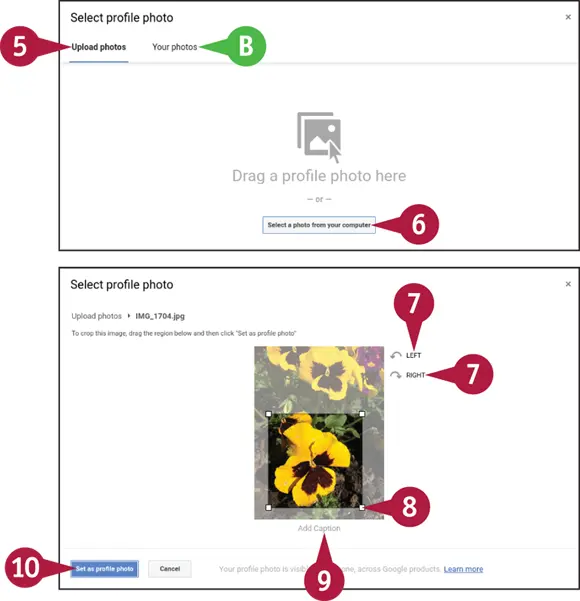
The Select Profile Photo dialog box opens.
 You can click Your photosand select an existing profile photo or a photo stored in Google Photos. Go to step 11.
 To upload a photo from your computer, click Upload Photos.
 Click Select a photo from your computer, and then follow the prompts.
 You can click Left(
  ) or Right(
  ) to rotate the photo 90°.
 Select the area of the photo you want to use.
 You can click Add Captionand type a caption.
 Click Set as profile photo.
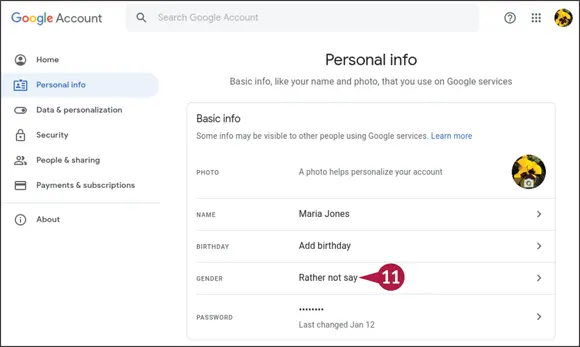
The photo appears on the Photo row.
 Click the next item you want to change, follow the prompts to change it and to decide who can see the change, and then click Save.
For example, click Genderto display the Gender screen. You can then click Female(  changes to ), click Male( changes to ), click Rather not say( changes to ), or click Add custom gender(
  ) and specify a custom gender.
See the tip for information on your choices on sharing personal data.
TIP
What are my choices for sharing my personal info?
The Google Account screens offer three choices for information such as your birthday and your gender. Click Only you( ) to prevent others from seeing the information. Click Your organization(  ) to let people in your organization see the information but prevent anyone beyond the organization from seeing it. Click Anyone(
  ) to allow anyone to view the information.
Интервал:
Закладка:
Похожие книги на «Teach Yourself VISUALLY Google Workspace»
Представляем Вашему вниманию похожие книги на «Teach Yourself VISUALLY Google Workspace» списком для выбора. Мы отобрали схожую по названию и смыслу литературу в надежде предоставить читателям больше вариантов отыскать новые, интересные, ещё непрочитанные произведения.
![Джулиан Ассанж - Google не то, чем кажется [отрывок из книги «When Google Met WikiLeaks»]](/books/405461/dzhulian-assanzh-google-ne-to-chem-kazhetsya-otryvok-thumb.webp)


Обсуждение, отзывы о книге «Teach Yourself VISUALLY Google Workspace» и просто собственные мнения читателей. Оставьте ваши комментарии, напишите, что Вы думаете о произведении, его смысле или главных героях. Укажите что конкретно понравилось, а что нет, и почему Вы так считаете.