Eric Butow - MCA Microsoft Office Specialist (Office 365 and Office 2019) Complete Study Guide
Здесь есть возможность читать онлайн «Eric Butow - MCA Microsoft Office Specialist (Office 365 and Office 2019) Complete Study Guide» — ознакомительный отрывок электронной книги совершенно бесплатно, а после прочтения отрывка купить полную версию. В некоторых случаях можно слушать аудио, скачать через торрент в формате fb2 и присутствует краткое содержание. Жанр: unrecognised, на английском языке. Описание произведения, (предисловие) а так же отзывы посетителей доступны на портале библиотеки ЛибКат.
- Название:MCA Microsoft Office Specialist (Office 365 and Office 2019) Complete Study Guide
- Автор:
- Жанр:
- Год:неизвестен
- ISBN:нет данных
- Рейтинг книги:4 / 5. Голосов: 1
-
Избранное:Добавить в избранное
- Отзывы:
-
Ваша оценка:
MCA Microsoft Office Specialist (Office 365 and Office 2019) Complete Study Guide: краткое содержание, описание и аннотация
Предлагаем к чтению аннотацию, описание, краткое содержание или предисловие (зависит от того, что написал сам автор книги «MCA Microsoft Office Specialist (Office 365 and Office 2019) Complete Study Guide»). Если вы не нашли необходимую информацию о книге — напишите в комментариях, мы постараемся отыскать её.
The MCA Microsoft Office Specialist (Office 365 and Office 2019) Complete Study Guide : Word Associate Exam MO-100, Excel Associate Exam MO-200, and PowerPoint Associate Exam MO-300 Discover practical, hands-on exercises that prepare you for real-world roles and jobs, and gain valuable experience as you reinforce key Microsoft Office skills that you’ll be expected to demonstrate in job interviews and your day-to-day professional life. Learn to manage and create text documents in Word, perform operations with formulas in Excel, and create engaging slideshows and presentations in PowerPoint.
This practical book also provides:
Fully updated information for the latest Microsoft Office Specialist certification exams covering Microsoft Office 365 Access to new career opportunities with a professional certification that’s relevant to virtually any office environment Access to the Sybex online study tools, with chapter review questions, full-length practice exams, hundreds of electronic flashcards, and a glossary of key terms
offers crystal-clear organization, comprehensive coverage, and easy-to-understand instruction. It’s perfect for anyone who hopes to prove their skills with the Microsoft Office Specialist certification or to improve their mastery of Microsoft Office 365.
MCA Microsoft Office Specialist (Office 365 and Office 2019) Complete Study Guide — читать онлайн ознакомительный отрывок
Ниже представлен текст книги, разбитый по страницам. Система сохранения места последней прочитанной страницы, позволяет с удобством читать онлайн бесплатно книгу «MCA Microsoft Office Specialist (Office 365 and Office 2019) Complete Study Guide», без необходимости каждый раз заново искать на чём Вы остановились. Поставьте закладку, и сможете в любой момент перейти на страницу, на которой закончили чтение.
Интервал:
Закладка:
It's easy to open the Navigation pane using the keyboard—just press Ctrl+F. If you want to open the Find And Replace dialog box, use the same key combination that Word has used for decades: Ctrl+H.
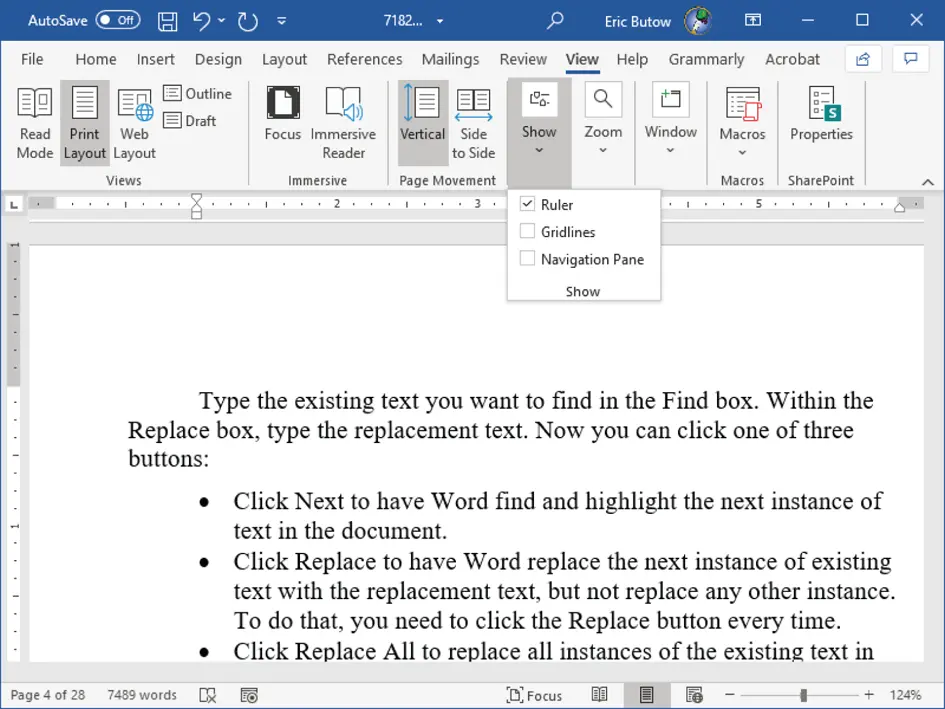
FIGURE 1.4The Navigation Pane check box
Linking to Locations Within Documents
You can put in a link in one place in your document that links to another place, such as a link on page 27 that will take you to the beginning of the document. Here's how to do it:
1 Click the word in the document that you want to use in the link.
2 Click the Insert menu option.
3 Within the Insert ribbon, click the Link icon.
4 Click Insert Link in the drop‐down menu.
5 In the Insert Hyperlink dialog box shown in Figure 1.5, click the Place In This Document option under Link To.
6 Click what you want to link to. From the Select A Place In This Document list box, click Top Of The Document, for example.
7 Click OK.
Now the link appears in your text.
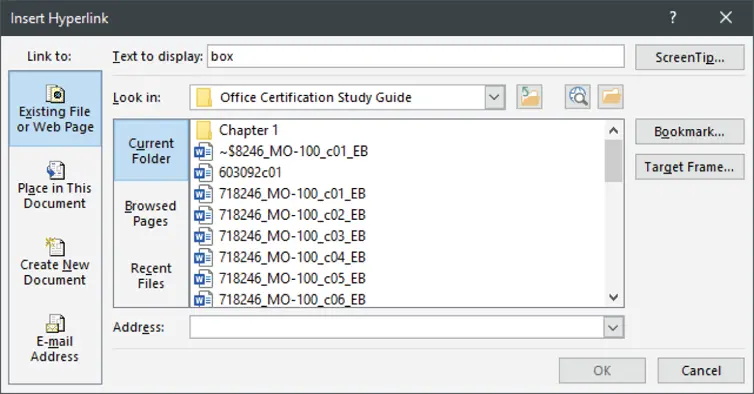
FIGURE 1.5Hyperlink dialog box
Moving to Specific Locations and Objects in Documents
Word makes it easier (I didn't say easy) to move to a specific location or an object. Start by clicking the Home menu option if it isn't already open.
Within the ribbon, click the down arrow to the right of Find (it's in the Editing section). Click Go To in the drop‐down menu.
Now you see the trusty Find And Replace dialog box, but the Go To tab is selected, as shown in Figure 1.6. Scroll up and down in the Go To What list, and then click on what you want to go to. It can be a location, such as a page in your document, or an object, such as a graphic.
What you see next depends on what you select. The default place to go is on a page in your document, so type the page number and then click Next to go to that page. You click an object in the list and then select an object by clicking in the Any Object list to view the list of options. When you click one, click Next to move the cursor to it.
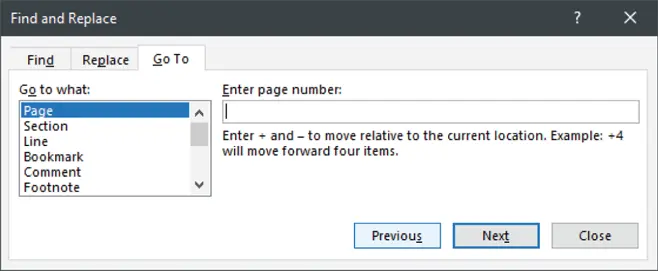
FIGURE 1.6Go To tab
Showing and Hiding Formatting Symbols and Hidden Text
Word adds a bunch of formatting symbols like paragraph marks in your document, but Microsoft is nice enough not to clutter your document with them by default. You can also hide text such as comments within the document that most people who read it in Word don't need to see.
Formatting Symbols
It's easy to view formatting symbols from within the Home ribbon. In the Paragraph section, click the Show/Hide ¶ icon that looks, of course, like a paragraph mark (see Figure 1.7).
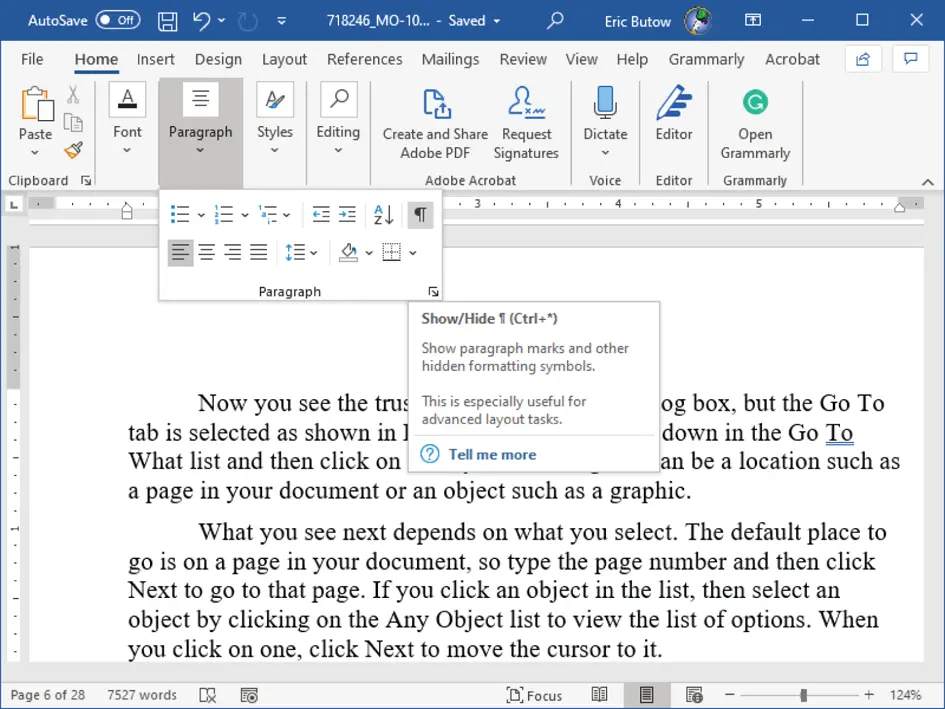
FIGURE 1.7Show/Hide ¶ icon
Now you see all the paragraph marks and other symbols, like a square dot that denotes a space. When you're done, click the icon again to turn off the formatting symbols.
 If you want to turn formatting symbols on and off more quickly, press Ctrl+Shift+8 on your keyboard.
Hidden Text
You can hide text that you select within the document, and you can even hide text in the entire document.
Selected Text
Here's how to hide selected text (and show it again):
1 Select the text that you want to hide.
2 Right‐click in the selection, and then click Font in the pop‐up menu or press Ctrl+Shift+F on your keyboard.
3 In the Font dialog box, as shown in Figure 1.8, click the Hidden check box under Effects.
4 Click OK.
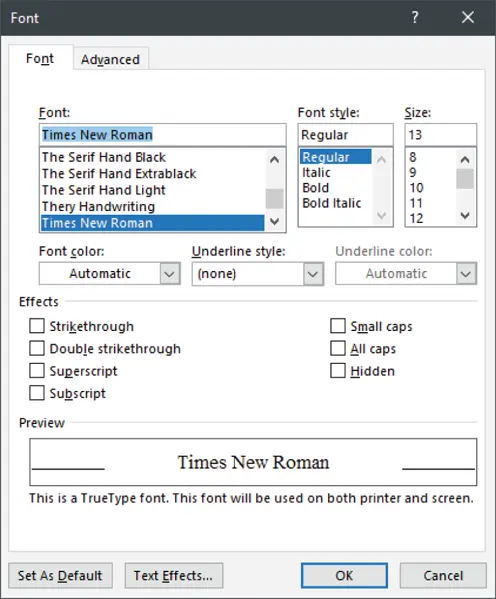
FIGURE 1.8Font dialog box
Now the text is hidden and doesn't show up at all, which leaves you with the potential pitfall of accidentally deleting hidden text. So how do you show the text again?
You'll need to show hidden text for the entire document, as I'll describe in the next section. However, if you know where the hidden text is located, then select the text before and after the hidden text. Now you can repeat steps 2–4 and you'll see your text restored.
For the Entire Document
You can tell Word to hide text for the entire document and yet still view the hidden text (with some formatting). This is especially useful if you've lost track of your hidden text. Here's what to do:
1 Click the File menu option.
2 Click Options at the lower left of the File window.
3 In the Word Options dialog box, as shown in Figure 1.9, click Display in the menu at the left side.
4 Click the Hidden Text check box under “Always show these formatting marks on the screen” to show all text with hidden text formatting.
5 Click OK.
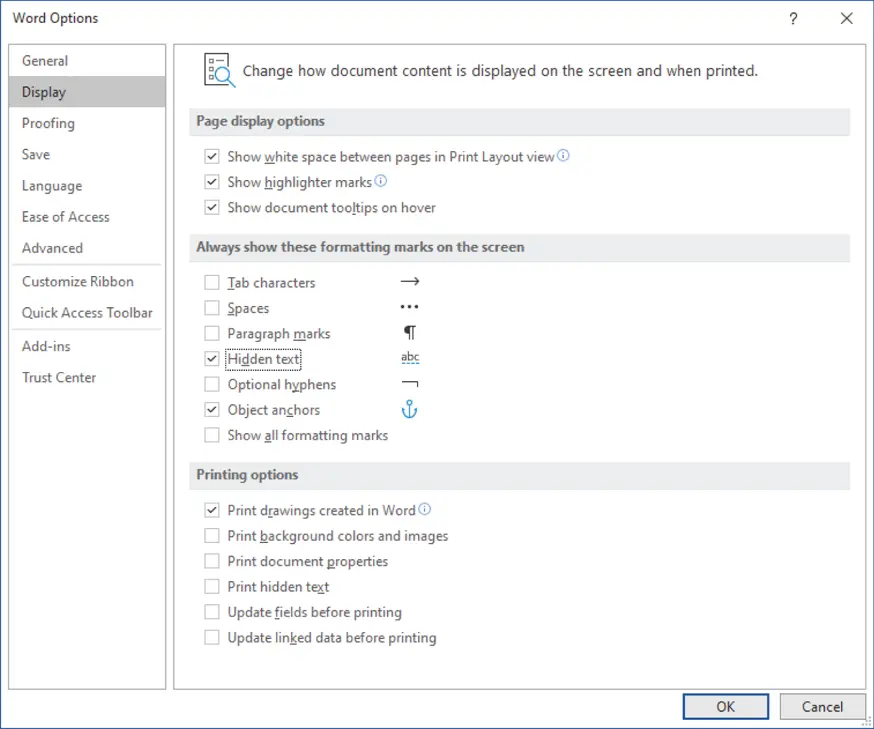
FIGURE 1.9Word Options dialog box
Now all of the hidden text in your document has a dotted black line underneath the hidden characters. If you share the Word document itself, the other person will be able to see the hidden characters. When you save the document to another format (like PDF) or print it, the hidden text doesn't appear.
EXERCISE 1.1 Navigating and Modifying Text in a Document
1 Open an existing Word document, preferably one that has multiple pages.
2 Open the Navigation pane.
3 Search for a word and click one of the results in the list to have Word highlight the result on the page.
4 Replace the word you found by opening the Find And Replace dialog box.
5 Since the word you want to replace is already in the Find box, type the new word in the Replace box.
6 Replace all of the words in the document.
7 Continue by scrolling to the end of the document. An easier way to get to the end is to press Ctrl+End on your keyboard.
8 Add a new link to the bottom of the page that links to the top of the document.
9 Select a sentence within a paragraph and hide it.
10 Unhide the sentence.
Formatting Documents
Word uses a basic template, which Word calls the Normal template, for a new document, which Word calls a blank document. When you create a new document, you can also select from various built‐in templates, such as a brochure.
However, if you want to format a document to fit your specific needs, you should start with a blank document and then set up your document pages. In this section, I'll tell you how to set up document pages as well as how to create and apply styles to text. Styles are a great way to apply formatting quickly to more than one block of text.
You may also want to create headers and footers that run at the top and bottom, respectively, of every page. For example, you can add a page number as a footer if you have a long document. I'll talk about those as well as how to create a background on each page, such as adding the word “DRAFT” to a document that you want to make sure your readers understand isn't final yet.
Читать дальшеИнтервал:
Закладка:
Похожие книги на «MCA Microsoft Office Specialist (Office 365 and Office 2019) Complete Study Guide»
Представляем Вашему вниманию похожие книги на «MCA Microsoft Office Specialist (Office 365 and Office 2019) Complete Study Guide» списком для выбора. Мы отобрали схожую по названию и смыслу литературу в надежде предоставить читателям больше вариантов отыскать новые, интересные, ещё непрочитанные произведения.


Обсуждение, отзывы о книге «MCA Microsoft Office Specialist (Office 365 and Office 2019) Complete Study Guide» и просто собственные мнения читателей. Оставьте ваши комментарии, напишите, что Вы думаете о произведении, его смысле или главных героях. Укажите что конкретно понравилось, а что нет, и почему Вы так считаете.