Jeryl E. Spear - Haircutting For Dummies
Здесь есть возможность читать онлайн «Jeryl E. Spear - Haircutting For Dummies» — ознакомительный отрывок электронной книги совершенно бесплатно, а после прочтения отрывка купить полную версию. В некоторых случаях можно слушать аудио, скачать через торрент в формате fb2 и присутствует краткое содержание. Жанр: unrecognised, на английском языке. Описание произведения, (предисловие) а так же отзывы посетителей доступны на портале библиотеки ЛибКат.
- Название:Haircutting For Dummies
- Автор:
- Жанр:
- Год:неизвестен
- ISBN:нет данных
- Рейтинг книги:3 / 5. Голосов: 1
-
Избранное:Добавить в избранное
- Отзывы:
-
Ваша оценка:
Haircutting For Dummies: краткое содержание, описание и аннотация
Предлагаем к чтению аннотацию, описание, краткое содержание или предисловие (зависит от того, что написал сам автор книги «Haircutting For Dummies»). Если вы не нашли необходимую информацию о книге — напишите в комментариях, мы постараемся отыскать её.
shows you how to draw out your inner artist and bring your ideas to glorious life on the heads of your nearest and dearest—and will help shave dollars off your beauty budget into the bargain!
In a free-spirited, chatty style, master stylist and social media corporate beauty consultant Jeryl E. Spear sits you down for a comprehensive snip-and-tell overview of how to reproduce the latest short, medium, and long hairstyles, as well as fancying things up with cutting-edge techniques like slicing, notching, and layering. Jeryl also provides a drawerful of tips on the tools you'll need to get started.
Get a grip on men's and women's styles Set up shop at home Choose your tools and keep them sharp Take the first steps to embracing a beauty career Packed with detailed illustrations and model shots to guide your work, this book has everything you need to begin the creative work of making everyone you know—and the world—a smarter, more beautiful place!
Haircutting For Dummies — читать онлайн ознакомительный отрывок
Ниже представлен текст книги, разбитый по страницам. Система сохранения места последней прочитанной страницы, позволяет с удобством читать онлайн бесплатно книгу «Haircutting For Dummies», без необходимости каждый раз заново искать на чём Вы остановились. Поставьте закладку, и сможете в любой момент перейти на страницу, на которой закончили чтение.
Интервал:
Закладка:
2 Place the comb at a diagonal, going from one of the front corners to the opposite side of the back of the head. Repeat this action on the other side. The points where the comb loses contact with the head mark the back corners (see Figure 5-3).
3 Create a top section by parting out the hair using the corners as your guide. When done correctly, the section will be in the shape of a rectangle.
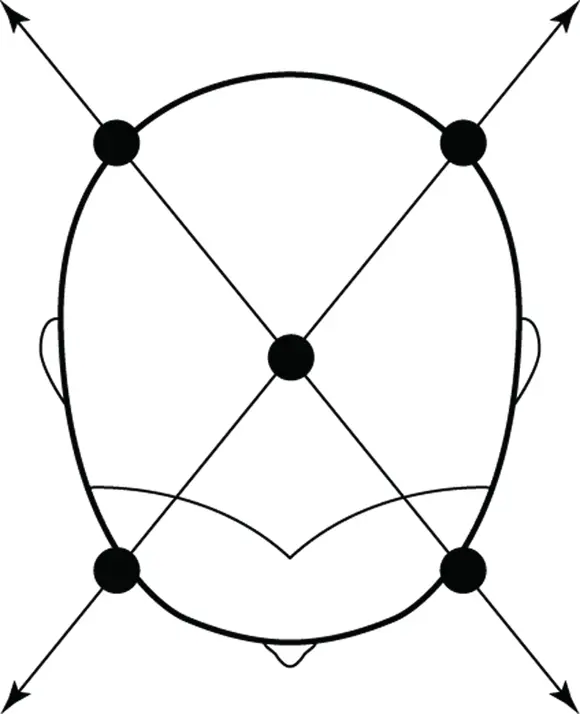
© John Wiley & Sons, Inc.; Illustration by Rashell Smith
FIGURE 5-3:The four corners of the head help to guide many aspects of individual haircut designs.
 Everyone’s head shape is unique. If a person has a pronounced occipital bone, for instance, not taking that into consideration could make the hair collapse on the underside of this prominent bone. If a person has a flat occipital bone, building more hair volume in that area will create a far more pleasing shape. A person’s head shape and its key points should guide every decision you make during a haircut.
Knowing how to identify key areas of the head is also important in terms of following all haircutting directions, whether they are included in this book or elsewhere.
 Thinking back to all the great salon haircuts that you’ve had in your life, you may or may not remember a stylist using a comb to map out key areas of your head. While an experienced stylist doesn’t always use a comb to do this, they still use their fingers to surreptitiously check out your head shape while going through your hair. They’ll place their hand over the entire occipital bone to get a 360-degree read on its shape; put their hand on the top of your head and lightly contract their fingers to feel where the parietal ridges begin and end; and so forth. When it’s necessary to map the four points at the top of the head, most stylists will still use a comb.
 The next time you are having your hair cut by a stylist who doesn’t know your head shape, pay attention to what they’re doing. This is important because some of the not-so-great salon haircuts that you had in the past could have been caused by the stylist not analyzing your head shape.
If knowing the key points and shapes, and how to find them, is still a bit fuzzy after finishing this chapter, I promise that by the time you cut your way through this book, you’ll be able to recite and identify them in your sleep. It all starts by being a hands-on learner.
Elevating Your Haircuts
Degrees of elevation are based on the hair’s direction at the scalp. How high or low you hold the hair determines whether the hair will be cut at a 0-degree elevation for a blunt, one-length bob; a 135-degree elevation for a long-layered haircut; a 90-degree elevation for more structured layers; and so on (see Figure 5-4).
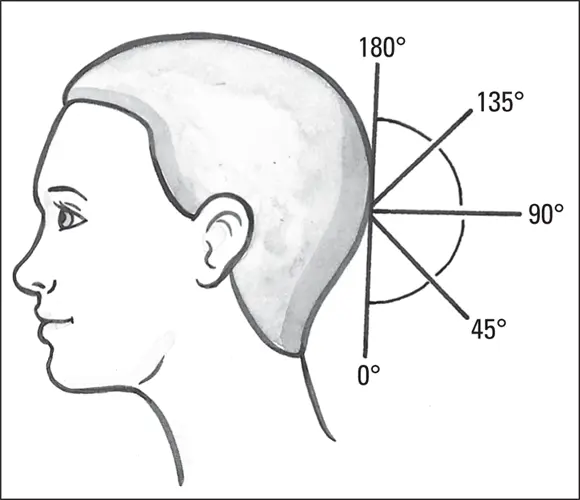
© John Wiley & Sons; Illustration by Lisa Reed
FIGURE 5-4:There may be six degrees of separation, but these are the five main degrees used when cutting hair.
Know your degrees of elevation:
0° = combed straight down
45° = equidistant between 90° and 0°
90° = straight out from the head
135° = equidistant between 90° and 180°
180° = straight up from lower area of the head
The Golden Rule of Elevation: Anything below a 90-degree elevation adds weight to the hair design; anything above a 90-degree elevation removes weight from the hair design. You’ll be referencing this diagram often as you cut your way through this book, so make sure to bookmark or dog ear this page.
As you’re getting familiar with elevations, try this quick activity. Nab a resident human (or yourself). Separate and comb different areas of the hair into various elevations that are detailed in Figure 5-4. Notice how elevations above 90-degrees create a diffuse, light layering, while holding the hair at 90-degrees (straight out from the scalp) creates bulkier, more defined layers.
Getting a Handle on Cutting Lines and Angles
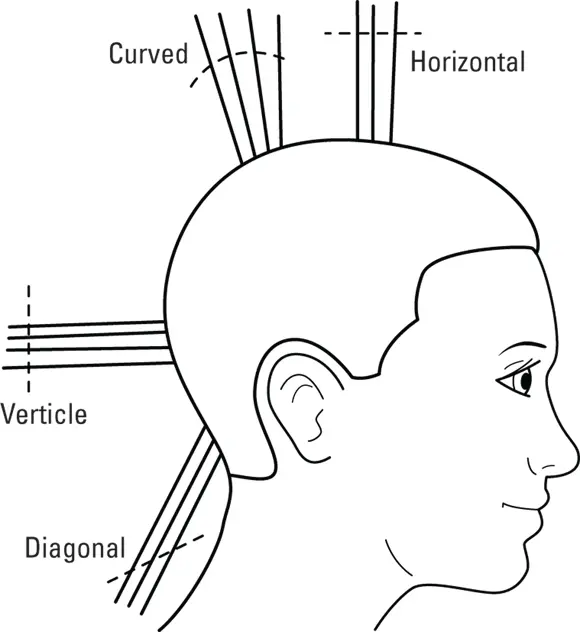
Cutting angles can be straight or curved:
Straight angles can be horizontal (straight across), vertical (straight up or straight down), or diagonal (at an angle, most common is 45-degrees). Straight cutting lines create strong cutting lines.
Curved angles are customized to the curvature of the head and what you want to accomplish. For instance, a curved angle can seamlessly connect where the top of the head meets the parietal ridge. Curved cutting lines create softer end shapes.
See Figure 5-5, which visually explains different cutting angles, and Figure 5-2 to view the location of the top and parietal ridge.
© John Wiley & Sons, Inc.; Illustration by Rashell Smith
FIGURE 5-5:Haircutting angles determine the shape of each haircutting section. Taking all angles used in a haircut into consideration, they determine the overall shape of the finished haircut.
Figures 5-6 and 5-7 show straight cuts and rounded or oval cuts.
© John Wiley & Sons, Inc.; Illustration by Lisa Reed
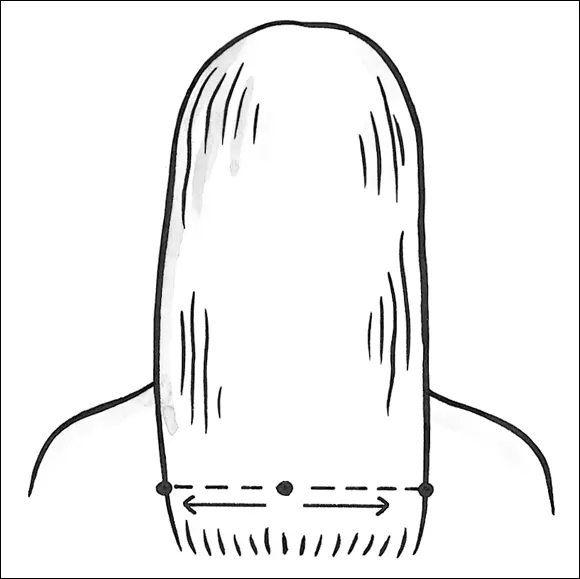
FIGURE 5-6:When you are cutting a straight-across perimeter on one-length hair, you are cutting a horizontal line.
Fingers play an important role in cutting hair by holding each cutting section at the desired elevation. Using the second and third fingers of your non-cutting hand, grip the cutting section at the proper elevation with moderate tension and move your fingers to the desired angle. Following your top finger, trim the hair.
© John Wiley & Sons, Inc.; Illustration by Lisa Reed
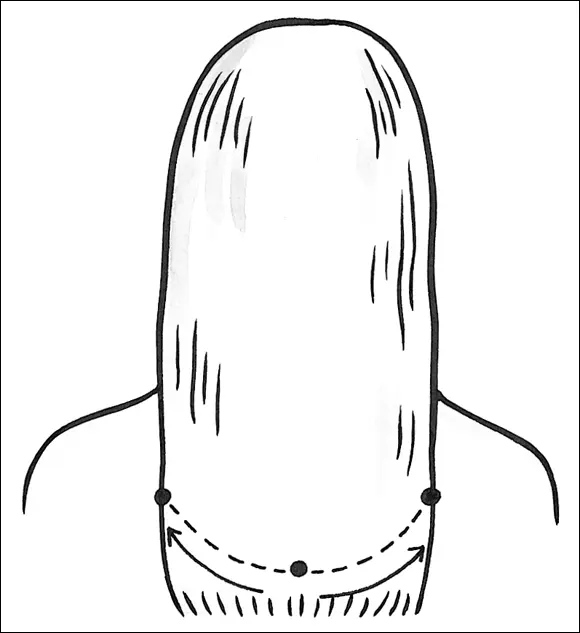
FIGURE 5-7:When you are cutting a rounded or oval perimeter on one-length hair, you are cutting a curved line.
To practice cutting angles, you can do the following activity. I suggest that you practice all the cutting angles shown in Figure 5-3.
1 Identify the four points at the top of the head (see Figure 5-3).
2 Create the top section by parting the hair and using the four points as the guideposts for your section.
3 Pin away the rest of the hair to avoid cutting confusion. Dampen the top section.
Читать дальшеИнтервал:
Закладка:
Похожие книги на «Haircutting For Dummies»
Представляем Вашему вниманию похожие книги на «Haircutting For Dummies» списком для выбора. Мы отобрали схожую по названию и смыслу литературу в надежде предоставить читателям больше вариантов отыскать новые, интересные, ещё непрочитанные произведения.


Обсуждение, отзывы о книге «Haircutting For Dummies» и просто собственные мнения читателей. Оставьте ваши комментарии, напишите, что Вы думаете о произведении, его смысле или главных героях. Укажите что конкретно понравилось, а что нет, и почему Вы так считаете.