Section hair to make cutting easier.
Deal with the ends: Bevel, diffuse, layer, and more.
Master the basics of using clippers.
Chapter 5
Understanding Head Shapes, Elevations, Angles, and Guides
IN THIS CHAPTER
 Surveying your head
 Elevating your cut
 Working all the angles
 Getting acquainted with guides
To fully participate in this chapter, you need the following tools: scissors, cutting comb, tail comb (optional), clips and clamps, and a mannequin head (optional).
This chapter is filled with technical information. It’s the driest chapter in this book and the one you will refer back to the most . This chapter is also the most empowering chapter. Understanding the technical side of haircutting makes the results of every haircut predictable and reproduceable. You’ll know how, why, and where you should take each snip. Cool, right?
 If you’re missing any of the tools listed, feel free to improvise. If you only have paper-cutting scissors, for instance, separating very thin cutting sections will get you by for this chapter. If you don’t have a mannequin head or a willing subject at hand, you can use your own head and hair.
 Once the information and techniques included in this chapter have been mastered, I promise they will be second nature to you when cutting hair. Until then, referring back to this chapter while following cutting tutorials will do the trick!
Getting to Know the Four Pillars of Haircutting
Haircutting is a mechanical process that guides your creativity. If you have a keen sense of balance, for instance, your work will stand apart from other people’s haircuts because of the precise symmetry of your cutting style. For someone else, a sharp eye for detail (or even a talent for decorating) may inspire the interesting finishing details you add to your haircuts.
Regardless of your unique cutting style, you should definitely become familiar with the following four pillars of haircutting and use them to guide all your hair designs.
Head mapping: Pinpointing different shapes and key points found throughout the head
Elevations: How high or low you hold the hair to create or prevent layering and control bulk
Angles: Horizontal, vertical, diagonal, or curved cutting lines that control the shape and bulk, and create uniform or graduated layers
Guides (also called guide lines): Templates that you create to maintain the desired length and shape of each haircutting section
The remaining sections in this chapter focus on each of these four pillars.
 The most important takeaway from this chapter is the need to familiarize yourself with the mechanics of haircutting, which includes very basic geometry.
If you find yourself suddenly regretting that you slept through math class, please relax. While there’s a lot of technical information in this chapter, you can easily master the four pillars of haircutting that I share by engaging your mind and using your hands to play along.
 This chapter contains information that you will use as part of every haircut included in the book, as well as all haircuts you will do in the future. In terms of the geometry involved in haircutting, please know that it’s tangible math that you create with your hands, as opposed to textbook, two-dimensional drawings. And, if it makes you feel any better, I confess that I have always struggled with math. If I can understand and use the four pillars of haircutting, you can too.
Identifying Head Shapes and Points of Interest (a.k.a. Head Mapping)
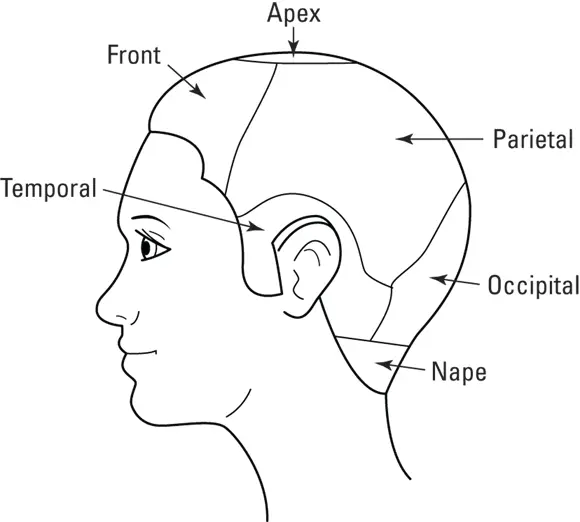
As you follow the haircutting tutorials in this book, I keep both of us on the same page by referencing different areas of the head during haircut tutorials, such as addressing the nape of the neck … starting at the occipital bone … beginning at the parietal ridge … or locating the apex of the head. Figure 5-1 visually explains what I am referencing every step of the way.

© John Wiley & Sons; Illustration by Rashell Smith
FIGURE 5-1:Key anatomical features of the head.
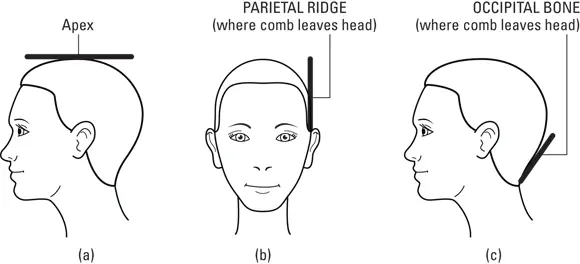
We’ve all known more than a few blockheads, but none are based on the actual shape of their head. A human head has flat, rounded, and curved areas that you need to keep track of when cutting hair. (You can help keep yourself on track by frequently referencing Figure 5-2.)
Because most haircutters are visual learners, here’s a quick activity to help you become familiar with head mapping. You can identify the following head points on yourself as well as other people. You can also extend your activity by checking out the head shapes of your dog (top ridges) and ducks (very smooth). Every living thing is fair game for this activity. Make sure to have Figure 5-2 close by while doing the following:
1 Locating the apex.Locate the apex by placing a styling comb on top of the head as shown in Figure 5-2a. The apex, which is the highest point of the head, is where the comb makes contact with the scalp. Finding the apex is key to mapping the top section of the head.
2 Identifying the parietal ridge.Identify the beginning and ending of the parietal ridge (shown in Figure 5-2b). This is where the head curvature begins along the side of the head.
3 Finding the occipital bone.Identify the position and shape of the occipital bone as shown in Figure 5-2c. Because everyone’s occipital bone is shaped differently, this feature poses unique considerations for every haircut.

© John Wiley & Sons, Inc.; Illustration by Rashell Smith
FIGURE 5-2:Locating key points of the head shape should be done before every haircut.
The four corners of the head
Locating the four corners on the top of the head helps to guide how you will cut the hair at top of the head, where the head starts to slope down the sides and back of the head; and how to adjust the hair elevation based on the changing head shape. Practice mapping the four corners on your family members’ heads, and while you’re at it, map your head too.
How to locate the four corners:
1 Place a cutting comb on each side of the head, starting at the front of the ear and straight up toward the top of the head. Repeat this action on the other side of the head. The points where the comb loses contact with the head are the front two corners.
Читать дальше

 Surveying your head
 If you’re missing any of the tools listed, feel free to improvise. If you only have paper-cutting scissors, for instance, separating very thin cutting sections will get you by for this chapter. If you don’t have a mannequin head or a willing subject at hand, you can use your own head and hair.
 Once the information and techniques included in this chapter have been mastered, I promise they will be second nature to you when cutting hair. Until then, referring back to this chapter while following cutting tutorials will do the trick!


