Heather Smith - Xero For Dummies
Здесь есть возможность читать онлайн «Heather Smith - Xero For Dummies» — ознакомительный отрывок электронной книги совершенно бесплатно, а после прочтения отрывка купить полную версию. В некоторых случаях можно слушать аудио, скачать через торрент в формате fb2 и присутствует краткое содержание. Жанр: unrecognised, на английском языке. Описание произведения, (предисловие) а так же отзывы посетителей доступны на портале библиотеки ЛибКат.
- Название:Xero For Dummies
- Автор:
- Жанр:
- Год:неизвестен
- ISBN:нет данных
- Рейтинг книги:5 / 5. Голосов: 1
-
Избранное:Добавить в избранное
- Отзывы:
-
Ваша оценка:
Xero For Dummies: краткое содержание, описание и аннотация
Предлагаем к чтению аннотацию, описание, краткое содержание или предисловие (зависит от того, что написал сам автор книги «Xero For Dummies»). Если вы не нашли необходимую информацию о книге — напишите в комментариях, мы постараемся отыскать её.
Xero For Dummies,
Xero For Dummies
Xero For Dummies
Xero For Dummies — читать онлайн ознакомительный отрывок
Ниже представлен текст книги, разбитый по страницам. Система сохранения места последней прочитанной страницы, позволяет с удобством читать онлайн бесплатно книгу «Xero For Dummies», без необходимости каждый раз заново искать на чём Вы остановились. Поставьте закладку, и сможете в любой момент перейти на страницу, на которой закончили чтение.
Интервал:
Закладка:
Here is how to delete an account:
1 From the organisation name in the top left corner of the screen, click on Settings in the drop-down menu and then Looking for Advanced Settings? Under Advanced Settings, click on Chart of Accounts.The Chart of Accounts dashboard appears.
2 Check the box on the left of the account you want to delete, and click the red Delete button at the top of the list of accounts.A confirmation window appears asking you to confirm you really want to delete this account. Once confirmed, this process can’t be undone, so make sure this is the correct account. Some accounts can’t be deleted because of their nature, or because they have a current Account Balance. If you’re trying to delete such an account, Xero automatically switches the process to the archive option (see following section).
3 Click the green OK button.This removes the account from your active accounts list.
Archiving an account
Maybe you’ve realised that you have some accounts you never use. If so, it’s time to streamline and simplify your Chart of Accounts. If you’re feeling nervous about permanently deleting an account, archiving an account so it’s stored in a retrievable format is the option for you!
To archive an account, follow these steps:
1 From the menu bar, click on Settings → General Settings, and then under Reports click on Chart of Accounts.The Chart of Accounts dashboard appears. Ensure the account balance is zero before you archive the account. Unfortunately, you can archive an account with a balance; however, you absolutely do not want to do this, because it unbalances your accounts. (The balances of archived accounts will also still appear in reports, such as the Balance Sheet, if appropriate.)
2 Check the box on the left side of the account you want to archive and click the blue Archive button.A confirmation window appears notifying you that you’ve selected an account to be archived. It also lets you know that the account will be removed from any contacts who are using it as a default sales or purchases account. After you click Confirm, the account appears under the archive tab.
3 Click the green OK button.This removes the account from your active accounts list.
HANDLING YOUR CASH
Ideally, all business transactions should go through business bank accounts; however, the reality is that sometimes this doesn’t happen. To monitor personal spending on behalf of the business, or through the business, set up an owner’s loan account or a petty cash account. Select the Enable Payments option to enable recognition of business cash transactions. Also, show these accounts on the Dashboard Watchlist to monitor spending. (Refer to the earlier section ‘ Adding a new account’ for more on how to select these options or settings.)
Putting Your Accounts into Practice
The following sections take you through some practical aspects you may need to go through once you have the main aspects of your accounts set up — conversion balances, comparative balances and historical invoices.
Checking your conversion balances
Conversion balances are the account balances as at the conversion date, when you start using Xero. Conversion balances follow basic accounting principles in that the debits need to equal the credits. A simple conversion balance of a new start-up business recognises company shares and the value of those shares as follows:
| Cash | DR $2 |
| Shares in Company | CR $2 |
This entry is reflected in Figure 2-7, which shows the Conversion Balances dashboard. If the business has been operational, the conversion balances are more detailed. If accounts haven’t been locked, users with Standard or Adviser status can save conversion balances — but if you’re at all unsure, engage an expert on your Xero support team to enter the conversion balance. Even if you don’t have all this information, you can start entering some now — any amount that doesn’t balance appears as an adjustment (called a Historical Adjustment in your Balance Sheet — or what those in the industry jokingly refer to as a hysterical adjustment!). Ask your accountant for the conversion balances or obtain a copy of your Trial Balance as at the date of conversion. The Trial Balance provides details of the balances of all the general ledger accounts.
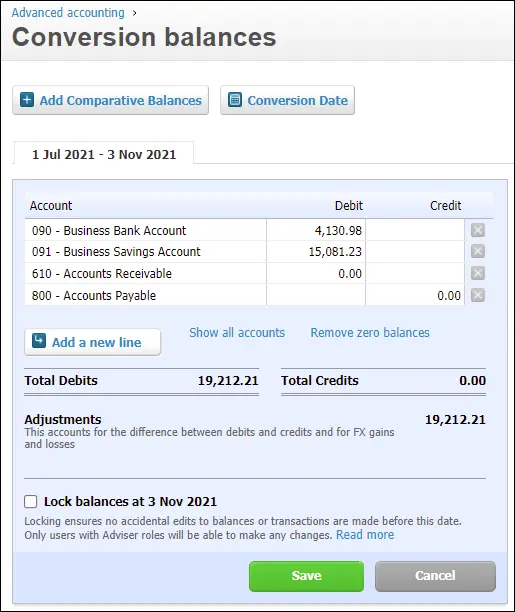
Source: Xero 2022
FIGURE 2-7:The Conversion Balances dashboard.
Note: If you’re using the set-up wizard, Account Balances, which includes conversion balances, is the window you’ll be taken to after you’ve set up your Chart of Accounts. However, entering and correcting conversion balances is likely something you’ll prefer to come back to after setting up the main aspects of your accounts, so the following steps also outline how to access the Conversion Balances dashboard after set-up.
To access the Conversion Balances dashboard, follow these steps:
1 From the organisation name in the top left corner of the screen, click on Setting in the drop-down list and then Looking for Advanced Settings? Under Advanced Settings, click on Conversion Balances.The Conversion Balances dashboard appears.
2 Click the Conversion Date button and enter the relevant date.If you were starting as at 1 July, the conversion month would be July, and you need to select the relevant Year. Make sure you’re really comfortable with the conversion date you select. It can be changed, but doing so is a bit of a hassle and you may need a consultant to assist you. Note: An added incentive of setting the conversion date for the start of the financial year is you have the opportunity to include comparative balances, because the balances are typically easy to access from financial reports prepared by you or your accountant. (See ‘ Adding comparative balances’, later in this chapter, for more.)
3 Click on the blue Show All Accounts hyperlink and carefully enter the balances.Show All Accounts is included in very tiny letters beside the Add a New Line button.Make sure you have a list of what all the account balances are and only enter positive balances. For example, a bank account’s ledger balance is typically debit in nature; however, if the balance is overdrawn, enter the balance in the credit column. Once all balances have been entered the debit and credit columns should equal, with the difference (if any) left over in the adjustments column. Keep in mind that your accountant can come back and update these balances at a later date if you don’t have the complete information at hand.
4 Check the box beside Lock Balances At …This ensures no-one accidentally changes balances; however, an Adviser can change them if necessary.
5 Click the green Save button.If you’re working through the set-up wizard, click the green Next button.If conversion balances contain a balance for either the accounts payable or accounts receivable account, the detail behind the balances needs to be entered (see the section ‘ Entering historical invoices, bills and credit notes’, later in this chapter). If you’ve no accounts payable or accounts receivable balance, congratulations! The set-up is complete.
Adding comparative balances
If your business was in operation prior to moving to Xero, the previous full-year balances for all or selected lines of the chart of accounts can be entered into your Xero file through the Comparative Balances function. In other words, you can add in the balances for accounts within your chart of accounts from before you started in Xero, as at the end of the previous financial year. If the detailed history of your business isn’t already in Xero, utilising the Comparative Balances function is an opportunity to incorporate summary level historical data into your reporting.
Читать дальшеИнтервал:
Закладка:
Похожие книги на «Xero For Dummies»
Представляем Вашему вниманию похожие книги на «Xero For Dummies» списком для выбора. Мы отобрали схожую по названию и смыслу литературу в надежде предоставить читателям больше вариантов отыскать новые, интересные, ещё непрочитанные произведения.


Обсуждение, отзывы о книге «Xero For Dummies» и просто собственные мнения читателей. Оставьте ваши комментарии, напишите, что Вы думаете о произведении, его смысле или главных героях. Укажите что конкретно понравилось, а что нет, и почему Вы так считаете.