Heather Smith - Xero For Dummies
Здесь есть возможность читать онлайн «Heather Smith - Xero For Dummies» — ознакомительный отрывок электронной книги совершенно бесплатно, а после прочтения отрывка купить полную версию. В некоторых случаях можно слушать аудио, скачать через торрент в формате fb2 и присутствует краткое содержание. Жанр: unrecognised, на английском языке. Описание произведения, (предисловие) а так же отзывы посетителей доступны на портале библиотеки ЛибКат.
- Название:Xero For Dummies
- Автор:
- Жанр:
- Год:неизвестен
- ISBN:нет данных
- Рейтинг книги:5 / 5. Голосов: 1
-
Избранное:Добавить в избранное
- Отзывы:
-
Ваша оценка:
- 100
- 1
- 2
- 3
- 4
- 5
Xero For Dummies: краткое содержание, описание и аннотация
Предлагаем к чтению аннотацию, описание, краткое содержание или предисловие (зависит от того, что написал сам автор книги «Xero For Dummies»). Если вы не нашли необходимую информацию о книге — напишите в комментариях, мы постараемся отыскать её.
Xero For Dummies,
Xero For Dummies
Xero For Dummies
Xero For Dummies — читать онлайн ознакомительный отрывок
Ниже представлен текст книги, разбитый по страницам. Система сохранения места последней прочитанной страницы, позволяет с удобством читать онлайн бесплатно книгу «Xero For Dummies», без необходимости каждый раз заново искать на чём Вы остановились. Поставьте закладку, и сможете в любой момент перейти на страницу, на которой закончили чтение.
Интервал:
Закладка:
Organisation Settings
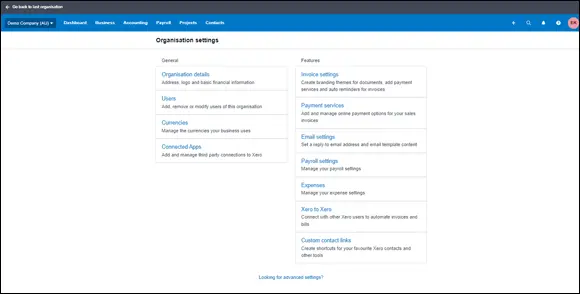
Business organisation details, including organisation name, type of business, contact details and contact links, can be entered in the Organisation Settings dashboard (Figure 2-4). In this section, I go through how to complete most of the elements on this dashboard.
1 To access the Organisation Settings dashboard, click on the organisation name in the top left of the screen and then select Settings from the drop-down list that appears.During the sign-up stage (refer to the preceding section), you may have already completed some of this information. If you click on the Organisation details link, in the new window at the top is a floating bar, with an On or Off option to include some of the organisation information on online invoices and quotes. If On is chosen, additional Terms and Conditions appear at the bottom of the page. To register for On, read the Xero Terms of Use and Community Guidelines and, if you agree, check the box, and Save the updated preferences.The first part of the Organisation Settings dashboard is the Basic Information area.
2 Click the Display Name field (in the Basic Information area) and enter your business name.Your business name is typically the name Joe Public would use to refer to your business, and this name is what appears within Xero.
3 Enter the legal/trading name of the business in the Legal/Trading Name field.This is the name that appears on documents produced by Xero. It may be a long and clumsy name and may include terms like atf (as trustee for) or trading as . If you’re a sole trader, your legal or trading name may be the same as your display name. If you’re uncertain, check with the business adviser who set up your business structure.
4 Upload your logo.The optimal size is 140 pixels by 140 pixels — a square image. The image type can be .jpg, .png or .gif, with a maximum file size of 1 MB.
5 Select the Organisation Type from the drop-down list of options.The Organisation Type field is optional, and is for information purposes only. The selection makes no difference to the file set-up, and can be changed at any time. You may have filled out the What Is Your Line of Business? field during sign-up.
6 Enter your business’s registration number, as required in your region. Australian users need to enter their Australian Business Number (ABN) and branch details (if they operate from more than one location). UK users need to enter their VAT Registration Number. New Zealand users need to enter their New Zealand Business Number. United States/Global users have space to enter a Business Registration Number, and United States users have space for an Employer Identification Number (EIN) if they need to record one.
7 Enter details in the Organisation Description field.The text entered here appears at the footer of online invoices and quotes, if you’ve opted to make it public.

Source: Xero 2022
FIGURE 2-4:The Organisation Settings dashboard.
The next part of the Organisation Settings dashboard is the Contact Details area and this is quite straightforward — simply enter the postal and physical addresses of your business.
 Enter your postal address information in the Contact Details area of the Organisation Settings dashboard and click Same as Postal Address to copy the details to the Physical Address/Registered Address column. You can then amend as necessary.
 Capitalising the Town and/or City entries in your postal and physical addresses ensures correspondence is properly delivered — making this another efficient business practice.
The final block of the Organisation Settings dashboard is the Social Links area. This enables you to connect with your customers via the online invoices that you send them — they can ‘like’ you on Facebook, tweet about you on Twitter, and/or connect with you on LinkedIn.
 Before adding links within Xero to all the social networking sites you’re active on, you may want to consider your business’s social media strategy. For instance, you may opt to only add links to a Facebook business page rather than share your personal details by adding a link to your personal Facebook page.
After adding social links, check that the links work — see Chapter 6, where you can explore online invoicing, for more details. (I did this recently and realised my links weren’t working and I had to correct them. Practising what I preach!)
Once you’ve entered your details in the Organisation Settings dashboard, click the green Save button on the bottom right.
Financial Settings
Financial information about the business that may affect reporting parameters can be defined in the Financial Settings dashboard. At the sign-up stage, you indicated where the business is registered to pay taxes (refer to the section ‘ Getting started’, earlier in this chapter, for more).
 Where your business is registered to pay tax affects the options available through the Financial Settings dashboard in Xero. If at all unsure, seek specialist advice for your own particular circumstances.
To access the Financial Settings dashboard, click on the organisation name in the top left of the screen and then select Settings from the drop-down list that appears. Click the link that says Looking for Advanced Settings? and select Financial settings.
The first field in the Financial Settings window is the Financial Year End. This date is the annual date that your business financial reports are prepared to. In many businesses, the financial year end aligns with the income tax year end for the country the business pays tax in. The business’s financial year end date is auto suggested, and can be changed if necessary.
Xero next asks you to choose the consumer tax options for your region (refer to Table 2-1for the options that may apply). If in any doubt about how to complete this section, check with your accountant or Xero Adviser.
The next block is the Tax Defaults for Sales and Purchases block. From the drop-down menu, you can choose from four options: Based on Last Sale, Tax Inclusive, Tax Exclusive, and No Tax.
 If UK users fall under the Construction Industry Scheme, they need to indicate if they are a registered contractor and/or subcontractor. You then enter your Unique Taxpayer Reference (UTR), Accounts Office Reference, Employer’s PAYE Reference, and the Subcontractor Deduction Rate, depending on the options chosen. If at all unsure on this, refer to your Xero Adviser, because this can’t be disabled once activated. UK users also need to enter their BACS Service User Number/Owner ID if they create a file from Xero that banks use to facilitate bulk payments (otherwise known as batch payments ; see Chapter 7for more).
 Lock dates prevent users from altering accounts prior to and inclusive of the set date. Xero has two lock date fields. Use the first lock date to lock down the previous period. Use the second lock date to lock down the previous financial year. To do this, go to the Period Lock Date drop-down menu, select the date, and click Save.
Интервал:
Закладка:
Похожие книги на «Xero For Dummies»
Представляем Вашему вниманию похожие книги на «Xero For Dummies» списком для выбора. Мы отобрали схожую по названию и смыслу литературу в надежде предоставить читателям больше вариантов отыскать новые, интересные, ещё непрочитанные произведения.
Обсуждение, отзывы о книге «Xero For Dummies» и просто собственные мнения читателей. Оставьте ваши комментарии, напишите, что Вы думаете о произведении, его смысле или главных героях. Укажите что конкретно понравилось, а что нет, и почему Вы так считаете.


