Doug Abbott - Embedded Linux development using Eclipse
Здесь есть возможность читать онлайн «Doug Abbott - Embedded Linux development using Eclipse» весь текст электронной книги совершенно бесплатно (целиком полную версию без сокращений). В некоторых случаях можно слушать аудио, скачать через торрент в формате fb2 и присутствует краткое содержание. Год выпуска: 2009, ISBN: 2009, Издательство: Elsevier, Жанр: Программирование, ОС и Сети, Программы, на английском языке. Описание произведения, (предисловие) а так же отзывы посетителей доступны на портале библиотеки ЛибКат.
- Название:Embedded Linux development using Eclipse
- Автор:
- Издательство:Elsevier
- Жанр:
- Год:2009
- ISBN:978-0-7506-8654-9
- Рейтинг книги:4 / 5. Голосов: 1
-
Избранное:Добавить в избранное
- Отзывы:
-
Ваша оценка:
Embedded Linux development using Eclipse: краткое содержание, описание и аннотация
Предлагаем к чтению аннотацию, описание, краткое содержание или предисловие (зависит от того, что написал сам автор книги «Embedded Linux development using Eclipse»). Если вы не нашли необходимую информацию о книге — напишите в комментариях, мы постараемся отыскать её.
• Overview of the latest C/C++ Development toolkit
• Includes case studies of eclipse use including Monta Vista, LynuxWorks, and WindRiver
Embedded Linux development using Eclipse — читать онлайн бесплатно полную книгу (весь текст) целиком
Ниже представлен текст книги, разбитый по страницам. Система сохранения места последней прочитанной страницы, позволяет с удобством читать онлайн бесплатно книгу «Embedded Linux development using Eclipse», без необходимости каждый раз заново искать на чём Вы остановились. Поставьте закладку, и сможете в любой момент перейти на страницу, на которой закончили чтение.
Интервал:
Закладка:
Alternatively, you can just go in and directly edit the network device parameters file. Network configuration parameters are found in /etc/sysconfig/network-scripts/where you should find a file named something like ifcfg-eth0that contains the parameters for network adapter 0. You might want to make a copy of this file and name it dhcp-ifcfg-eth0. That way you’ll have a DHCP configuration file for future use if needed. Now open the original file with an editor (as root user of course). It should look something like Box 5.1a. Delete the line BOOTPROTO=dhcpand add the four new lines shown in Box 5.1b.
Box 5.1a ifcfg-eth0
DEVICE=eth0
ONBOOT=yes
BOOTPROTO=dhcp
Box 5.1b revised ifcfg-eth0
DEVICE=eth0
ONBOOT=yes
IPADDR=192.168.1.2
NETMASK=255.255.255.0
GATEWAY=192.168.1.1
BROADCAST=192.168.1.255
We’ll use NFS (Network File System) to download executable images to the target. That means we have to “export” one or more directories on the workstation that the target can mount on its file system. Exported directories are specified in the file /etc/exports. Initially this file is present but empty. As root user, open it with an editor and insert the following on a single line:
/home//workspace *(rw,no_root_squash,no_all_squash,sync,nosubtree_check)
This makes the Eclipse workspace/directory visible to other computers on the network.
Be sure the NFS server is running. In most cases it will be automatically started at boot time. Use the command:
/etc/rc.d/init.d/nfs status
to check this. If it isn’t started automatically, execute the command /etc/rc.d/init.d/nfs start. [5] This is the location of the nfs script on a Red Hat or Fedora distribution. Other distributions may locate it somewhere else.
You can execute this command from a shell window or, better yet, add it near the end of /etc/rc.d/rc.local. This is the last script executed at boot up.
5.4.4 Target Configuration
There are a couple of files that need to be edited on the target to support NFS file mounting. The equivalent of /etc/sysconfig/network-scripts/ifcfg-eth0needs to be modified to specify a fixed IP address. The exact location, name, and layout of this file will vary from board to board. On the Intellimetrix board it’s /etc/network/interfaces. I usually assign 192.168.1.50 to the target board.
The other file that needs modification is the last script executed by the init process when the system boots. Again, this will vary from board to board. On the Intellimetrix board it’s /etc/init.d/rcS. Add the following line at the end of that file:
/bin/mount –o nolock 192.168.1.2:/home//workspace /home
On a PC target /etc/rc.d/rc.localis a good place to add this.
This causes the workspace/sub-directory under your home directory to appear as /homeon the target using the Network File System.
In order to debug on the target, you’ll need a program called gdbservercompiled for the target and loaded on the target’s file system, preferably someplace visible from the PATHenvironment variable. gdbserverruns the program under test and communicates over the network with GDB running under Eclipse on the host.
5.4.5 Creating a Target Eclipse Project
Even though our thermostat project included a make target for the target version of the thermostat, we’ll create a new project to illustrate some additional features of Eclipse. Create a new C executable project and call it “target.” From the thermostat project, select the following files using the Shift and Ctrl keys in the same way you do when selecting multiple files in Windows or graphical Linux environments:
• AT91RM9200.h
• driver.h
• thermostat.h
• monitor.c
• thermostat.c
• trgdrive.c
Right-click and select Copy. Click on the new target project, right-click and select Paste. We now have all the files we need for the project. But remember that we don’t want to build this project for the host, but rather for the target. This requires configuring the project to use a different GNU tool chain.
The file trgdrive.cprovides a set of device driver functions for the Intellimetrix ARM9 board. This is not a real Linux “device driver,” but rather accesses memory mapped I/O directly from user space. If you’re using some other target board, you’ll need to modify the functions in trgdrive.caccordingly.
If your target is a PC, you can skip to the next section on debugging on the target. You don’t need to select a different compiler.
Right-click on the project name and select Properties. Expand the C/C++ Buildentry and select Settings. This brings up the dialog shown in Figure 5.11. The first tab, Tool settings, lets you specify which C compiler, C linker, and assembler to use. By default, the compiler and linker are just gcc. This is the standard name for a host GNU C compiler.
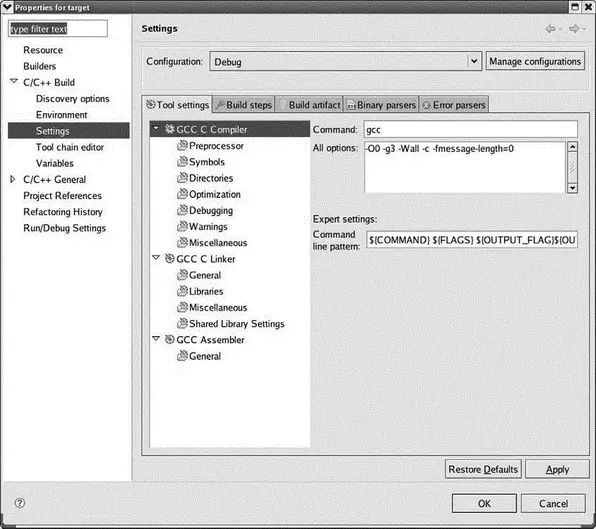
Figure 5.11: Project build settings.
By convention, cross compilers are given a prefix that identifies the architecture and the operating system on which the compiled program will run. On my system, the ARM cross compiler is called arm-linux-gccand I’ve added the path to it to my PATH environment variable. So change the Command name to match your cross compiler. All of the items under GCC C Compilerrepresent categories of compiler options. Take a look through them to see what’s there.
Likewise, change the GCC C Linkercommand to match your cross compiler. Here we also have to add a library to the linker command. Select Libraries, click the Addbutton, and enter “pthread.” This is the library of Posix threads functions. Take a quick look at the categories of linker options.
Finally, change the GCC Assemblerto match your cross assembler.
Note that we’ve done all this for the Debugconfiguration. Click the Configurationdrop-down menu at the top, select Release, and make the same changes.
Click OKto exit the Properties dialog. Make sure the active build configuration is Debug and build the project. You’ll find two new entries under the target project in the Project Explorer view: Binaries and Debug. Debug lists all of the built objects including an executable named “target”. Expanding any of the built object entries produces a list of every source file used to build that object. It’s not clear to me what purpose that serves.
5.4.6 Debugging on the Target
From a developer’s standpoint, there’s virtually no difference between debugging on host and debugging on a target board. The only difference is in how Eclipse connects to the debugger. For this you’ll need to create a new debug configuration.
With the target project selected in the Project Explorer view, select Run→Debug Configurations…. Click the New launch configurationbutton. A new configuration named target Debug is created, referencing the target project and the Debug/target application. Select the Debugger tab (Figure 5.12).
Читать дальшеИнтервал:
Закладка:
Похожие книги на «Embedded Linux development using Eclipse»
Представляем Вашему вниманию похожие книги на «Embedded Linux development using Eclipse» списком для выбора. Мы отобрали схожую по названию и смыслу литературу в надежде предоставить читателям больше вариантов отыскать новые, интересные, ещё непрочитанные произведения.


Обсуждение, отзывы о книге «Embedded Linux development using Eclipse» и просто собственные мнения читателей. Оставьте ваши комментарии, напишите, что Вы думаете о произведении, его смысле или главных героях. Укажите что конкретно понравилось, а что нет, и почему Вы так считаете.