Doug Abbott - Embedded Linux development using Eclipse
Здесь есть возможность читать онлайн «Doug Abbott - Embedded Linux development using Eclipse» весь текст электронной книги совершенно бесплатно (целиком полную версию без сокращений). В некоторых случаях можно слушать аудио, скачать через торрент в формате fb2 и присутствует краткое содержание. Год выпуска: 2009, ISBN: 2009, Издательство: Elsevier, Жанр: Программирование, ОС и Сети, Программы, на английском языке. Описание произведения, (предисловие) а так же отзывы посетителей доступны на портале библиотеки ЛибКат.
- Название:Embedded Linux development using Eclipse
- Автор:
- Издательство:Elsevier
- Жанр:
- Год:2009
- ISBN:978-0-7506-8654-9
- Рейтинг книги:4 / 5. Голосов: 1
-
Избранное:Добавить в избранное
- Отзывы:
-
Ваша оценка:
Embedded Linux development using Eclipse: краткое содержание, описание и аннотация
Предлагаем к чтению аннотацию, описание, краткое содержание или предисловие (зависит от того, что написал сам автор книги «Embedded Linux development using Eclipse»). Если вы не нашли необходимую информацию о книге — напишите в комментариях, мы постараемся отыскать её.
• Overview of the latest C/C++ Development toolkit
• Includes case studies of eclipse use including Monta Vista, LynuxWorks, and WindRiver
Embedded Linux development using Eclipse — читать онлайн бесплатно полную книгу (весь текст) целиком
Ниже представлен текст книги, разбитый по страницам. Система сохранения места последней прочитанной страницы, позволяет с удобством читать онлайн бесплатно книгу «Embedded Linux development using Eclipse», без необходимости каждый раз заново искать на чём Вы остановились. Поставьте закладку, и сможете в любой момент перейти на страницу, на которой закончили чтение.
Интервал:
Закладка:
There’s an option to save the user ID and password as defaults, so you don’t have to enter them every time.
Right-click on Ssh Shells and select Launch Shell. You now have a command shell connected to the remote machine. You can also right-click any directory entry in the remote file system and launch a shell in that directory. This allows for multiple shells to the same remote system. These are opened as tabs in the Remote Shell view.
Right-click a text file in the remote system and select Open. The file is opened in the Eclipse editor.
The dstore protocol provides more capability than SSH at the expense of requiring a Java-based server running on the remote machine. dstore supports browsing into archive files such as tar, tgz, and zip. It supports remote search without transferring files to your local host. Nevertheless, the requirement for Java means it’s probably not the best fit for embedded devices.
Before creating a dstore connection, you must install the dstore server on the remote machine. Download it from the Target Management project download site at http://www.download.eclipse.org/dsdp/tm/downloads. Click on the latest release link, currently 3.0, and in that page scroll down to the DStore Server Runtime. Versions are available for Linux, Windows, other Unix, and Mac OS X (considered experimental). Currently, a server implementation for Windows CE is in “incubation.”
Decide where to install the server — on a Linux box /optis a good place — and create a directory for it, say, /opt/rseserver. Untar the downloaded tar file there.
The dstore server also requires a Java Runtime Environment (JRE) version 1.4 or higher. An IBM, Sun, or equivalent JRE is required. The gcj-based jvm that comes with most Linux distributions doesn’t work. If necessary, refer back to Chapter 2, Installation, for information on installing a JRE. The scripts that start the Linux server also require Perl, which is installed by default on most distributions.
There are two ways to start the dstore server on a Linux remote system. As root user you can start a server daemon by executing the Perl script daemon.pl. The server daemon listens for connection requests on port 4075 by default. You can change the port number with an optional port argument to the script. In response to a connection request, the daemon spawns a dstore server.
Alternatively, if you don’t have root access, or just don’t want the daemon running, you can manually start the server with the Perl script server.pl. If you don’t specify a port, the server picks the first one available and prints out the port number. This is usually 4033. If no connection shows up in about two minutes, the server times out. A manually launched server also terminates when you terminate the connection.
The process is essentially the same for a Windows remote system, except that the scripts are called respectively daemon.batand server.bat.
To establish a dstore connection, click the New Connectionicon and select either Linux or Windows as the remote system type. Specify the host name and a connection name, just as we did for the SSH connection. Click Next. In this dialog (Figure 6.7) Launcher Properties specifies how the server is started on the remote system. If you started the daemon on the remote system, then select Daemonas the Launcher. If you manually started the server, select Running.
Click Finish. Right-click on the new entry in the Remote Systems view and click Connect.
Personally, I find the SSH Only connection to be simpler and easier to work with. Dstore is useful in connecting to Windows boxes, because standard Windows doesn’t include an SSH server.
There are times when you might want to have two or more connections open to the same remote system. You might want to log on with a different user ID, for example. Or you might want to have both a dstore and an SSH connection open.
With the first connection selected in the Remote Systems view, click the New Connectionicon or right-click and select New→Connection. The Host name remains the same. You just need to give it a unique Connection name. Go ahead and create a second connection, because we’ll use it to illustrate referencing filter pools later on.
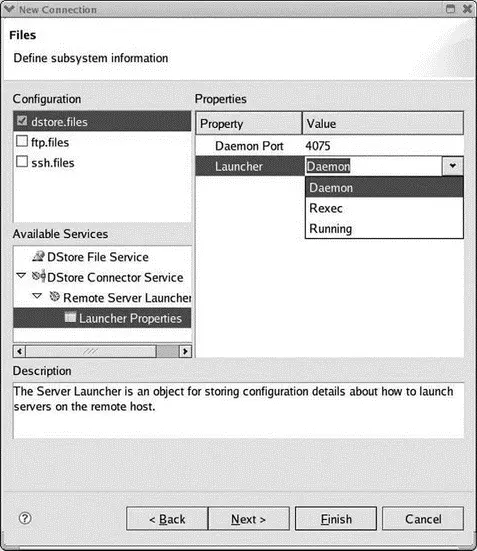
Figure 6.7: Setting launcher properties.
6.2.2 Filters and Filter Pools
The entries My Home and Root under Sftp Files in your first remote connection are known as filters . RSE automatically creates these two filters for every SSH connection. Right-click on My Homeand select Properties. The Filter Information page tells you that this is a Filter Resource and gives its name. It also says that it belongs to a specified filter pool and profile . The Filter Strings page tells you that this filter points to the home folder “.” and that displayed file entries are filtered by name, but the file name filter, in fact, is “*” or everything. Note that none of this information is editable in the default filters that RSE creates.
You can create your own filters to simplify the management of remote resources. You might, for example, want a filter that lists just C/C++ source files, those with a .c, .h, or .cpp extension. Pick a folder on your remote system that has some source files in it, or in subfolders. In my case, it’s drivers/that has some examples for my Linux device driver class.
Right-click the folder name and select New→Filter…. This brings up the dialog in Figure 6.8. Select Subset by file types, and click Select…. This brings up a list of file extensions, but sadly, .c and .h aren’t listed. In Other Extensions enter “c,h,cpp” and click OK.
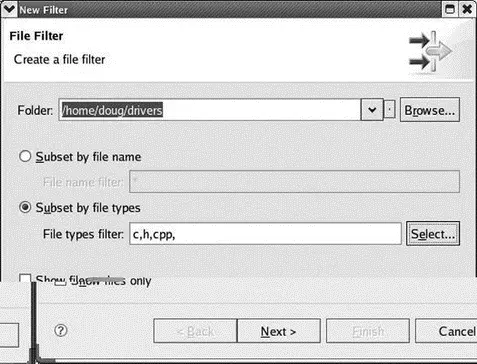
Figure 6.8: Creating a filter.
Click Nextand give the filter a name, “My C Files,” for example. On this screen you also have a choice of making this filter private to this connection or making it part of a filter pool, which makes it visible to other connections. Uncheck the Only create filter in this connectionbox to make it part of the default filter pool. Clicking Nextbrings up some “tips” about filters and filter pools. Click Finish.
The new filter shows up below Root under Sftp Files in your remote connection. For filters you create, you can modify the Filter Strings from the Properties page and add new filter strings.
Over time, you may end up with such a large number of filters that the system becomes hard to navigate. The solution is to aggregate related filters into filter pools. But in order to work with filter pools, we have to make them visible. Select Window→Preferences→Remote Systemsand check the Show filter pools in Remote Systems viewbox. While you’re there have a look at some of the other preferences related to remote systems. Click Apply and then OK. [6] You can also manipulate this preference by clicking the View Menu icon in the Remote Systems view.
Back in the Remote Systems view, the filters previously listed under Sftp Files have been replaced by a filter pool entry called :ssh.files, where is the name of the default RSE profile that defaults to the name of your local host system. Expand the filter pool entry to reveal the same set of filters we previously had. Right-click the pool entry and select Properties. Here we see that this is not a filter pool but is, in fact, a reference to a filter pool.
Интервал:
Закладка:
Похожие книги на «Embedded Linux development using Eclipse»
Представляем Вашему вниманию похожие книги на «Embedded Linux development using Eclipse» списком для выбора. Мы отобрали схожую по названию и смыслу литературу в надежде предоставить читателям больше вариантов отыскать новые, интересные, ещё непрочитанные произведения.


Обсуждение, отзывы о книге «Embedded Linux development using Eclipse» и просто собственные мнения читателей. Оставьте ваши комментарии, напишите, что Вы думаете о произведении, его смысле или главных героях. Укажите что конкретно понравилось, а что нет, и почему Вы так считаете.