Doug Abbott - Embedded Linux development using Eclipse
Здесь есть возможность читать онлайн «Doug Abbott - Embedded Linux development using Eclipse» весь текст электронной книги совершенно бесплатно (целиком полную версию без сокращений). В некоторых случаях можно слушать аудио, скачать через торрент в формате fb2 и присутствует краткое содержание. Год выпуска: 2009, ISBN: 2009, Издательство: Elsevier, Жанр: Программирование, ОС и Сети, Программы, на английском языке. Описание произведения, (предисловие) а так же отзывы посетителей доступны на портале библиотеки ЛибКат.
- Название:Embedded Linux development using Eclipse
- Автор:
- Издательство:Elsevier
- Жанр:
- Год:2009
- ISBN:978-0-7506-8654-9
- Рейтинг книги:4 / 5. Голосов: 1
-
Избранное:Добавить в избранное
- Отзывы:
-
Ваша оценка:
Embedded Linux development using Eclipse: краткое содержание, описание и аннотация
Предлагаем к чтению аннотацию, описание, краткое содержание или предисловие (зависит от того, что написал сам автор книги «Embedded Linux development using Eclipse»). Если вы не нашли необходимую информацию о книге — напишите в комментариях, мы постараемся отыскать её.
• Overview of the latest C/C++ Development toolkit
• Includes case studies of eclipse use including Monta Vista, LynuxWorks, and WindRiver
Embedded Linux development using Eclipse — читать онлайн бесплатно полную книгу (весь текст) целиком
Ниже представлен текст книги, разбитый по страницам. Система сохранения места последней прочитанной страницы, позволяет с удобством читать онлайн бесплатно книгу «Embedded Linux development using Eclipse», без необходимости каждый раз заново искать на чём Вы остановились. Поставьте закладку, и сможете в любой момент перейти на страницу, на которой закончили чтение.
Интервал:
Закладка:
Filter pools are associated with profiles and then referenced by connections. To create a new filter pool, right-click on Sftp Files and select New→Filter Pool…Give it a name, “My New Pool,” perhaps. At this point there should be only one profile to which it can be attached named for your host computer. Click Finishand the new pool shows up under Sftp Files. You can now create new filters to add to this pool.
You might want to make your new filter pool visible to the second connection we created earlier. Right-click on the Sftp Files entry of your second connection and select New→Filter Pool Reference→→My New Pool. The new pool is now visible in your second connection.
6.2.3 Profiles
Profiles are the “big picture,” so to say, a way of tying everything together. RSE resources such as connections, filter pools, and other artifacts are owned by a profile. Figure 6.9 schematically illustrates how these elements tie together. Profiles are a useful tool for managing resources when you have a lot of connections.
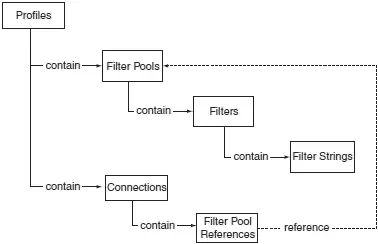
Figure 6.9: The role of profiles.
RSE creates an initial profile when it’s started for the first time, usually named after the host name of the machine that creates the workspace. This profile is considered private and can’t be deleted or made inactive. All of the objects we’ve created so far have gone into this profile.
Profiles are managed from the Team view, which should currently look something like Figure 6.10. You should see three connections: your local host, and two connections to a remote target.
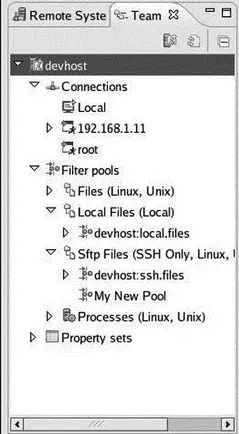
Figure 6.10: RSE Team view.
Creating a new profile is trivial. Click the New profileicon in the Team view menu. All you have to do is give it a name and decide whether or not to make it active. Click Finishand the new profile immediately shows up in the Team view. The new profile has Connections and Filter pool entries, but of course, they’re currently empty.
Now whenever you create a connection or a filter pool you have a choice of which profile to put it in.
6.2.4 Debugging With a Remote Connection
With a remote connection established, we’ll use the record_sort project to illustrate how to set up a remote debug configuration. Initially, you have to copy the application executable, record_sort, to a location on the remote target. My Home seems like a good place. The main reason for doing this is so you can change the permissions to make the file executable. Eclipse will, in fact, download the executable to the target when you click Debug, but if the file doesn’t already exist, oddly enough it won’t be created with execute permission. While you’re at it, copy datafileto the target as well.
Now go back to the C/C++ perspective and open the Debug Configurations dialog for the record_sort project. You’ll find a new configuration type called C/C++ Remote Application. Create a new configuration of this type.
In the Connection drop-down, select your remote connection. Then click Search Project…next to C/C++ Application and select the Debug binary just as you would for a local debug configuration. Now click Browsenext to Remote Absolute File Path for C/C++. This brings up a dialog (Figure 6.11) that lets you specify where the application executable will be downloaded on the remote machine. Expand My Home and select the record_sortexecutable that you just downloaded.
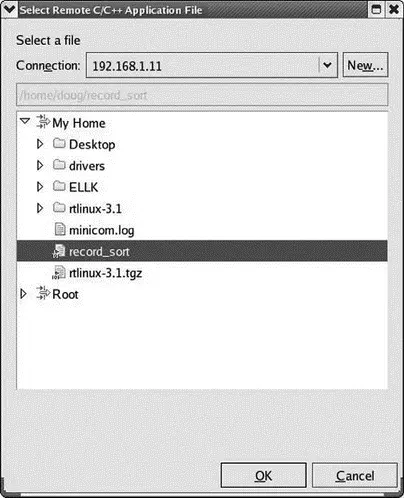
Figure 6.11: Select remote file location.
The Main tab of Debug Configurations now resembles Figure 6.12. Add “datafile” in the Arguments tab. Take a look at the Debugger tab and note that the only choice for Debugger is remote gdb/mi. Also note under Gdbserver Settings, that the default port number is 2345.
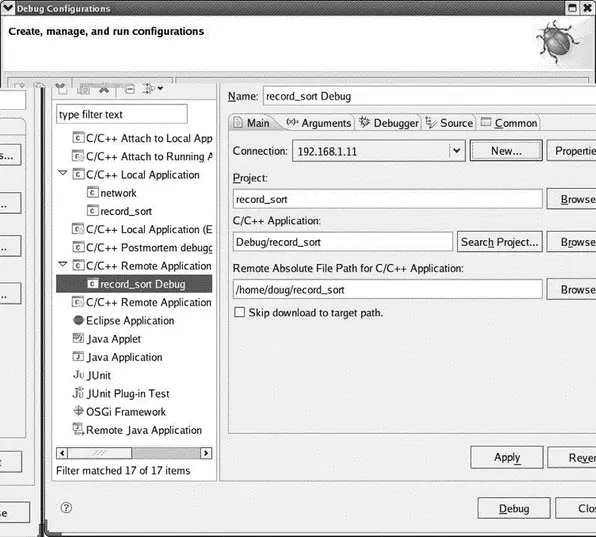
Figure 6.12: Remote debug configuration.
Click Applyand then Debug. Eclipse invokes make all, which may have nothing to do, downloads the executable to the target, starts gdbserver on the target, and switches to the Debug perspective. You’re now debugging on the remote target without having to manually start gdbserver.
6.3 Native Application Builder (NAB)
The goal of the Native Application Builder (NAB) is to enable you to develop platform-independent graphical applications in an intuitive and graphical manner. Conceptually, this is similar to SWT and JFace, except that NAB is written in C++ and is oriented toward developing C++ applications.
NAB makes use of run-time libraries from WideStudio/MWT, an open source project based in Japan. The MWT stands for Multi-platform Widget Toolkit. WideStudio/MWT is described as an “Integrated Development Environment for desktop applications.” Nevertheless, the intention is that applications developed with WideStudio should be able to run on a wide range of embedded platforms simply by recompiling and relinking with the appropriate library. In addition to C/C++, WideStudio supports Java, Perl, Ruby, Python, and Objective Caml (OCaml).
6.3.1 Getting and Installing NAB
There are actually three elements to NAB:
1. The NAB Eclipse plug-in itself
2. WideStudio
3. JDK, the Java 2 software development kit
These elements need to be installed in the reverse order that they’re listed above. That is, JDK should be installed first. Go to http://www.java.sun.com/javase/downloads/index.jsp and click Download for JDK 6 Update 7(or whatever is the latest update at the time). On the next page select Linux as your platform (unless you’re running Eclipse under Windows), agree to the Java SE Development Kit 6 License Agreement, and click Continue. You are then presented with a choice of downloading a self-extracting binary or a self-extracting RPM. I chose the binary.
Move the resulting .binfile to the directory where you want to install it. I chose /usr/local/. Then execute it. The binary code license is displayed, and you are prompted to agree to its terms. The JDK files are installed in a directory called jdk1.6.0_in the current directory.
The DSDP-NAB project downloads page has a link to the WideStudio MWT libraries package, which happens to be hosted at http://www.sourceforge.net/.
Download the file, and then follow these instructions to install it:
1. Copy the *.tar.gzfile to the directory where you want to build it.
2. cdto that directory.
3. cd ws-v3.97-12/src
4. ./configure
5. make runtime
6. export JAVA_HOME=JDK_install_directory
7. make mwt_java
8. su
9. make install
10. Add /usr/local/libto the LD_LIBRARY_PATHenvironment variable.
11. Add /usr/local/ws/bin [7] Regardless of where you chose to build the package, the MWT runtimes get installed in /usr/local by default.
to your PATH
Step 6 is necessary if, like me, you have an older version of the JDK lurking in the default location.
Читать дальшеИнтервал:
Закладка:
Похожие книги на «Embedded Linux development using Eclipse»
Представляем Вашему вниманию похожие книги на «Embedded Linux development using Eclipse» списком для выбора. Мы отобрали схожую по названию и смыслу литературу в надежде предоставить читателям больше вариантов отыскать новые, интересные, ещё непрочитанные произведения.


Обсуждение, отзывы о книге «Embedded Linux development using Eclipse» и просто собственные мнения читателей. Оставьте ваши комментарии, напишите, что Вы думаете о произведении, его смысле или главных героях. Укажите что конкретно понравилось, а что нет, и почему Вы так считаете.