Doug Abbott - Embedded Linux development using Eclipse
Здесь есть возможность читать онлайн «Doug Abbott - Embedded Linux development using Eclipse» весь текст электронной книги совершенно бесплатно (целиком полную версию без сокращений). В некоторых случаях можно слушать аудио, скачать через торрент в формате fb2 и присутствует краткое содержание. Год выпуска: 2009, ISBN: 2009, Издательство: Elsevier, Жанр: Программирование, ОС и Сети, Программы, на английском языке. Описание произведения, (предисловие) а так же отзывы посетителей доступны на портале библиотеки ЛибКат.
- Название:Embedded Linux development using Eclipse
- Автор:
- Издательство:Elsevier
- Жанр:
- Год:2009
- ISBN:978-0-7506-8654-9
- Рейтинг книги:4 / 5. Голосов: 1
-
Избранное:Добавить в избранное
- Отзывы:
-
Ваша оценка:
Embedded Linux development using Eclipse: краткое содержание, описание и аннотация
Предлагаем к чтению аннотацию, описание, краткое содержание или предисловие (зависит от того, что написал сам автор книги «Embedded Linux development using Eclipse»). Если вы не нашли необходимую информацию о книге — напишите в комментариях, мы постараемся отыскать её.
• Overview of the latest C/C++ Development toolkit
• Includes case studies of eclipse use including Monta Vista, LynuxWorks, and WindRiver
Embedded Linux development using Eclipse — читать онлайн бесплатно полную книгу (весь текст) целиком
Ниже представлен текст книги, разбитый по страницам. Система сохранения места последней прочитанной страницы, позволяет с удобством читать онлайн бесплатно книгу «Embedded Linux development using Eclipse», без необходимости каждый раз заново искать на чём Вы остановились. Поставьте закладку, и сможете в любой момент перейти на страницу, на которой закончили чтение.
Интервал:
Закладка:
The final step is installing NAB, which doesn’t show up in any of the current software update sites, so you would expect to install it “manually.” This is what the DSDP-NAB download page describes. Unfortunately, it doesn’t work. There are apparently some undocumented dependencies in the NAB plug-in.
A plea for help on the DSDP-NAB newsgroup finally yielded a response that included the link to an NAB update site:
http://download.eclipse.org/dsdp/nab/updates/
Add this to your list of update sites and expand it. You’ll find three entries:
• NAB/MWT for Linux GTK
• NAB/MWT for Win32
• Uncategorized, which expands to:
○ NAB/MWT Plug-in
Select the third item and one of the first two depending on your host platform.
Note: It seems that many, if not most, of the mature Eclipse projects have established update sites, although it’s not always apparent. It may take some serious digging around and asking questions on the relevant newsgroup. As a last resort, see if the following link exists:
http://download.eclipse.org///updates/
where is the name of the project you’re trying to install and is an optional sub-project name.
6.3.2 An NAB Project
After adding the NAB components, you’ll find a new perspective called NAB/MWT that initially looks something like Figure 6.13. The NAB/MWT perspective introduces several new views. You may want to expand Eclipse to full screen in order to see more detail.
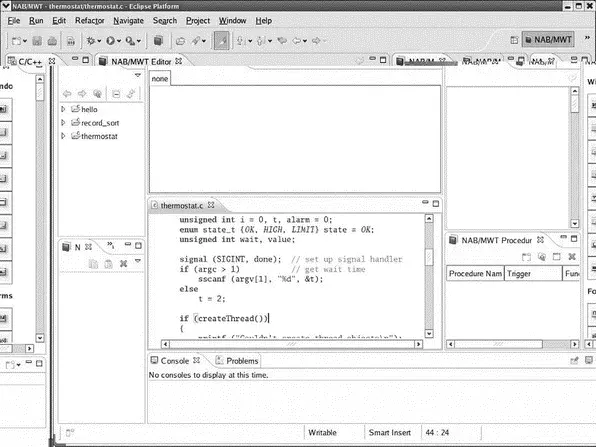
Figure 6.13: Initial NAB/MWT perspective.
Proceeding from left to right, the views are:
• C/C++ Projects: This is virtually identical to the Project Explorer view in the C/C++ perspective. Underneath it are …
• NAB/MWT Tree: Shows the current project’s application windows and their elements, or instances , in tree form.
• NAB/MWT List: For each instance in the Tree view, this view shows the child instances. Moving to the right …
• NAB/MWT Editor: Enables you to visually lay out screen images, known as application windows . Multiple windows are identified by tabs across the top.
• NAB/MWT Properties: Displays and edits the properties of an instance selected in the Editor, Tree, or List.
• NAB/MWT Attributes: Displays and edits the attributes of a selected instance. The only attribute for a variable is Global. A window instance has a Type that identifies it as a Normal window, a Class definition, or an object store that isolates window configuration information in a file.
• NAB/MWT Procedures: Associates event procedures written in a procedural language with instances. A procedure has an arbitrary Procedure name, a Function name by which it is called, and a Trigger that specifies the conditions for calling it.
• NAB/MWT Object Box: Displays icons for all object types and classes implemented by WideStudio/MWT. These are added to an application window by simply dragging them into the Editor.
So let’s create our first NAB project. Select File→New→Projectand you’ll find a new wizard category called NAB. Expand that and select NAB/MWT Project (Figure 6.14). Next, you’re asked to select between C++ and Java as the Programming language. Leave it as C++. Then you give the project a name. Call it “HelloNAB” and click Finish.
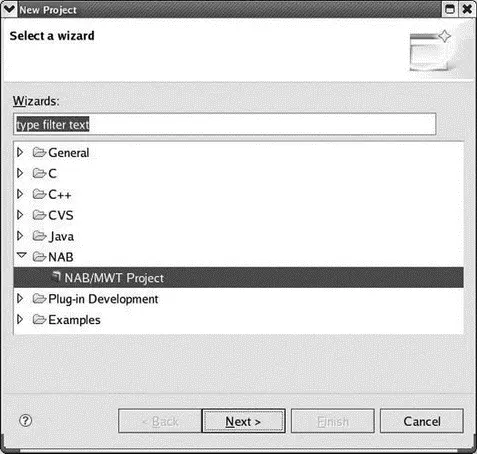
Figure 6.14: Select NAB project wizard.
The new project shows up in the C/C++ Projects view, and already has a number of files including a template .ccp file. In fact, Eclipse went ahead and built the project, although there isn’t anything useful in it yet. Have a look at HelloNAB.cppjust to get a feel for what’s there. Remember that the objective of NAB is to generate programs that make use of the WideStudio/MWT libraries.
Select File→New→Other…. The wizard dialog now has another entry under NAB called NAB/MWT Window. Select that and click Next. The new window gets a name, a class, and a type. For now, leave the defaults and click Finish. The new window shows up in the NAB/MWT Editor and the Properties view shows that it is 400×400 pixels. Add a Title string property. Call it “NAB Application.”
Now we’ll add a button to the window. Find the Commands section in the Object Box view and select the first entry, WSCvbn (Button class). Select that and click somewhere near the upper left corner of the newwin001tab of the Editor. A new button instance is created. Grab a corner of the button and expand it. Note that the Properties view reflects the current location and size of the button, among other things.
Edit the properties (in the Properties view) as follows:
X: 10
Y: 10
Width: 200
Height: 30
Label string: Hello
The result should look like Figure 6.15.
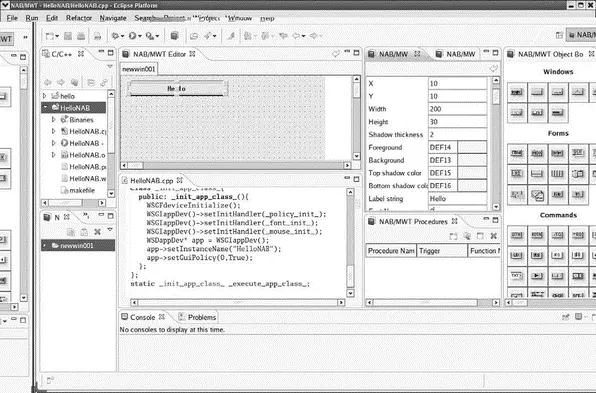
Figure 6.15: Application window in NAB/MWT perspective.
In order for our new button to actually do something, we have to attach it to an event procedure. With the Hello button selected in the Editor, click the Add procedureicon in the Procedures view to bring up the dialog in Figure 6.16. Name the function “hello_button” and select ACTIVATE as the trigger.
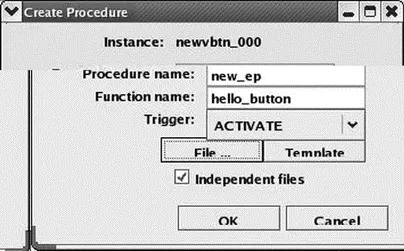
Figure 6.16: NAB Create Procedure dialog.
Clicking OKcreates a new .cpp file with a template for the hello_button()function. In the source code Editor, enter the following line in the hello_button()function:
object->setProperty(WSNlabelString, "Hello from NAB");
When you save the revised hello_button.cppfile, the project is rebuilt. Now we have a program that does something.
As we have with previous projects, open the Debug Configurations dialog and create a new configuration for this project. The default values should be fine. Click Applyif it’s active and click Debug. The Debug perspective displays an error in an Editor tab saying that no source is available for “main()”. That’s because main()is supplied by the WideStudio/MWT library. That’s OK, because we’re not interested in debugging main().
Click the Resumeicon. The application window with the Hello button shows up (Figure 6.17). When you click the button, the label changes to the string you set in the hello_button()function.
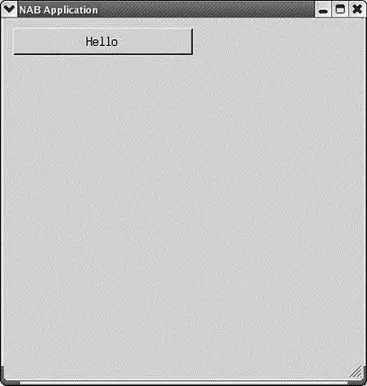
Figure 6.17: The running application window.
Granted this is not a very exciting application, but it does serve to illustrate the fundamental capabilities of NAB. You can easily build and test the GUI elements of an embedded application on your host and then move it over to the target. In a sense, this is a more elaborate version of the simple simulation we did in the previous chapter.
Читать дальшеИнтервал:
Закладка:
Похожие книги на «Embedded Linux development using Eclipse»
Представляем Вашему вниманию похожие книги на «Embedded Linux development using Eclipse» списком для выбора. Мы отобрали схожую по названию и смыслу литературу в надежде предоставить читателям больше вариантов отыскать новые, интересные, ещё непрочитанные произведения.


Обсуждение, отзывы о книге «Embedded Linux development using Eclipse» и просто собственные мнения читателей. Оставьте ваши комментарии, напишите, что Вы думаете о произведении, его смысле или главных героях. Укажите что конкретно понравилось, а что нет, и почему Вы так считаете.