Doug Abbott - Embedded Linux development using Eclipse
Здесь есть возможность читать онлайн «Doug Abbott - Embedded Linux development using Eclipse» весь текст электронной книги совершенно бесплатно (целиком полную версию без сокращений). В некоторых случаях можно слушать аудио, скачать через торрент в формате fb2 и присутствует краткое содержание. Год выпуска: 2009, ISBN: 2009, Издательство: Elsevier, Жанр: Программирование, ОС и Сети, Программы, на английском языке. Описание произведения, (предисловие) а так же отзывы посетителей доступны на портале библиотеки ЛибКат.
- Название:Embedded Linux development using Eclipse
- Автор:
- Издательство:Elsevier
- Жанр:
- Год:2009
- ISBN:978-0-7506-8654-9
- Рейтинг книги:4 / 5. Голосов: 1
-
Избранное:Добавить в избранное
- Отзывы:
-
Ваша оценка:
Embedded Linux development using Eclipse: краткое содержание, описание и аннотация
Предлагаем к чтению аннотацию, описание, краткое содержание или предисловие (зависит от того, что написал сам автор книги «Embedded Linux development using Eclipse»). Если вы не нашли необходимую информацию о книге — напишите в комментариях, мы постараемся отыскать её.
• Overview of the latest C/C++ Development toolkit
• Includes case studies of eclipse use including Monta Vista, LynuxWorks, and WindRiver
Embedded Linux development using Eclipse — читать онлайн бесплатно полную книгу (весь текст) целиком
Ниже представлен текст книги, разбитый по страницам. Система сохранения места последней прочитанной страницы, позволяет с удобством читать онлайн бесплатно книгу «Embedded Linux development using Eclipse», без необходимости каждый раз заново искать на чём Вы остановились. Поставьте закладку, и сможете в любой момент перейти на страницу, на которой закончили чтение.
Интервал:
Закладка:
The core of a plug-in is Java code, so in order to develop truly useful plug-ins, you’ll need to know Java. This book is not the place to learn it. The Resources section at the end of the chapter can point you to Java resources.
With the release of version 3.0, Eclipse adopted the OSGi [8] OSGi originally stood for Open Services Gateway initiative. At some point that term was dropped, and now the organization and its specifications are simply referred to as OSGi.
framework for modular, dynamic, Java components. The OSGi framework defines a dynamic component model that allows applications or components, in the form of “bundles,” to be remotely installed, started, stopped, updated, and uninstalled without requiring a system reboot. An Eclipse plug-in is the equivalent of an OSGi bundle.
7.2.1 Extensions and Extension Points
Fundamentally, extensions and extension points are how plug-ins communicate with the Eclipse platform and with each other. Conceptually, you can think of an extension point as a socket and an extension as a plug that mates with the socket.
Extension points define places where the Eclipse platform can be extended by plugging in additional functionality in the form of extensions. The current Eclipse platform exposes around 200 extension points in the following categories:
• Platform Runtime: Controls the global behavior of Eclipse itself. If you wanted to write an application based on the Eclipse platform, this is the place to start.
• Workspace: Contains extension points for managing projects, such as resource builders (build tools), markers, project life-cycle behavior, and team behavior.
• Platform Text: Facilities for extending editors.
• Workbench: Manages the user interface. This is the largest class of extension points and includes things like support for new views and editors, key bindings, drag-and-drop operations, and additional panels in the Preferences dialog.
• Team: Extension points to manage sharing of project resources, such as folders and files, among team members.
• Debug: Controls application launching as well as debugging. Includes extension points for both behavior and user interface functionality.
• Console: A set of three extension points for managing console views.
• User Assistance(in other words, Help): Facilities to extend the Eclipse Help engine. You can add new HTML help pages and cheat sheets, extend the table of contents, and access the search engine.
• Language Toolkit: Extension points that support refactoring.
• Other: Provides access to the underlying Ant infrastructure. Facilities include read-only content viewers and specialized search pages.
The Platform Plug-in Developer Guide in the Eclipse online documentation provides a thorough description of all the extension points and this is, in fact, the best place to get familiar with what the various extension points represent.
Extensions in turn provide the additional functionality that plugs into the extension points. This is what plug-ins generally do. They extend Eclipse functionality by “plugging in” to extension points.
7.2.2 MANIFEST.MF and plugin.xml
In Eclipse terminology, plug-ins are defined by two files, MANIFEST.MFand plugin.xml. The MANIFEST.MFfile identifies the plug-in by name, version, and so on. The plugin.xml file defines the extensions and extension points that this plug-in provides. This is how the plug-in gets linked into the Eclipse platform environment.
Ultimately, MANIFEST.MFand plugin.xmlget packaged along with the Java code in a Java archive (.jar) file.
7.2.3 Naming Conventions
You’ve probably noticed by now that all of the Eclipse plug-ins have rather long names of the form org.eclipse.._.jar. This is a naming convention that assures that all Java packages, or in this case Eclipse plug-ins, are unique. Eclipse requires that all plug-ins have a name that is unique throughout the world.
The name begins with a top-level Internet domain, such as .com, .org, .edu, etc., or one of the two-letter codes that identify a country outside the United States. The next element is a domain name representing the organization that wrote and/or maintains the package. Subsequent components of the name are specified by the organization and may include elements such as division, department, project, and so on.
For Eclipse the next component of the name is a component such as core, ui, or debug, or a subproject such as cdt, jtk, or pde. This is usually followed by the element of the component or subproject. Then comes the underscore followed by a version number. This is followed by another underscore, a “v”, and the date the package was built.
The convention further suggests that the Eclipse project name should match the plug-in name up to the first underscore.
7.3 Our First Plug-In
As a way to get started with writing plug-ins, we’ll create a simple workbench view that just lists all views available in the workbench at run-time. You might think of it as a “super view” so that’s what we’ll call it: SuperView. While it doesn’t really do a lot, it does illustrate most of the basic principles involved in using PDE.
7.3.1 Creating a Plug-In Project
Like every other project, building a plug-in starts by creating a project. Select File→New Project. Find and expand the Plug-in Developmentcategory and select Plug-in Projectas shown in Figure 7.1.
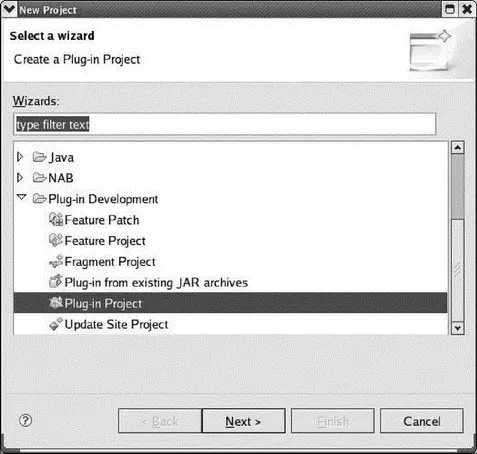
Figure 7.1: Project selection wizard.
This brings up the dialog shown in Figure 7.2. Again, like every other project, we have to give it a name. In accordance with the Java naming standard, let’s call it com.eclipsebook.superview. There is also an option to choose a target platform, which simply means whether we’re targeting a version of Eclipse, or an OSGi framework like Equinox. In this case, we’ll stick with the 3.4 version of Eclipse to keep things simple.
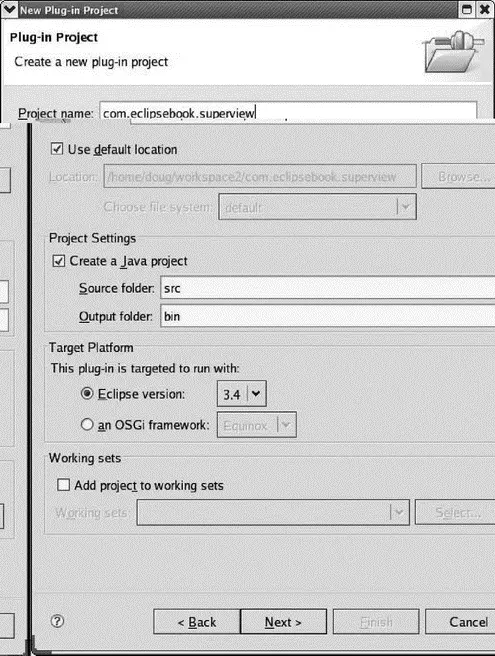
Figure 7.2: Plug-in new project dialog.
The next screen (Figure 7.3), called Plug-in Content, basically identifies the plug-in in the form of properties, and says something about its content. The properties are structured to make the plug-in compliant with Eclipse. All the default values are suitable.
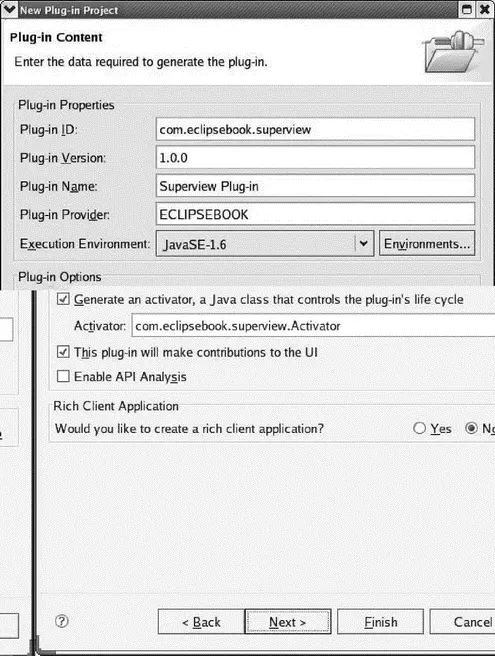
Figure 7.3: Plug-in Content dialog.
The Plug-in ID represents a unique identifier for your plug-in. No other plug-in can share the same identifier. Note that the default value for the ID is the same as the name we used in the previous screen. The Plug-in Version consists of four segments (three integers and a string) respectively named major.minor.service.qualifier . The Plug-in Name is simply a human-readable name. Likewise, the Plug-in Provider is a human-readable string identifying the author of the plug-in, which defaults to the organization field of the name.
There’s an option to generate a plug-in activator, which is simply a class that controls the life cycle of a plug-in; basically a start and stop method. The activator is usually responsible for setting up things and for properly disposing of resources when the plug-in isn’t needed anymore. We’ll also say here that this plug-in makes contributions to the UI.
Читать дальшеИнтервал:
Закладка:
Похожие книги на «Embedded Linux development using Eclipse»
Представляем Вашему вниманию похожие книги на «Embedded Linux development using Eclipse» списком для выбора. Мы отобрали схожую по названию и смыслу литературу в надежде предоставить читателям больше вариантов отыскать новые, интересные, ещё непрочитанные произведения.


Обсуждение, отзывы о книге «Embedded Linux development using Eclipse» и просто собственные мнения читателей. Оставьте ваши комментарии, напишите, что Вы думаете о произведении, его смысле или главных героях. Укажите что конкретно понравилось, а что нет, и почему Вы так считаете.