Doug Abbott - Embedded Linux development using Eclipse
Здесь есть возможность читать онлайн «Doug Abbott - Embedded Linux development using Eclipse» весь текст электронной книги совершенно бесплатно (целиком полную версию без сокращений). В некоторых случаях можно слушать аудио, скачать через торрент в формате fb2 и присутствует краткое содержание. Год выпуска: 2009, ISBN: 2009, Издательство: Elsevier, Жанр: Программирование, ОС и Сети, Программы, на английском языке. Описание произведения, (предисловие) а так же отзывы посетителей доступны на портале библиотеки ЛибКат.
- Название:Embedded Linux development using Eclipse
- Автор:
- Издательство:Elsevier
- Жанр:
- Год:2009
- ISBN:978-0-7506-8654-9
- Рейтинг книги:4 / 5. Голосов: 1
-
Избранное:Добавить в избранное
- Отзывы:
-
Ваша оценка:
Embedded Linux development using Eclipse: краткое содержание, описание и аннотация
Предлагаем к чтению аннотацию, описание, краткое содержание или предисловие (зависит от того, что написал сам автор книги «Embedded Linux development using Eclipse»). Если вы не нашли необходимую информацию о книге — напишите в комментариях, мы постараемся отыскать её.
• Overview of the latest C/C++ Development toolkit
• Includes case studies of eclipse use including Monta Vista, LynuxWorks, and WindRiver
Embedded Linux development using Eclipse — читать онлайн бесплатно полную книгу (весь текст) целиком
Ниже представлен текст книги, разбитый по страницам. Система сохранения места последней прочитанной страницы, позволяет с удобством читать онлайн бесплатно книгу «Embedded Linux development using Eclipse», без необходимости каждый раз заново искать на чём Вы остановились. Поставьте закладку, и сможете в любой момент перейти на страницу, на которой закончили чтение.
Интервал:
Закладка:
In the main menu select Window→Show View→Other. Expand the EclipseBookentry and select SuperView. The new view shows up in the bottom window.
Now that you know what the plug-in does, go back into the Java code and try to figure out how it does it.
Debugging is virtually identical to what we did with CDT. The one “gotcha” here is that there’s no “Stop on main.” This means you must have a breakpoint set before you launch the debug run. Open SuperView.javaif it’s not already open. Now switch to the Debug perspective. This is essentially the same Debug perspective we used for C programming, but now we’re using a Java debugger instead of gdb.
Scroll down to line 24 in SuperView.javathat starts with viewer.setContentProvider…and set a breakpoint just as we did before. Now from the Manifest Editor Overview form, click Launch an Eclipse application in Debug mode. The new Eclipse instance starts as before. Select the SuperViewview as we did above and the program hits the breakpoint (Figure 7.8).
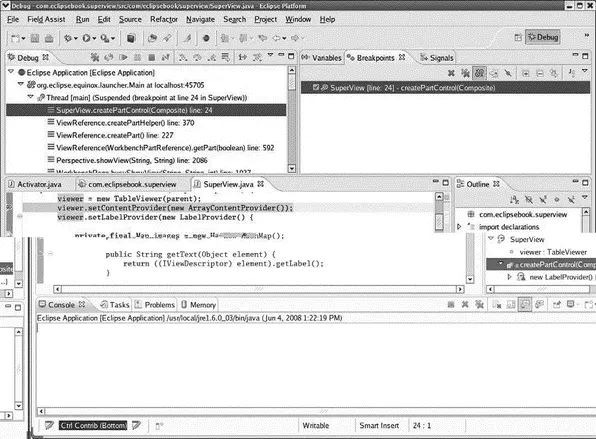
Figure 7.8: Java Debug perspective.
The Debug view shows the call stack with the method containing the breakpoint highlighted. If you select any other frame in the call stack, a window appears in the editor saying that the source is not available. Nevertheless, the local variables for that frame are displayed in the Variables view and the Outline view shows an outline of the corresponding method.
Note, incidentally, that the debug instance of Eclipse is blank and waiting for something to happen. You can step through the createPartControl()method to see what happens, but in fact nothing actually changes on the workbench until after setFocus()is called.
Without going into a lot of detail, let’s take a quick look at what createPartControl()does. First it creates a table-like visual component, a “table viewer,” to display your view’s contents. It then configures the viewer with a content provider and a label provider. The former allows the viewer to navigate your model, or more specifically, to extract your model’s structural elements suitable for inclusion in a table. The latter allows it to convert your model’s elements into table cells with textual labels and optional images.
Then there’s a sorter to display the entries in alphabetical order. Finally, you provide an input source that is an array of descriptors of all views available in the workbench at run-time. Note that we’re providing an implementation of setLabelProvider()here, and we’re overriding the getText()and getImage()methods.
7.4 Building and Exporting a Plug-In
Our plug-in is fully debugged and it’s time to share it with the rest of the world. This requires packaging all of its components in a Java archive (.jar). This, too, is a fairly painless process owing to wizards available to help.
There are three steps to going from a working plug-in to its corresponding .jar file:
• Clean up and organize the manifests.
• Configure the build content.
• Build and export the plug-in.
7.4.1 Clean Up and Organize the Manifests
PDE provides an Organize Manifestswizard to help ensure that the information in your MANIFEST.MFfile is complete and up to date. Among other things, it gives you the opportunity to override and extend options selected in the Manifest Editor.
The Organize Manifestswizard (Figure 7.9) is accessible from the Overview form in the Exportingsection. The various options, which tend to be rather verbose, are:
• Ensure that all packages appear in the MANIFEST.MF: Adds Export-Package declarations for any package in the project that isn’t already exported.
• Mark as internal all packages that match the following filter: Can change the visibility of a package based on its name. The Package filter field is a regular expression that identifies packages to be marked as internal. Internal packages are not available for use by other plug-ins.
• Remove unresolved packages: Removes Export-Package entries that can’t be resolved, probably because they simply don’t exist in the project.
• Calculate ‘uses’ directive for public packages: Does the complex computations for the “uses” directive for packages that other plug-ins have access to. This requires code introspection and can be a lengthy process.
• Handle unresolved dependencies by: Offers the option of removing unresolved dependencies or declaring them as optional. The most common reason a dependency might be unresolved is that an optional plug-in is missing from the configuration.
• Remove unused dependencies: Analyzes the project code for references to unused dependencies, which could result in unnecessary plug-ins being installed at runtime. This can be a time consuming process.
• Add required dependencies: Sort of the complement of the previous option, it looks for dependencies that are not currently included in the manifest. This only finds dependencies for plug-ins listed in the Automated Management of Dependenciessection of the Dependencies form of the Manifest Editor. This can be a time consuming operation.
• Remove unnecessary lazy activation headers: Removes so-called “lazy activation headers” if a Bundle-Activator is not defined. The lazy activation header isn’t necessary if a plug-in has nothing to contribute when it is started.
• Delete unnecessary plug-in manifest files: Removes plugin.xmlfiles if a plug-in doesn’t contribute any extensions or extension points.
• Prefix icon paths in plug-in extensions with a $nl$ segment: Modifies icon paths to allow fragments to contribute unique icons for different locales.
• Remove unused keys from the plug-in’s properties file: Finds and removes unused keys in the properties file.
• In most cases the default values are fine.
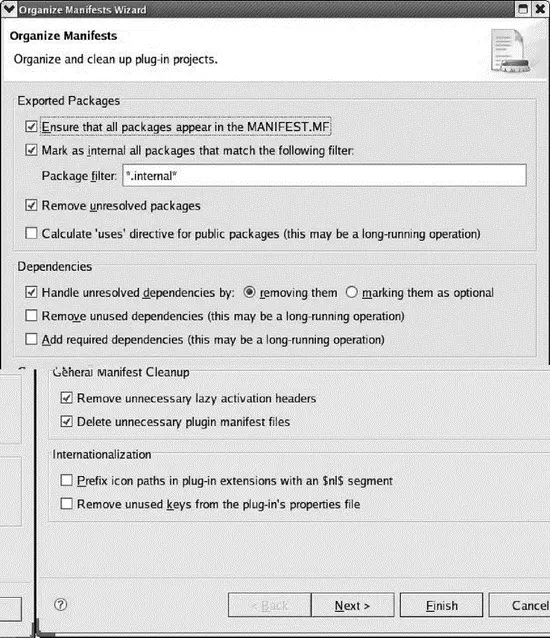
Figure 7.9: Organize Manifests wizard.
7.4.2 Configure Build Content
The file build.propertiesdefines what is included in the final plug-in. Its contents are specified in the Build form of the Manifest Editor shown in Figure 7.10. Again, for now anyway, the defaults are fine.
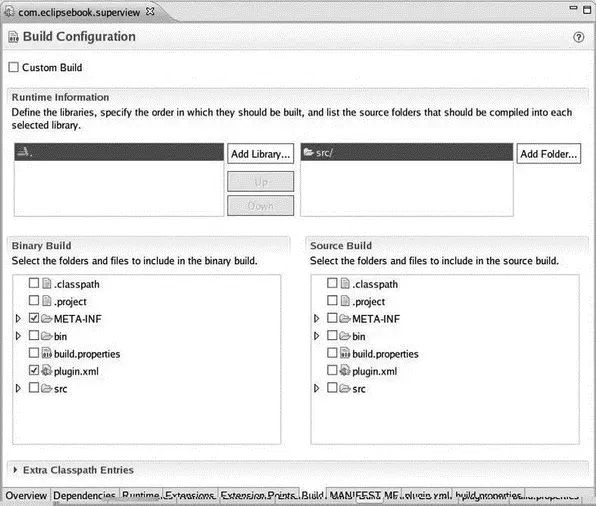
Figure 7.10: Build Configuration.
The Binary Buildis what you specify for building your plug-in. Oddly, the binand srcdirectories are not selected, yet they do show up in the actual text of the build.propertiesfile. The Source Buildis not commonly used or needed by general users. It’s used if you need to ship source in separate plug-ins rather than in the binary plug-ins.
7.4.3 Build and Export
The final step in creating a deployable plug-in is to build the .jarfile and place it somewhere in the file system. The Export Wizardis the last item under Exportingon the Manifest Editor’s Overview form. Clicking that link brings up the dialog in Figure 7.11. The wizard lists the plug-ins that are available to deploy, in this case just our com.eclipsebook.superview project. Check it if it isn’t already checked.
Интервал:
Закладка:
Похожие книги на «Embedded Linux development using Eclipse»
Представляем Вашему вниманию похожие книги на «Embedded Linux development using Eclipse» списком для выбора. Мы отобрали схожую по названию и смыслу литературу в надежде предоставить читателям больше вариантов отыскать новые, интересные, ещё непрочитанные произведения.


Обсуждение, отзывы о книге «Embedded Linux development using Eclipse» и просто собственные мнения читателей. Оставьте ваши комментарии, напишите, что Вы думаете о произведении, его смысле или главных героях. Укажите что конкретно понравилось, а что нет, и почему Вы так считаете.