Doug Abbott - Embedded Linux development using Eclipse
Здесь есть возможность читать онлайн «Doug Abbott - Embedded Linux development using Eclipse» весь текст электронной книги совершенно бесплатно (целиком полную версию без сокращений). В некоторых случаях можно слушать аудио, скачать через торрент в формате fb2 и присутствует краткое содержание. Год выпуска: 2009, ISBN: 2009, Издательство: Elsevier, Жанр: Программирование, ОС и Сети, Программы, на английском языке. Описание произведения, (предисловие) а так же отзывы посетителей доступны на портале библиотеки ЛибКат.
- Название:Embedded Linux development using Eclipse
- Автор:
- Издательство:Elsevier
- Жанр:
- Год:2009
- ISBN:978-0-7506-8654-9
- Рейтинг книги:4 / 5. Голосов: 1
-
Избранное:Добавить в избранное
- Отзывы:
-
Ваша оценка:
Embedded Linux development using Eclipse: краткое содержание, описание и аннотация
Предлагаем к чтению аннотацию, описание, краткое содержание или предисловие (зависит от того, что написал сам автор книги «Embedded Linux development using Eclipse»). Если вы не нашли необходимую информацию о книге — напишите в комментариях, мы постараемся отыскать её.
• Overview of the latest C/C++ Development toolkit
• Includes case studies of eclipse use including Monta Vista, LynuxWorks, and WindRiver
Embedded Linux development using Eclipse — читать онлайн бесплатно полную книгу (весь текст) целиком
Ниже представлен текст книги, разбитый по страницам. Система сохранения места последней прочитанной страницы, позволяет с удобством читать онлайн бесплатно книгу «Embedded Linux development using Eclipse», без необходимости каждый раз заново искать на чём Вы остановились. Поставьте закладку, и сможете в любой момент перейти на страницу, на которой закончили чтение.
Интервал:
Закладка:
Click Finish. If you’re not in the Plug-in Development environment, Eclipse will prompt you to switch to it.
PDE has created a template project for our new plug-in. Views initially visible in the Plug-in Development Perspective include:
• Package Explorer: The Java equivalent of the Project Explorer in CDT. It shows the contents of our new Hello World project.
• Plug-ins: Lists all of the plug-ins presently installed in Eclipse. You can select a plug-in and open it in the…
• Manifest Editor: A form-based multi-page editor that aids in the creation of the plugin.xmland MANIFEST.MFfiles.
• Outline: As in CDT, this view organizes the information in the Manifest Editor in an easily browsable structure.
7.3.2 Plug-In Content
The Manifest Editor initially shows an overview as seen in Figure 7.4. This essentially duplicates the information entered in the Plug-in Content dialog and also includes links to several other tabs in the Manifest Editor and related functionality. Our plug-in will create a new extension that contributes to the Eclipse toolbar and also adds an item to the main menu.
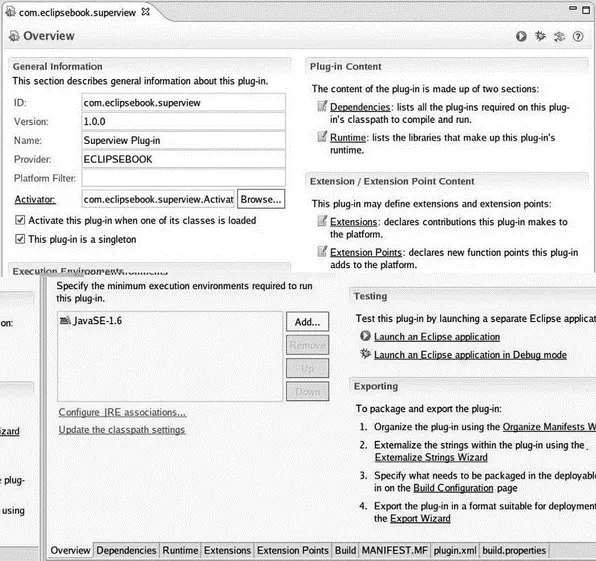
Figure 7.4: Manifest Editor overview tab.
The Dependenciestab specifies what plug-ins and packages this plug-in depends on. Initially the Required Plug-inslist has two entries: org.eclipse.uiand org.eclipse.core.runtime. Just about everything is dependent on these two.
The Imported Packageslist lets you specify packages that your plug-in depends on without identifying the plug-in that contains the package.
Packages are a useful way to specify implementation-independent behavior. Suppose, for example, that your plug-in is dependent on an XML parser. We can implement that parser as a package called com.company.xml.parser. You could then create two plug-ins, say, com.company.xml.parser.mobileand com.company.xml.parser.desktop, each of which implements the same parser package — that is, the same extension points, but for a different environment.
Click the Runtimetab in the Manifest Editor, or click Runtimeunder Plug-in Contentin the Overview form. This lets us specify which packages contained in the plug-in will be made visible to other plug-ins. Any packages not explicitly exported will not be visible externally. Click Add…to see that our plug-in has one package available for export. We don’t really need to export the package, but it doesn’t hurt, so go ahead and select it, and click OK. Now click on the package in the Exported Packages list. The Properties…button lets you set a version for that package.
Normally, exported packages are visible to all “downstream” plug-ins. Nevertheless, you can declare packages to be internal , meaning they’re not necessarily intended for use by downstream plug-ins, but are still visible. Such internal packages can be hidden when Eclipse is started in “strict” mode by selecting the hiddenoption under package visibility. Internal packages can also have “friend” plug-ins that have access to the package even in strict mode.
The Classpathsection lists all locations the runtime will search when loading classes from a plug-in. This is an artifact of earlier Eclipse releases and should normally be left blank. Starting with Eclipse 3.1, plug-ins are packaged as Java archives (.jar) and don’t require an extended classpath.
Click the Extensionstab or click Extensionsin the Extension/Extension Point Contentsection of the Overviewtab. This is where the real functionality of our plug-in is defined. Clicking Add…brings up a list of extension points defined in the plug-ins listed in the Dependenciestab. Here we select the extension points for which our plug-in will provide extensions. Find and select org.eclipse.ui.views. A description of the extension point appears (Figure 7.5). Many extension points also offer one or more templates to provide additional help in structuring the plug-in’s Java code. In this case, we won’t use the template. Click Finish.
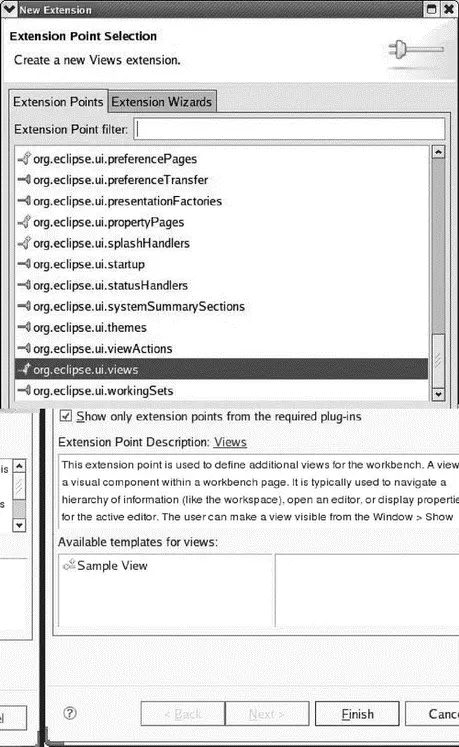
Figure 7.5: Selecting extension points.
Back in the Extensionslist, right-click on the new entry and select New→category (Figure 7.6). Leave the idas is, and change the nameto EclipseBook.
Figure 7.6: Adding a category.
Right-click the extension point entry again and select New→view(Figure 7.7). Change the name to SuperView and add com.eclipsebook.superview.category1to the category to match the id in the category entry. Click the classlink, enter SuperView as the name, and click Finish.
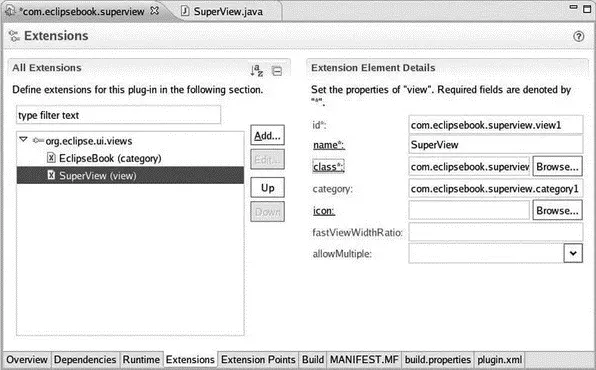
Figure 7.7: Adding a view.
The PDE creates a new class implementing the required interface and opens it in the Java editor. We’ll come back to that in a moment, but for now let’s finish up our tour of the Manifest Editor.
The final product of the Manifest Editor is the two files that constitute the plug-in’s manifest, MANIFEST.MFand plugin.xml. The content of these files is available in tabs of the same names. Have a look. MANIFEST.MFbasically describes the plug-in with the information from the Overview and Dependencies forms. plugin.xmldefines the extensions and extension points that this plug-in provides. In this case, we haven’t defined any extension points.
You can, of course, edit MANIFEST.MFand plugin.xmlmanually, but why? The beauty of PDE is that you don’t need to understand XML or the syntax of MANIFEST.MF, in order to create a plug-in. Some developers even suggest that it is bad practice to manually edit an XML file as this can lead to hard-to-diagnose configuration problems.
Now go back to the Editor tab displaying SuperView.java. Not much here. Just templates for the class constructor and two other functions that are the minimum necessary to extend the view. To get something that works, import the file SuperView.javafrom EclipseSamples/plug-in/to com.eclipsebook.superviewin the Package Explorer. Eclipse asks if you want to overwrite the existing file. Yes, you do.
7.3.3 Running and Debugging a Plug-In
Eclipse and PDE have a notion of self-hosting , which means that we can launch a new instance of Eclipse with plug-ins we’re currently working on, without having to export or deploy any plug-ins. One way to start the new instance is to go back to the Overview form in the Manifest Editor and click on Launch an Eclipse applicationunder Testing. You can also just click on the Run icon in the menu toolbar or, from the top-level project context menu in the Package Explorer view, select Run As→Eclipse Application.
After a little churning, a new instance of Eclipse appears in the default C/C++ perspective. Interestingly, it doesn’t ask for a workspace location. Instead, it creates a workspace in your home directory, called runtime-EclipseApplication.
Читать дальшеИнтервал:
Закладка:
Похожие книги на «Embedded Linux development using Eclipse»
Представляем Вашему вниманию похожие книги на «Embedded Linux development using Eclipse» списком для выбора. Мы отобрали схожую по названию и смыслу литературу в надежде предоставить читателям больше вариантов отыскать новые, интересные, ещё непрочитанные произведения.


Обсуждение, отзывы о книге «Embedded Linux development using Eclipse» и просто собственные мнения читателей. Оставьте ваши комментарии, напишите, что Вы думаете о произведении, его смысле или главных героях. Укажите что конкретно понравилось, а что нет, и почему Вы так считаете.