Doug Abbott - Embedded Linux development using Eclipse
Здесь есть возможность читать онлайн «Doug Abbott - Embedded Linux development using Eclipse» весь текст электронной книги совершенно бесплатно (целиком полную версию без сокращений). В некоторых случаях можно слушать аудио, скачать через торрент в формате fb2 и присутствует краткое содержание. Год выпуска: 2009, ISBN: 2009, Издательство: Elsevier, Жанр: Программирование, ОС и Сети, Программы, на английском языке. Описание произведения, (предисловие) а так же отзывы посетителей доступны на портале библиотеки ЛибКат.
- Название:Embedded Linux development using Eclipse
- Автор:
- Издательство:Elsevier
- Жанр:
- Год:2009
- ISBN:978-0-7506-8654-9
- Рейтинг книги:4 / 5. Голосов: 1
-
Избранное:Добавить в избранное
- Отзывы:
-
Ваша оценка:
Embedded Linux development using Eclipse: краткое содержание, описание и аннотация
Предлагаем к чтению аннотацию, описание, краткое содержание или предисловие (зависит от того, что написал сам автор книги «Embedded Linux development using Eclipse»). Если вы не нашли необходимую информацию о книге — напишите в комментариях, мы постараемся отыскать её.
• Overview of the latest C/C++ Development toolkit
• Includes case studies of eclipse use including Monta Vista, LynuxWorks, and WindRiver
Embedded Linux development using Eclipse — читать онлайн бесплатно полную книгу (весь текст) целиком
Ниже представлен текст книги, разбитый по страницам. Система сохранения места последней прочитанной страницы, позволяет с удобством читать онлайн бесплатно книгу «Embedded Linux development using Eclipse», без необходимости каждый раз заново искать на чём Вы остановились. Поставьте закладку, и сможете в любой момент перейти на страницу, на которой закончили чтение.
Интервал:
Закладка:
Summary
This chapter has introduced the basic concepts and operation of the C/C++ Development Tools, CDT. We saw how to create a project and looked at the many tools the C Editor offers to ease the task of coding. We examined many of the views in the C/C++ Perspective in detail, to see how they contribute to the development process.
After building the project, we looked at the Debug perspective in detail, with particular emphasis on the many capabilities of breakpoints. We also looked at other views in the Debug perspective to see how they help you gain insight into what’s happening in your program.
Finally, we explored a couple of nifty features of Eclipse that can make life easier for developers. Projects can refer to, and can be dependent on, other projects. When changes are made to the referenced project, the dependent project will be rebuilt. Refactoring offers a way to automatically rename a symbol throughout a project or a set of related projects.
The next chapter goes deeper into CDT. In particular, we’ll look at how to connect a remote embedded target and debug a program on it.
Fowler, Martin, et al. 2002. Refactoring: Improving the design of existing code . Addison-Wesley.
This book takes a task that many programmers do intuitively and recasts it in a formal methodology.
CHAPTER 5
Eclipse CDT — Digging Deeper
The last chapter covered the basics of the C/C++ Developer Tools: basically how to create, build, debug, and run projects. In this chapter we’ll get into more advanced concepts, such as supplying your own makefile and connecting CDT to a remote embedded target.
The project we’ll be using in this chapter is called “thermostat.” It simulates the operation of a thermostat controlling a cooler. When the indicated temperature rises above the setpoint, the cooler turns on. If the temperature exceeds a limit value, an alarm indicator flashes. The thermostat can also be built for an ARM-based embedded target board.
A separate program provides a means to set the indicated temperature and to observe the cooler and alarm outputs.
5.1 User-Supplied Makefiles
In the last chapter we created a project where Eclipse supplied the Makefile. But there are situations where it makes more sense to create the Makefile yourself and import it into the project along with the source files. This is also useful for bringing “legacy” projects into Eclipse that already have a makefile.
In the C/C++ perspective, create a new C project ( File→New→C Project) but this time select Makefile Project as shown in Figure 5.1. Call the project “thermostat.” Eclipse creates an empty project with an Includes entry and attempts to build the “all” target. Since the project is empty, there is no “all” target and the build fails.
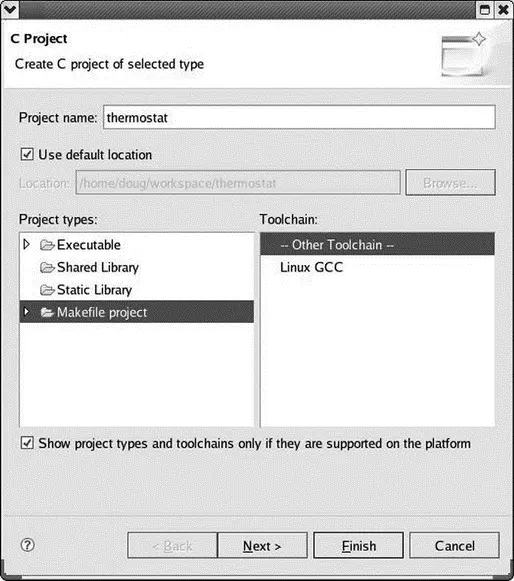
Figure 5.1: Makefile Project.
Right-click thermostatin the Project Explorer and select Import→General→File System. Browse to the EclipseSamples/thermostatdirectory and click OK. Now click Select Alland Finishas shown in Figure 5.2 to import the entire collection of source files into your thermostat project. Eclipse again attempts to build the “all” target and oddly, it fails even though the Makefile does in fact include an “all” target.
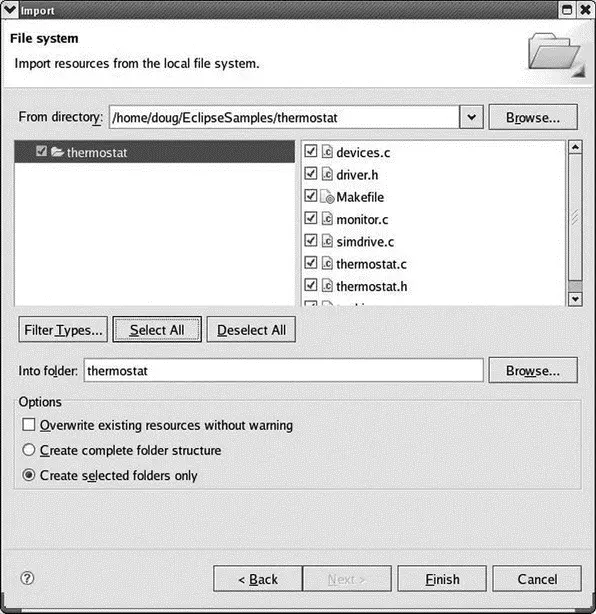
Figure 5.2: Import File System dialog.
Right-click thermostatand select Build Configurations→Build→All. This time Eclipse builds an executable target called thermostat_s(“s” for simulation).
5.1.1 Make Targets
Open the Makefile in the Editor window. You’ll notice that it builds three different targets, one of which is intended to run on an embedded computer board.
By default, the only thing CDT knows how to make is “all.” In this case, “all” can be one of two targets depending on the environment variable TARGET. Then there’s an additional build target for the simulated devices program. We have to tell Eclipse about these additional targets.
In the right-hand tabbed window, select the Make Targetview and right click on the thermostat entry, which brings up a context menu as shown in Figure 5.3. Select Add Make Target, which is probably the only selection currently enabled. That brings up the Create a new Make targetdialog shown in Figure 5.4.
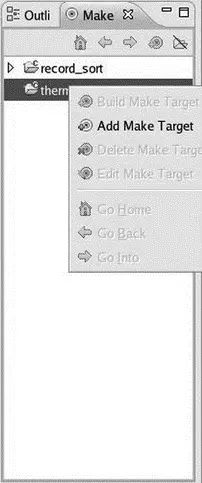
Figure 5.3: Make Target view.
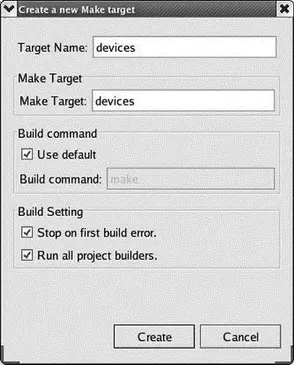
Figure 5.4: Create make target dialog.
Fill it out as shown in Figure 5.4 and click Create. There is now a new entry under thermostat in the Make Target view named “devices.” Right-click that entry and select Build Make Target. The devicesprogram builds.
Like most operations in Eclipse, there are several ways to create a Make target. With the thermostat project name highlighted in either the Make Targetor Project Explorerviews, select Project→Make Target→Create…. Enter the Target Nameas “target” and the Make Targetas “all.” Uncheck the Use defaultbox and add “TARGET=1” after make in the Build commandbox.
This target will only build if you happen to have an ARM-Linux tool chain. More on that later in the chapter.
5.2 Thermostat Internals
Let’s take a closer look at how the thermostat program is organized before we run it under the debugger. As shown in Figure 5.5, thermostat consists of three modules:
• thermostat.c— The main()function that implements the thermostat state machine and outputs the current temperature to stdout. main()takes a run-time argument that is the delay between samples in seconds. The default is two seconds.
• simdrive.c— A set of simulated device driver functions for an A to D converter and digital output.
• monitor.c— A separate thread that monitors the keyboard for operator input to change the thermostat operating parameters — setpoint, limit, and deadband.
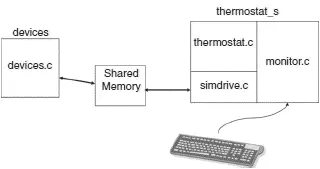
Figure 5.5: Simulated thermostat.
simdriveuses a shared memory region to communicate with the simulated devicesprogram. devices uses the ncurses library to create a pseudo-graphical user interface. It just reads A/D input values entered by the user and depends on a signal sent by thermostat_sto indicate a change in one of the output bits. Entering a non-numeric value for the A/D terminates the program.
The command syntax for changing parameter values is fairly simple. It’s just a single lower case letter followed by a number:
• s — setpoint
• l — limit
• d — deadband
The monitor thread just sets the new value into the corresponding global variable. Although it’s probably not strictly necessary in this case, access to the global variables is protected by a mutex because that’s the right thing to do.
Читать дальшеИнтервал:
Закладка:
Похожие книги на «Embedded Linux development using Eclipse»
Представляем Вашему вниманию похожие книги на «Embedded Linux development using Eclipse» списком для выбора. Мы отобрали схожую по названию и смыслу литературу в надежде предоставить читателям больше вариантов отыскать новые, интересные, ещё непрочитанные произведения.


Обсуждение, отзывы о книге «Embedded Linux development using Eclipse» и просто собственные мнения читателей. Оставьте ваши комментарии, напишите, что Вы думаете о произведении, его смысле или главных героях. Укажите что конкретно понравилось, а что нет, и почему Вы так считаете.