Doug Abbott - Embedded Linux development using Eclipse
Здесь есть возможность читать онлайн «Doug Abbott - Embedded Linux development using Eclipse» весь текст электронной книги совершенно бесплатно (целиком полную версию без сокращений). В некоторых случаях можно слушать аудио, скачать через торрент в формате fb2 и присутствует краткое содержание. Год выпуска: 2009, ISBN: 2009, Издательство: Elsevier, Жанр: Программирование, ОС и Сети, Программы, на английском языке. Описание произведения, (предисловие) а так же отзывы посетителей доступны на портале библиотеки ЛибКат.
- Название:Embedded Linux development using Eclipse
- Автор:
- Издательство:Elsevier
- Жанр:
- Год:2009
- ISBN:978-0-7506-8654-9
- Рейтинг книги:4 / 5. Голосов: 1
-
Избранное:Добавить в избранное
- Отзывы:
-
Ваша оценка:
Embedded Linux development using Eclipse: краткое содержание, описание и аннотация
Предлагаем к чтению аннотацию, описание, краткое содержание или предисловие (зависит от того, что написал сам автор книги «Embedded Linux development using Eclipse»). Если вы не нашли необходимую информацию о книге — напишите в комментариях, мы постараемся отыскать её.
• Overview of the latest C/C++ Development toolkit
• Includes case studies of eclipse use including Monta Vista, LynuxWorks, and WindRiver
Embedded Linux development using Eclipse — читать онлайн бесплатно полную книгу (весь текст) целиком
Ниже представлен текст книги, разбитый по страницам. Система сохранения места последней прочитанной страницы, позволяет с удобством читать онлайн бесплатно книгу «Embedded Linux development using Eclipse», без необходимости каждый раз заново искать на чём Вы остановились. Поставьте закладку, и сможете в любой момент перейти на страницу, на которой закончили чтение.
Интервал:
Закладка:
• Pass this signal to the program.
• Suspend the program when this signal happens.
If both boxes are checked, the program is suspended before the signal is passed to the program. Resuming the program then allows the signal handler to be executed. With the Pass box checked and the Suspend box unchecked, the signal handler is executed first, and then oddly enough, the debugger catches the signal later. Try it with thermostat and you’ll see that Thread [1] is suspended in the pthread_cancel()call inside terminateThread().
5.4 Working With Embedded Target Hardware
While the simulated thermostat is a useful way to illustrate many Eclipse concepts, and it can help you start testing software before the target hardware is ready, eventually you’ll need to test your program on real hardware. Eclipse has facilities to support that process.
5.4.1 System Requirements
The following hardware and software components are required in order to work through the example in this section:
• Target embedded computer board with network and serial ports. The example here is based on a board available from Intellimetrix. See Appendix B, “The Embedded Linux Learning Kit,” for details on this board and how to obtain it. A nice feature of this board is that it includes a temperature sensor for the thermostat example.
• Serial and network ports on the host workstation.
• GCC cross tool chain for the target board.
• NFS server running on the host machine.
• minicom terminal emulator for communicating with the target board’s serial port.
• TFTP server is useful but not required.
All of the software components with the exception of the cross tool chain should be part of any decent Linux distribution. The tool chain should be available from the target board vendor.
The other approach to a target environment for the purpose of this chapter is to make use of an old 486 box that’s sitting in the closet or serving as a doorstop. Put a network card in the box and install Linux on it. Redirect stdin, stdout, and stderrto a serial port. In this case you don’t need a cross compiler. The one you’ve been using is quite sufficient.
5.4.2 The Cross-Development Environment
Very often a target board stores its root file system in a non-volatile or “semi-volatile” medium such as flash memory. This can make it difficult and time-consuming to load executable images onto the target for testing. This is especially true in early stages of testing, where the edit-compile-debug cycle turns rapidly.
The development paradigm we’ll follow here makes use of the Network File System (NFS) to remotely mount part (or even all) of the target’s file system on the host workstation. Then we simply put our target executables in a location on the host that’s visible to the target, which then loads the image off the host and executes it.
Figure 5.8 illustrates the process graphically. The /home directory on the target is remotely mounted through NFS to ~/workspace, the default Eclipse workspace. Now all the project subdirectories of ~/workspaceon the host show up as subdirectories of /homeon the target. The serial port serves as the target shell’s console communicating with the minicom terminal emulator running on the host. Technically, you could telnet to the target shell and get by without the serial port, but in many cases a serial port is still necessary to communicate with the target’s boot loader.
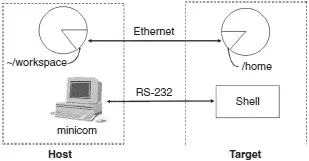
Figure 5.8: Cross-development paradigm.
5.4.3 Host Configuration
There are three aspects to configuring the host workstation for target development:
1. Install the GNU cross tool chain. The supplier of the tool chain should provide instructions and/or scripts for this. If your target is a PC, this step isn’t required.
2. Configure the terminal emulator, minicom.
3. Configure networking.
minicomis a fairly simple Linux application that emulates a dumb RS-232 terminal through a serial port. This is what we’ll use to communicate with the Linux system running on the target board.
There are a number of minicom configuration options that we need to change to facilitate communication with the target.
In a shell window as root user, enter the command minicom –s. If you’re running minicom for the first time you may see the following warning message:
WARNING: Configuration file not found. Using defaults
You will be presented with a configuration menu. Select Serial port setup (Figure 5.9). By default, minicomcommunicates through the modem device, /dev/modem. We need to change that to talk directly to one of the PC’s serial ports. Type “A” and replace the word “modem” with either “ttyS0” or “ttyS1”, where ttyS0 represents serial port COM1 and ttyS1 represents COM2. However, if your host only has USB ports and you’re using a USB-to-serial converter, the correct device is most likely “ttyUSB0.”
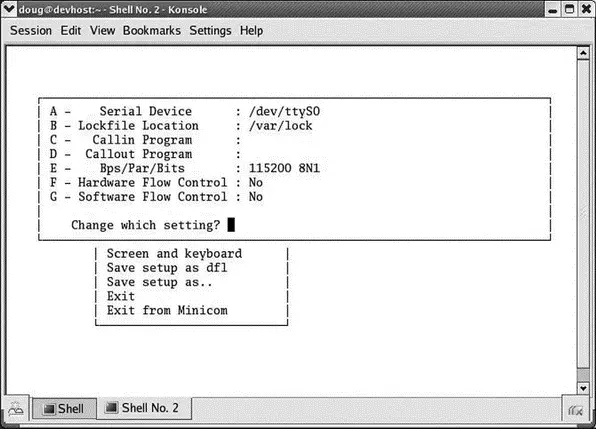
Figure 5.9: minicom serial port setup.
You’ll need to change the data rate (bps) to match your target board. Chances are you won’t want either hardware or software flow control.
Type Enterto exit Serial port setup and then select Modem and dialing. Here we want to delete the modem’s Init string and Reset string since they’re just in the way on a direct serial connection. Type “A” and backspace through the entire Init string. Type “B” and do the same to the Reset string.
Type Enterto exit Modem and dialing. In the Screen and keyboard menu, you may need to change the backspace behavior for shell line editing to work correctly. Finally, select Save setup as dflto save the configuration.
You will probably have to change the permissions on the device node for the selected serial port to allow the group and world to read and write the device. And of course, you must be root user to do this.
Your workstation is probably configured to get a network address via DHCP (Dynamic Host Configuration Protocol). But in this case, to keep things simple, we’re going to specify fixed IP addresses for both ends. This is particularly useful if you choose to directly connect the workstation to the target using an Ethernet crossover cable.
If you’re using KDE, there’s a nice graphical menu for changing network parameters. How you get to that menu from the Start menu varies depending on the distribution. The two variants I’ve seen so far are System→Network Configurationand System Settings→Network. You’ll be asked for the root password.
The actual layout of the dialog boxes will vary by distribution. You should find a Devicestab and then be able to edit the entry for your Ethernet device, which is probably eth0. The edit dialog allows you to select between “Automatically obtain IP address settings” and “Statically set IP addresses.” Select the latter and assign an address. I usually assign 192.168.1.2 to the workstation. The dialog from Red Hat Enterprise Linux 4 is shown in Figure 5.10.
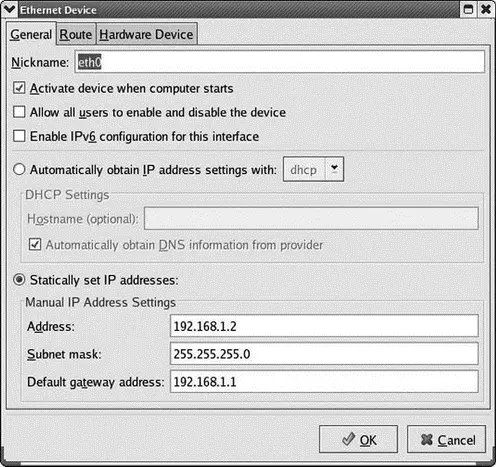
Figure 5.10: Ethernet configuration dialog.
Читать дальшеИнтервал:
Закладка:
Похожие книги на «Embedded Linux development using Eclipse»
Представляем Вашему вниманию похожие книги на «Embedded Linux development using Eclipse» списком для выбора. Мы отобрали схожую по названию и смыслу литературу в надежде предоставить читателям больше вариантов отыскать новые, интересные, ещё непрочитанные произведения.


Обсуждение, отзывы о книге «Embedded Linux development using Eclipse» и просто собственные мнения читателей. Оставьте ваши комментарии, напишите, что Вы думаете о произведении, его смысле или главных героях. Укажите что конкретно понравилось, а что нет, и почему Вы так считаете.