Chris Tyler - Fedora Linux
Здесь есть возможность читать онлайн «Chris Tyler - Fedora Linux» весь текст электронной книги совершенно бесплатно (целиком полную версию без сокращений). В некоторых случаях можно слушать аудио, скачать через торрент в формате fb2 и присутствует краткое содержание. Год выпуска: 2006, ISBN: 2006, Издательство: O'Reilly, Жанр: ОС и Сети, на английском языке. Описание произведения, (предисловие) а так же отзывы посетителей доступны на портале библиотеки ЛибКат.

- Название:Fedora Linux
- Автор:
- Издательство:O'Reilly
- Жанр:
- Год:2006
- ISBN:978-0-596-52682-5
- Рейтинг книги:5 / 5. Голосов: 1
-
Избранное:Добавить в избранное
- Отзывы:
-
Ваша оценка:
Fedora Linux: краткое содержание, описание и аннотация
Предлагаем к чтению аннотацию, описание, краткое содержание или предисловие (зависит от того, что написал сам автор книги «Fedora Linux»). Если вы не нашли необходимую информацию о книге — напишите в комментариях, мы постараемся отыскать её.
Fedora Linux: A Complete Guide to Red Hat's Community Distribution In this book, you'll learn how to:
Install Fedora and perform basic administrative tasks
Configure the KDE and GNOME desktops
Get power management working on your notebook computer and hop on a wired or wireless network
Find, install, and update any of the thousands of packages available for Fedora
Perform backups, increase reliability with RAID, and manage your disks with logical volumes
Set up a server with file sharing, DNS, DHCP, email, a Web server, and more
Work with Fedora's security features including SELinux, PAM, and Access Control Lists (ACLs)
Whether you are running the stable version of Fedora Core or bleeding-edge Rawhide releases, this book has something for every level of user. The modular, lab-based approach not only shows you how things work - but also explains why--and provides you with the answers you need to get up and running with Fedora Linux.
Fedora Linux — читать онлайн бесплатно полную книгу (весь текст) целиком
Ниже представлен текст книги, разбитый по страницам. Система сохранения места последней прочитанной страницы, позволяет с удобством читать онлайн бесплатно книгу «Fedora Linux», без необходимости каждый раз заново искать на чём Вы остановились. Поставьте закладку, и сможете в любой момент перейти на страницу, на которой закончили чтение.
Интервал:
Закладка:
Use the checkboxes in the Default column to select which operating system will be loaded by default if the user doesn't override the selection at boot time.
It is a good idea to install a bootloader password. Without this, any person with physical access to your machine will be able to easily override all security by booting the system into single-user mode. Click "Use a boot loader password" and then enter your selected password twice when prompted.
The bootloader password is a critical piece of information. Don't lose it!
Click Next to proceed.
1.3.1.9. General questions
If you have not already configured the network, and you have a network adapter installed in your system, the network configuration screen appears next, as shown in Figure 1-24 .
Figure 1-24. Network configuration screen
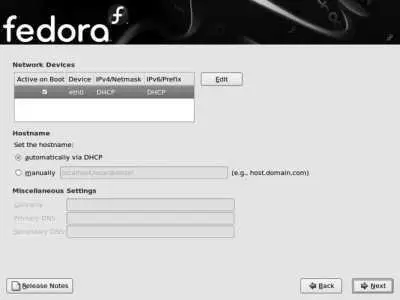
If you have a DHCP server on your networkwhich is the case in most large networks and in most small office and home networks that have a broadband Internet gateway/router devicethen you will only need to change the "Set the hostname" option to "manually" and then enter the hostname of your choice (unless your DHCP server sets the hostname for you). If you have a registered domain, choose a hostname within that domain, such as bluesky.fedorabook.com (which specifies the host bluesky within the domain fedorabook.com ); otherwise, choose a hostname and append .localdomain to the end of the name.
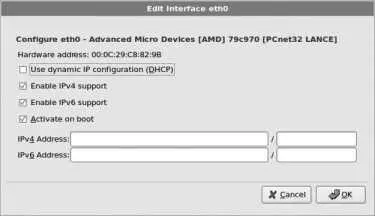
If you do not have a DHCP server on your network, select your primary Ethernet card from the Network Devices list and then click Edit. You will see the Edit interface window shown in Figure 1-25 . Click on the "Configure using DHCP " option to deselect that checkbox, then enter the IP address and netmask. Click OK to save this information, and enter the hostname, gateway, and DNS server information in the blanks provided (it is necessary only to enter a Primary DNS server).
Figure 1-25. Edit interface window
Click Next to proceed to the next step in the installation, which is time zone selection, as shown in Figure 1-26 .
Figure 1-26. Time zone selection
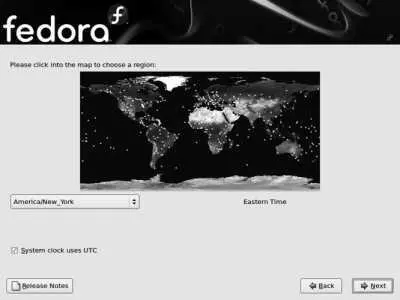
Click on your region of the map to zoom in, and then click on the major city closest to your locationor use the pull-down menu to select your time zone.
You can choose to configure the system's hardware clock to store information in local time or in Coordinated Universal Time (UTC). This is controlled by the checkbox labeled "System clock uses UTC." If you are using multiple operating systems on your computer (dual-boot), to use local time, deselect the checkbox so that the other operating system will interpret the time correctly.
If you are using only Fedora, or Fedora and another distribution of Linux, choose UTC by selecting the checkbox. This will avoid multiple adjustments of the clock when entering or exiting daylight savings time.
Click Next to proceed.
The screen in Figure 1-27 requests that you enter a root password for the system (twice). This is the master system administration password, so be sure to safeguard it against both theft and loss.
Choose passwords that are easy for you to remember but hard for others to guess. One way to do this it to choose a line or verse from a song, poem, book, or play, and use the first letter from each word plus the punctuation marks. For example, from Shakespeare's line "Do you bite your thumb at us, sir?" you would derive the password Dybytau,s?
Figure 1-27. Creating a root password

1.3.1.10. Software selection
The next screen, shown in Figure 1-28 , is used to select the software that will be installed. Use the checkboxes to select the categories of applications that you wish to have installed. To further refine the software selection, select the "Customize now" option; this is recommended if you are installing on a system with minimal disk space or a slow Internet connection.
When installing from DVD or CD, the button labeled "Add additional software repositories" can be used to add a Fedora Updates network repository to ensure that the latest versions of the Fedora Core packages are installed. This can be somewhat faster than installing the disc version of all packages and then updating the software after installation, but it requires a good Internet connection (or local repository). See Lab 5.3, "Using Repositories," for more information.
Figure 1-28. Software selection screen

Click Next to continue. If you selected "Customize now," you will see the screen shown in Figure 1-29 . Otherwise, skip ahead two paragraphs.
Figure 1-29. Software customization screen
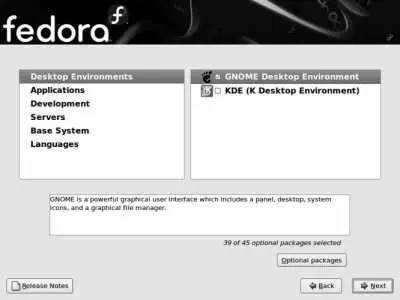
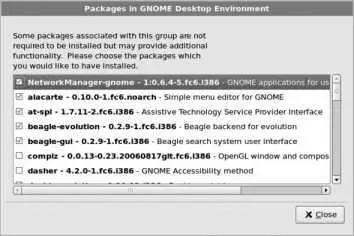
Select a category on the left side to see the package groups within that family on the right side. Use the checkboxes provided to select the groups you want. For even finer control, you can select a package group, click the "Optional packages" button, then select the individual packages you wish to include from the window shown in Figure 1-30 .
Figure 1-30. Optional package selection screen
Click Next to continue. After a short time for dependency processing, the screen shown in Figure 1-31 will appear.
Figure 1-31. Installation confirmation
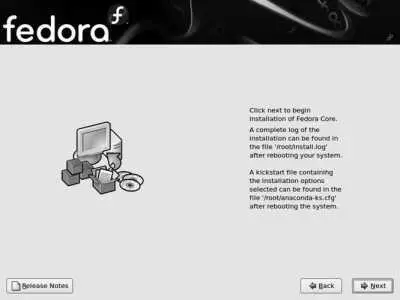
This is the point of no return; once you click Next, the partition table, filesystems, and bootloader will all be modified. Once the installation process begins, it cannot be safely interrupted and must be allowed to run to completion. During the installation, a progress bar similar to the one in Figure 1-32 will be shown.
Bored? You can read the release notes during the installation; just click on the button in the lower-left corner of the screen.
Figure 1-32. Installation progress indicator

When the installation is complete, the confirmation message shown in Figure 1-33 is displayed. Remove the installation boot media, and then click Reboot to start up the new system.
On some systems, you may need to click Reboot and wait for the system to start the boot process before you can remove optical media.
Figure 1-33. Completed installation

1.3.1.11. First boot
Интервал:
Закладка:
Похожие книги на «Fedora Linux»
Представляем Вашему вниманию похожие книги на «Fedora Linux» списком для выбора. Мы отобрали схожую по названию и смыслу литературу в надежде предоставить читателям больше вариантов отыскать новые, интересные, ещё непрочитанные произведения.


Обсуждение, отзывы о книге «Fedora Linux» и просто собственные мнения читателей. Оставьте ваши комментарии, напишите, что Вы думаете о произведении, его смысле или главных героях. Укажите что конкретно понравилось, а что нет, и почему Вы так считаете.