Chris Tyler - Fedora Linux
Здесь есть возможность читать онлайн «Chris Tyler - Fedora Linux» весь текст электронной книги совершенно бесплатно (целиком полную версию без сокращений). В некоторых случаях можно слушать аудио, скачать через торрент в формате fb2 и присутствует краткое содержание. Год выпуска: 2006, ISBN: 2006, Издательство: O'Reilly, Жанр: ОС и Сети, на английском языке. Описание произведения, (предисловие) а так же отзывы посетителей доступны на портале библиотеки ЛибКат.

- Название:Fedora Linux
- Автор:
- Издательство:O'Reilly
- Жанр:
- Год:2006
- ISBN:978-0-596-52682-5
- Рейтинг книги:5 / 5. Голосов: 1
-
Избранное:Добавить в избранное
- Отзывы:
-
Ваша оценка:
Fedora Linux: краткое содержание, описание и аннотация
Предлагаем к чтению аннотацию, описание, краткое содержание или предисловие (зависит от того, что написал сам автор книги «Fedora Linux»). Если вы не нашли необходимую информацию о книге — напишите в комментариях, мы постараемся отыскать её.
Fedora Linux: A Complete Guide to Red Hat's Community Distribution In this book, you'll learn how to:
Install Fedora and perform basic administrative tasks
Configure the KDE and GNOME desktops
Get power management working on your notebook computer and hop on a wired or wireless network
Find, install, and update any of the thousands of packages available for Fedora
Perform backups, increase reliability with RAID, and manage your disks with logical volumes
Set up a server with file sharing, DNS, DHCP, email, a Web server, and more
Work with Fedora's security features including SELinux, PAM, and Access Control Lists (ACLs)
Whether you are running the stable version of Fedora Core or bleeding-edge Rawhide releases, this book has something for every level of user. The modular, lab-based approach not only shows you how things work - but also explains why--and provides you with the answers you need to get up and running with Fedora Linux.
Fedora Linux — читать онлайн бесплатно полную книгу (весь текст) целиком
Ниже представлен текст книги, разбитый по страницам. Система сохранения места последней прочитанной страницы, позволяет с удобством читать онлайн бесплатно книгу «Fedora Linux», без необходимости каждый раз заново искать на чём Вы остановились. Поставьте закладку, и сможете в любой момент перейти на страницу, на которой закончили чтение.
Интервал:
Закладка:
At the bottom of this screen, be sure to select the checkbox labeled "Review and modify partitioning layout" so that you will have an opportunity to see the proposed disk layout before it is used. Click Next to continue.
If you have selected an option that involves removing an existing partition, you will see the partition-removal warning shown in Figure 1-16 . Review the information shown, and then click Yes to confirm that you are prepared to remove the partitions listed.
Figure 1-16. Partition removal warning

1.3.1.8. Partitioning layout
By default, Fedora Core uses a system called Logical Volume Management (LVM). A partition managed using LVM is called a physical volume (PV). Storage space from one or more PVs is used to create a pool of storage called a volume group (VG). Out of this pool of storage, one or more virtual partitions are created; each virtual partition is a logical volume (LV). Figure 1-17 illustrates the relationship between these components.
Figure 1-17. Relationship between LVM components
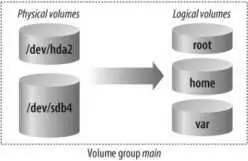
LVM has several advantages over traditional partitioning:
Logical volumes can be resized, enabling you to shift space between filesystems without reinstalling the system.
Logical volumes can span multiple physical volumes, enabling the use of filesystems that are larger than one physical disk.
Additional storage can be added to existing filesystemsfor example, you can add a new disk drive and add that storage space to the home filesystem.
Data can be migrated from one drive to another.
Chapter 6 delves into more detail regarding LVM.
Although logical volumes can be enlarged or reduced at any time, the ext3 filesystem that Fedora uses can be enlarged only while it is in use. It must not be in use when it is reduced in size. This can make it fairly complicated to shrink an ext3 partition. Because it's difficult to determine how much disk space each filesystem will require in the future, it is a good idea to make Fedora filesystems no larger than necessary at first, and then add space to them as required. This avoids the need to reduce the size of one LV in order to increase the size of another.
Unfortunately, the LVM system is too complex to use during the early stages of the booting process, so a system configured to use LVM must also have a small traditional partition for boot files.
In order to use Fedora Core's hibernate feature, you will also need a swap partition (either instead of or in addition to swapspace on a logical volume). See Lab 3.1, "Power Management," for more information on hibernation.
If you have selected a partitioning option that includes the default layout and have selected the checkbox to review and modify the layout, the screen in Figure 1-18 will appear at this point in the installation.
Figure 1-18. Fedora Disk Druid partitioning screen
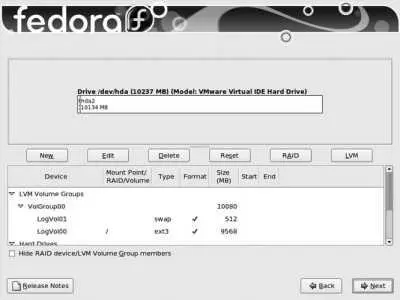
The table on the bottom half of the screen contains two sections: one for LVM volume groups and one for hard disks. The default layout creates a 100 MB boot partition, and takes all remaining available disk space on all drives and places it in a single volume group named VolGroup00 . The space in this volume group is then divided into two logical volumes: LogVol00 for the root filesystem and LogVol01 for swap space (virtual memory).
There are three improvements that we are going to make to the default Fedora Core partition/LVM layout:
A separate LV will be used for the /home filesystem, so that users' home directories are separated from the operating system. This will enable you to wipe out the operating system and reinstall it (or install another distribution of Linux or a later version of Fedora Core) without affecting the users' files.
The LVs will be reduced in size so that they are no larger than necessary. Surplus disk space can be left unassigned within the volume group and added to logical volumes as needed; this eliminates the need to perform complex operations to shrink one volume group in order to grow another.
The volume group and logical volume names will be replaced with more descriptive text.
To make these changes, double-click on the line in the table that reads VolGroup00 and then click the Edit button. The Edit LVM Volume Group window will appear, as shown in Figure 1-19 .
Figure 1-19. Edit LVM Volume Group window
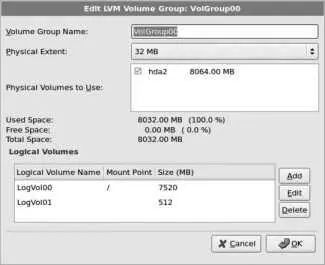
Start by changing the Volume Group Name at the top of this window from VolGroup00 to main . Next, click on the entry that has a mount point of / and click Edit; the Edit Logical Volume window shown in Figure 1-20 will appear.
Figure 1-20. Edit Logical Volume window for the root LV
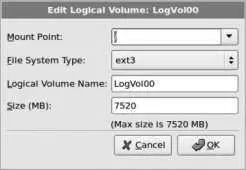
Change the Logical Volume Name to root , and change the size to a value that is closer to the size of the installation. I recommend 8,000 MB (i.e., 8 GB; most server and desktop systems will take 26 GB of space to install, so 8 GB gives a modest amount of headroom). Click OK when you are done.
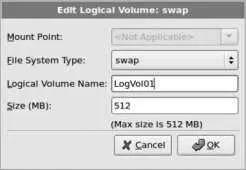
Figure 1-21 shows the settings that repeat the process for the other predefined LV: click on this LV and then click Edit. Change the Logical Volume Name to swap , leaving the size at the default value. Click OK when you are done.
Figure 1-21. Edit Logical Volume window for the swap LV
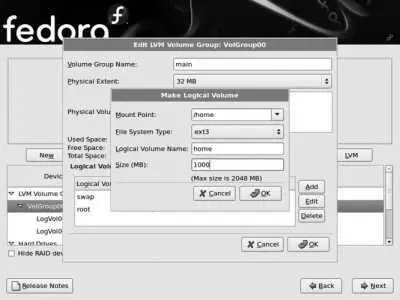
Finally, click the Add button and create a new Logical Volume to hold the home directories, as shown in Figure 1-22. Set the Mount Point to /home , the File System Type to ext3 , the Logical Volume Name to home , and then set a reasonable size for storing the users' home directories (if you're not sure what value to use, start with 1000 ). Click OK when you are done.
Figure 1-22. Creating a new Logical Volume for the home LV
Review the final disk partition and LVM layout, and then click Next. The bootloader configuration screen will appear, as shown in Figure 1-23 .
Figure 1-23. Bootloader configuration screen
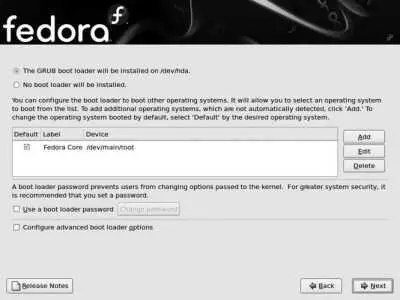
The default bootloader configuration replaces any existing bootloader installed on the main hard disk. If you have more than one operating system installed, the bootloader will ask you which OS to boot when the system is started. If you have a Windows boot partition present, it will be listed as a boot option, but it will be labeled Other. To change this label to something more descriptive, click on that entry, and then click Edit. Enter the text of your choice, such as Windows XP Professional , and then click OK.
Читать дальшеИнтервал:
Закладка:
Похожие книги на «Fedora Linux»
Представляем Вашему вниманию похожие книги на «Fedora Linux» списком для выбора. Мы отобрали схожую по названию и смыслу литературу в надежде предоставить читателям больше вариантов отыскать новые, интересные, ещё непрочитанные произведения.


Обсуждение, отзывы о книге «Fedora Linux» и просто собственные мнения читателей. Оставьте ваши комментарии, напишите, что Вы думаете о произведении, его смысле или главных героях. Укажите что конкретно понравилось, а что нет, и почему Вы так считаете.