Robert Correll - Canon EOS 90D For Dummies
Здесь есть возможность читать онлайн «Robert Correll - Canon EOS 90D For Dummies» — ознакомительный отрывок электронной книги совершенно бесплатно, а после прочтения отрывка купить полную версию. В некоторых случаях можно слушать аудио, скачать через торрент в формате fb2 и присутствует краткое содержание. Жанр: unrecognised, на английском языке. Описание произведения, (предисловие) а так же отзывы посетителей доступны на портале библиотеки ЛибКат.

- Название:Canon EOS 90D For Dummies
- Автор:
- Жанр:
- Год:неизвестен
- ISBN:нет данных
- Рейтинг книги:4 / 5. Голосов: 1
-
Избранное:Добавить в избранное
- Отзывы:
-
Ваша оценка:
Canon EOS 90D For Dummies: краткое содержание, описание и аннотация
Предлагаем к чтению аннотацию, описание, краткое содержание или предисловие (зависит от того, что написал сам автор книги «Canon EOS 90D For Dummies»). Если вы не нашли необходимую информацию о книге — напишите в комментариях, мы постараемся отыскать её.
canhelp you maximize the potential of the camera and its features.
Canon EOS 90D For Dummies Choose the best setting for your situation Manage focus and color Make the most of your lighting Understand camera settings Customize your camera to your needs Create remarkable photos and memories, whether you stick with user-friendly automatic settings or decide to dive into more advanced features. With your Canon EOS 90D and this book at your side, you can shoot quality video and capture moving subjects confidently.
Canon EOS 90D For Dummies — читать онлайн ознакомительный отрывок
Ниже представлен текст книги, разбитый по страницам. Система сохранения места последней прочитанной страницы, позволяет с удобством читать онлайн бесплатно книгу «Canon EOS 90D For Dummies», без необходимости каждый раз заново искать на чём Вы остановились. Поставьте закладку, и сможете в любой момент перейти на страницу, на которой закончили чтение.
Интервал:
Закладка:
Instructions from this point forward assume that you don’t need to be told the specifics of how to select menus and menu options at every turn. So instead of stepping you through each button press or touch-screen tap required to adjust a setting, instructions simply say something like “Choose Image Quality from Shooting Menu 1.” If choosing a menu option involves any special steps, however, instructions offer guidance.
Navigating Custom Functions
Custom Functions are a group of advanced settings available only in the P, Tv, Av, M, B, C1, or C2 exposure modes. ( Remember: You set the exposure mode via the Mode dial on top of the camera.)
To explore Custom Functions, navigate to the Custom Functions menu and select a Custom Function category, as shown on the left in Figure 1-10. Press Set or the center Joystick button to display specific Custom Functions, as shown on the right in the figure. Here’s a guide to using the Custom Function screens, which work a little differently from other menu screens:
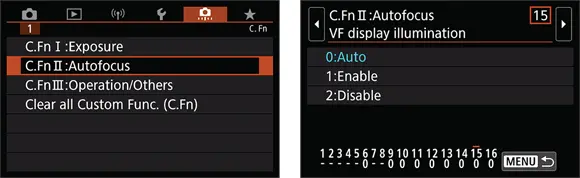
FIGURE 1-10:Navigate to the Custom Functions menu to access additional customization options.
Interpreting the screens: The Custom Functions screens are a little intimidating until you know what’s what: Custom Functions are grouped into three categories: Exposure, Autofocus, and Operation/Others. The category number and name appear in the upper-left corner of the screen. In Figure 1-10, for example, the label indicates that you’re looking at a screen from the Autofocus category. (C.Fn II refers to Custom Functions group two.) The number of the selected function appears in the upper-right corner. Custom Function II: 15 is shown in Figure 1-10. Settings for the current function appear in the middle of the screen. Blue text indicates the current setting. The default setting is represented by the number 0. So in Figure 1-10, Auto is selected and is the default setting. Numbers at the bottom of the screen show you the current setting for all Custom Functions in the current category. The top row of numbers represents the Custom Functions, with the currently selected function indicated with a tiny red horizontal bar over the number (15, in the figure). The lower row shows the number of the current setting for each Custom Function; again, 0 represents the default.Dashes, shown for example under Custom Function II-1, reflect settings that aren’t organized into lists. This is Canon’s way of letting you know that this menu option controls more than one camera setting (thus, there isn’t one single default setting). If you change those settings, a blue dot replaces the dash.
Scrolling from one Custom Function to the next: Use the Quick Control dial or press the left or right arrows using the Joystick or Multi-controller or tap the left or right scroll arrows at the top of the screen. You can see the arrows in the right screen in Figure 1-10.
Changing the setting: You first must activate the menu by pressing the Set or center Joystick button or tapping one of the available setting options. The screen then changes to look similar to the one shown on the left in Figure 1-11, with the currently selected option highlighted. To select a different option, highlight it by tapping it or pressing up or down using the Joystick or Multi-controller. You can also rotate through options using the Quick Control dial.To lock in your setting and deactivate the settings screen, tap the Set icon or press the Set or center Joystick button. The screen returns to its inactive state, as shown on the right in Figure 1-11, with the setting you selected appearing in blue and the row of digits at the bottom of the screen reflecting the number for that setting. Again, a blue number at the bottom indicates that you chose a setting other than the default.
Exiting the Custom Functions submenu: Tap the Menu icon in the lower-right corner of the screen or press the Menu button. Press Menu again to exit the menu system entirely and return to shooting.
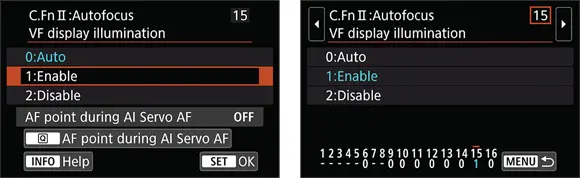
FIGURE 1-11:After you select a setting (left), the menu screen updates to reflect your choice (right).
Customizing the Touch Screen
Your camera’s touch screen works much like the ones found on smartphones and other touch-based devices. When the touch screen is enabled, as it is by default, you can simply touch the monitor to choose menu commands, change picture settings, scroll through your pictures, and more.
How you touch the screen depends on the task at hand. Here’s a rundown of the names assigned to various touch-screen moves, or gestures:
Tap: Tap a finger on the monitor. (Figures and instructions throughout the book indicate exactly where to tap.)
Drag: Using light pressure, drag your finger across the screen. On some menu screens, for example, you can drag up or down to scroll through a list of options.
Swipe: Drag one or two fingers quickly across the screen. You use this gesture, known in some circles as a flick, to scroll through your pictures in Playback mode, just as you do when showing off your photos on a smartphone.
Pinch in/pinch out: To pinch in, place your thumb at one edge of the screen and your pointer finger at the other. Then drag both toward the center of the screen. To pinch out, start in the center of the screen and swipe both fingers outward. Pinching is how you zoom in and out on pictures during playback.
 You can customize two aspects of touch-screen behavior:
Adjust (or disable) the touch-screen response: You can choose from three settings, accessed via the Touch Control option, found on Setup Menu 3 and shown in Figure 1-12. Standard is the default, setting the screen to respond to a “normal” amount of pressure. Don’t ask how the Powers That Be decided what that pressure level is — just know that if your normal pressure doesn’t evoke a response, you can change the setting from Standard to Sensitive. Choose Disable to make the touch screen totally inactive.
Silence the touch screen: By default, the touch screen emits a tiny “beep” with every tap. If you find that annoying, choose the Beep option, found just beneath the Touch Control option on Setup Menu 3. The option that keeps the beep silent is Touch to Silence — silence indicated by a little speaker with a slash through it. The Disable setting turns off both touch-screen sounds and the beep the camera emits when focus is achieved.
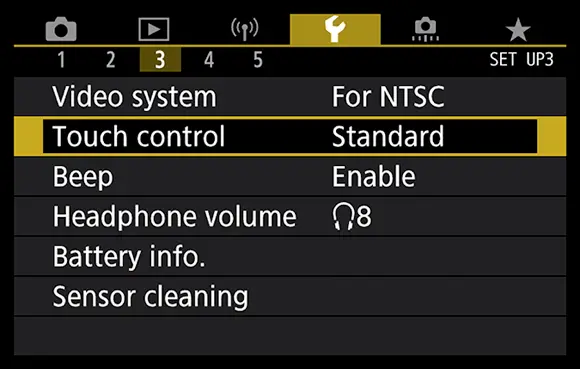
FIGURE 1-12:Control the touch-screen response through this menu item.
 CARING FOR THE CAMERA MONITOR
To keep the monitor in good working order, follow these precautions:
Don’t use force when adjusting the monitor position. Although the monitor assembly is sturdy, treat it with respect as you adjust the screen position. The monitor twists only in certain directions, and it’s easy to forget which way it’s supposed to move. So, if you feel resistance, don’t force things — you could break the monitor. Instead, rely on that feeling of resistance to remind you to turn the screen the other way.
Читать дальшеИнтервал:
Закладка:
Похожие книги на «Canon EOS 90D For Dummies»
Представляем Вашему вниманию похожие книги на «Canon EOS 90D For Dummies» списком для выбора. Мы отобрали схожую по названию и смыслу литературу в надежде предоставить читателям больше вариантов отыскать новые, интересные, ещё непрочитанные произведения.


Обсуждение, отзывы о книге «Canon EOS 90D For Dummies» и просто собственные мнения читателей. Оставьте ваши комментарии, напишите, что Вы думаете о произведении, его смысле или главных героях. Укажите что конкретно понравилось, а что нет, и почему Вы так считаете.