Robert Correll - Canon EOS 90D For Dummies
Здесь есть возможность читать онлайн «Robert Correll - Canon EOS 90D For Dummies» — ознакомительный отрывок электронной книги совершенно бесплатно, а после прочтения отрывка купить полную версию. В некоторых случаях можно слушать аудио, скачать через торрент в формате fb2 и присутствует краткое содержание. Жанр: unrecognised, на английском языке. Описание произведения, (предисловие) а так же отзывы посетителей доступны на портале библиотеки ЛибКат.

- Название:Canon EOS 90D For Dummies
- Автор:
- Жанр:
- Год:неизвестен
- ISBN:нет данных
- Рейтинг книги:4 / 5. Голосов: 1
-
Избранное:Добавить в избранное
- Отзывы:
-
Ваша оценка:
Canon EOS 90D For Dummies: краткое содержание, описание и аннотация
Предлагаем к чтению аннотацию, описание, краткое содержание или предисловие (зависит от того, что написал сам автор книги «Canon EOS 90D For Dummies»). Если вы не нашли необходимую информацию о книге — напишите в комментариях, мы постараемся отыскать её.
canhelp you maximize the potential of the camera and its features.
Canon EOS 90D For Dummies Choose the best setting for your situation Manage focus and color Make the most of your lighting Understand camera settings Customize your camera to your needs Create remarkable photos and memories, whether you stick with user-friendly automatic settings or decide to dive into more advanced features. With your Canon EOS 90D and this book at your side, you can shoot quality video and capture moving subjects confidently.
Canon EOS 90D For Dummies — читать онлайн ознакомительный отрывок
Ниже представлен текст книги, разбитый по страницам. Система сохранения места последней прочитанной страницы, позволяет с удобством читать онлайн бесплатно книгу «Canon EOS 90D For Dummies», без необходимости каждый раз заново искать на чём Вы остановились. Поставьте закладку, и сможете в любой момент перейти на страницу, на которой закончили чтение.
Интервал:
Закладка:
 The maximum burst value also makes an appearance in the Quick Control screen when the camera is set to an advanced exposure mode (P, Tv, Av, M, B, C1, or C2) after you press the Shutter button halfway down. It is displayed directly to the left of the shots-remaining value. The good news is that you rarely need to even worry about this number; we just bring it up so you don’t scratch your head wondering what that value means when you see it on either display.
Reading the LCD panel
Another way to keep track of shooting information is through the LCD panel on top of the camera, shown in Figure 1-16. Don’t see any data in the panel? The camera is probably in sleep mode; give the shutter button a half-press to wake it up.
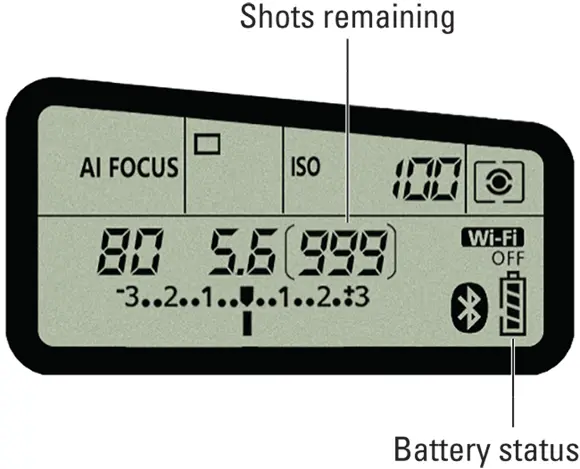
FIGURE 1-16:The top LCD panel is another useful situational awareness tool.
As with the viewfinder and Quick Control screen, the panel shows you the shots remaining value and battery status, as labeled in Figure 1-16.
In dim lighting, you can press the little light bulb button above the right corner of the display to illuminate the panel with an amber light.
Switching to Live View Mode
Your camera offers an alternative way of setting up shots called Live View, which disables the viewfinder and instead displays a live preview of your subject on the camera monitor. The following list explains the basics of using Live View:
Switching to Live View for photography: Set the Live View/Movie shooting switch, labeled in Figure 1-17, to the camera icon. Next, press the Start/Stop button to shift from viewfinder shooting to Live View mode. You hear a clicking noise and then the viewfinder goes dark and the monitor displays the live scene. By default, some shooting data appears as well, with the amount and type of information varying depending on your exposure mode and a few other settings. The figure shows the display as it appears in the Scene Intelligent Auto exposure mode when the default picture-taking settings are used for that mode. FIGURE 1-17:In Live View mode, a live preview of your subject appears on the monitor, and the viewfinder is disabled. If nothing happens after you press the Start/Stop button a few times, you may need to reset the Live View Shoot menu option to Enable. This is the default setting, but it’s possible you or another user changed the setting to Disable at some point. Where you find the Live View Shoot option depends on your exposure mode; in the basic exposure modes, the option lives on Shooting Menu 2, as shown on the left in Figure 1-18. In the advanced modes (P, Tv, Av, M, B, C1, and C2), go to Shooting Menu 4, as shown on the right.Why would Canon give you the option to disable Live View functionality? Because it’s possible to accidentally press the Live View button and switch to that mode when you don’t really want to go there.
Engaging Live View for movie recording: For movie recording, simply moving the Live View/Movie shooting switch to the Movie mode setting, represented by the red movie-camera symbol, engages Live View. You can’t use the viewfinder in Movie mode, so you can’t disable Live View shooting from the menu.In Movie mode, pressing the Start/Stop button starts and stops recording. To exit Movie mode, move the Live View/Movie shooting switch to the camera icon.
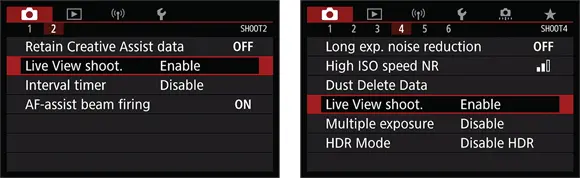
FIGURE 1-18:To use Live View, make sure this menu option is set to Enable.
In many ways, shooting photos in Live View mode is the same as for viewfinder photography, but some important aspects, such as autofocusing, work very differently. Chapter 3shows you how to take a picture in Scene Intelligent Auto exposure mode using Live View; Chapter 8covers movie recording. Other chapters mention Live View variations related to specific picture-taking options.
Customizing the Live View display
By default, the Live View display offers the data shown on the left in Figure 1-19 when you’re taking photographs in an advanced exposure mode (P, Tv, Av, M, B, C1, or C2); in Movie mode, the default display appears as shown on the right. Black bars appear at the top and bottom of the movie display to indicate the boundaries of the 16:9 movie frame. As is the case with other information displays, the type and amount of data that appears depends on your exposure mode and whether the camera is set to take still photos or shoot movies.
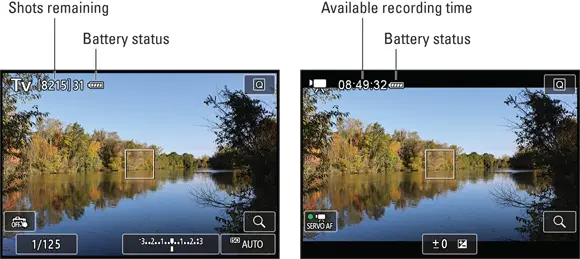
FIGURE 1-19:Here’s a look at the default Live View display for photography (left) and movie recording (right).
You also can vary the amount of data that appears in either display by pressing the Info button. Figure 1-20 shows the four alternative displays available for photography. In Movie mode, the Histogram display isn’t available.

FIGURE 1-20:Press the Info button to change the type of data that appears during Live View shooting.
Additionally, you can add one of three grids to your screen, which can be helpful when checking alignment of objects in the frame. To enable or hide the grid, turn on Live View or enter Movie mode and then navigate to Setup Menu 4. Select the Shooting Info Display option and press Set or the center Joystick button to show the Grid Display option, featured on the left in Figure 1-21.
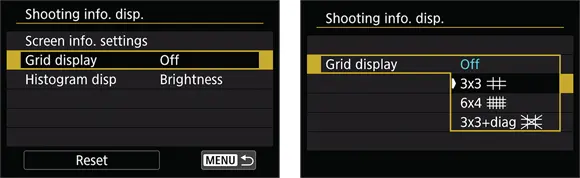
FIGURE 1-21:Through this option, you can add one of three alignment grids to the screen.
Although the various symbols and numbers on the displays won’t make much sense until you explore the rest of the book, here are a few details that may give you a basic understanding of some of the common symbols:
The white box or corner markings represent the autofocusing frame. The appearance of the frame depends on the AF Method, which Chapter 5explains.
Check the areas labeled in Figure 1-19to view the battery status. The symbol shown in the figure represents a full battery.
The number of shots remaining or the available movie recording time appears next to the battery symbol. Again, Figure 1-19 shows you where to look.
You can’t display the Electronic Level when the camera is set to the default AF Method setting (Face + Tracking). To display the level, you must switch to Spot AF, 1-Point AF, or Zone AF. (You can do so via the Quick Control screen, as outlined a little later in this chapter.)
The chart that appears in the histogram display (bottom-right screen in Figure 1-20) is a tool you can use to gauge exposure. See the discussion on interpreting a Brightness histogram in Chapter 9to find out how to make sense of what you see. But note that when you use flash, the histogram is dimmed. The histogram can’t display accurate information because the final exposure will include light from the flash and not just the ambient lighting. In addition, the histogram dims when you use B (Bulb) exposure mode, which keeps the shutter open for as long as you hold down the shutter button. The camera can’t predict how long you’re going to hold that button down, so it can’t create a histogram that will reflect your final exposure.
Читать дальшеИнтервал:
Закладка:
Похожие книги на «Canon EOS 90D For Dummies»
Представляем Вашему вниманию похожие книги на «Canon EOS 90D For Dummies» списком для выбора. Мы отобрали схожую по названию и смыслу литературу в надежде предоставить читателям больше вариантов отыскать новые, интересные, ещё непрочитанные произведения.


Обсуждение, отзывы о книге «Canon EOS 90D For Dummies» и просто собственные мнения читателей. Оставьте ваши комментарии, напишите, что Вы думаете о произведении, его смысле или главных героях. Укажите что конкретно понравилось, а что нет, и почему Вы так считаете.