Jason Gumster - Blender For Dummies
Здесь есть возможность читать онлайн «Jason Gumster - Blender For Dummies» — ознакомительный отрывок электронной книги совершенно бесплатно, а после прочтения отрывка купить полную версию. В некоторых случаях можно слушать аудио, скачать через торрент в формате fb2 и присутствует краткое содержание. Жанр: unrecognised, на английском языке. Описание произведения, (предисловие) а так же отзывы посетителей доступны на портале библиотеки ЛибКат.
- Название:Blender For Dummies
- Автор:
- Жанр:
- Год:неизвестен
- ISBN:нет данных
- Рейтинг книги:5 / 5. Голосов: 1
-
Избранное:Добавить в избранное
- Отзывы:
-
Ваша оценка:
Blender For Dummies: краткое содержание, описание и аннотация
Предлагаем к чтению аннотацию, описание, краткое содержание или предисловие (зависит от того, что написал сам автор книги «Blender For Dummies»). Если вы не нашли необходимую информацию о книге — напишите в комментариях, мы постараемся отыскать её.
Author Jason van Gumster shares his insight as an independent animator and digital artist to help Blender newcomers turn their ideas into three-dimensional drawings. From exporting and sharing scenes to becoming a part of the Blender community, this accessible book covers it all!
Create 3D characters—no experience required Build scenes with texture and real lighting features Animate your creations and share them with the world Avoid common rookie mistakes This book is the ideal starting place for newcomers to the world of 3D modeling and animation.
Blender For Dummies — читать онлайн ознакомительный отрывок
Ниже представлен текст книги, разбитый по страницам. Система сохранения места последней прочитанной страницы, позволяет с удобством читать онлайн бесплатно книгу «Blender For Dummies», без необходимости каждый раз заново искать на чём Вы остановились. Поставьте закладку, и сможете в любой момент перейти на страницу, на которой закончили чтение.
Интервал:
Закладка:
 Many game engines and other 3D applications have a notion of grouping that’s very different from how Blender works. They tend to treat all members of a group as a single unit, regardless of which one gets selected. They also tend to treat groups hierarchically; an object can only belong to one group (in turn, that group can be a member of another group, but the base object is still only a member of one). In fact, this behavior is a lot more like Blender’s parenting. To mimic this behavior more seamlessly, follow these steps:
1 Create an Empty object near the center of your “grouping” of objects and display it as a cube (Add ⇒ Empty ⇒ Cube).
2 Adjust the size of the Empty from the Last Operator panel (it’s the Radius value) to roughly include all the objects in your grouping.
3 Name the Empty something clever to indicate the grouping’s name.
4 Make all objects you’re grouping a child of the Empty (select each object, select the Empty, Ctrl+P ⇒ Object).
With this bit of legwork done, you can select the Empty’s cube outline to transform your whole grouping. Even better, your grouping will be hierarchically organized in the Scenes display mode of the Outliner. Many game-engine export scripts properly recognize and translate this structure to their native means of grouping.
Creating collections

 Of course, under some circumstances, parenting doesn’t make sense for organizing a set of objects. A good example is a lighting setup that you want to adjust and reuse. Sure, you can rationalize that perhaps the key light is the most important light and, therefore, should be the parent, but that logic is a bit of a stretch and doesn’t make much sense in more complex setups. You could also add an Empty to the scene and parent all your lights to it. That solution works, but what if you wanted to make a duplicate instance of that light rig?
 For these cases, Blender’s collections feature is ideal. You may not be aware of this, but if you’ve been working in Blender, you’ve been using collections all along. Fire up a new Blender session and have a look at the Outliner. You should see something like what’s shown in Figure 4-13. By default, all Blender sessions start with two collections: a Scene Collection that binds objects to a particular scene in your
 .blendfile, and a general collection — named Collection — within that scene. All the default objects (the cube, camera, and light) are part of the collection.
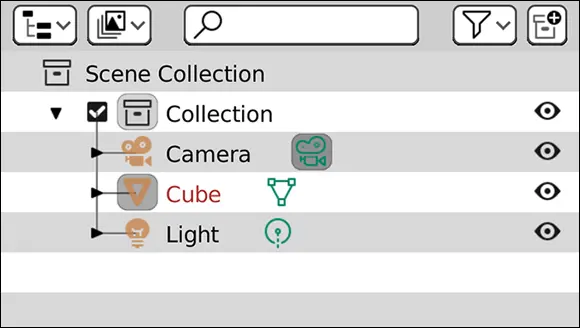
FIGURE 4-13:The Outliner is where you manage collections. Four chapters into this book and you’ve been using them all along!
 If you’re coming from another 3D application, you might think of collections like groups or layers, but they’re so much more than that in Blender. Collections are not only a great way to organize your scenes, but they’re also an integral part of other processes in Blender such as instancing and compositing.
Even with just the one collection in your scene, there are a few things you may want to do from the Outliner. For the first thing, I strongly recommend that you rename your collection to something that makes sense to you. Nothing is more confusing than opening an old project and seeing your collections named Collection, Collection 1, Collection 2, and so on.
To rename a collection, double-click its name in the Outliner and type the new name you’d like to use. You can’t do this with the scene collection, but any collection within the scene is fair game.
Looking back at Figure 4-13, notice also that the collection has a check box to the left of its name and an eye icon to the right of it. Both these controls seem to have a similar effect on the objects in the 3D Viewport, but in application, they’re used very differently. The check box is specific to how the collection relates to your current view layer, used when rendering and compositing (see Chapter 18for more on view layers). If you disable the check box, that collection is basically disabled for this part of your scene. The eye icon will also hide the objects from your scene if you click on it to disable it, but the difference is that those objects aren’t disabled, they’re just not currently visible in the 3D Viewport.
To test the difference between these two controls, disable one and then render your scene (Render ⇒ Render Image). Then re-enable it and disable the other before rendering again. You should notice that when you disable the check box, nothing appears when you render, but when you click the eye icon to close it, your objects in the collection still appear when you render.
For a faster way to control the visibility of collections in your scene, you can use the Collections panel in the View tab of the 3D Viewport’s Sidebar. That panel lists all the collections enabled in your current view layer and provides you with toggles to control visibility.
 Playing with one collection is fun and all, but it’s when you have multiple collections that you can really see this feature sing. From the View Layers display mode of the Outliner, you can create a new collection by clicking the New Collection button on the right side of the Outliner’s header. Clicking this button adds a new empty collection to your scene. You can populate that collection by dragging and dropping objects into it.
 Of course, you’re not always working in the Outliner. Sometimes the Outliner is hidden or you’re working with a maximized 3D Viewport (Ctrl+Spacebar) and you don’t want to shrink it just to see the Outliner. Fortunately, you can also manage collections from the 3D Viewport. The easiest way to create a new collection from the 3D Viewport is to move one or more objects to it. Follow these steps:
1 Select all the objects you want to include in the new collection.As an example, say you want the lights in your scene to be in their own collection, so you start off by selecting all your lights.
2 Choose Object ⇒ Collection ⇒ Move to Collection or use the M hotkey.A secondary menu appears with a list of your current collections in your scene. Choose the menu item at the bottom that says New Collection. A pop-up will appear where you can name your new collection. In this example, you might choose to name that collection Lights. After you confirm the collection’s name by clicking OK, all your selected objects are moved to your new collection.
Looking in the Outliner, you should now see that your selected objects (in this example, your lights) are no longer in your original collection, but in your newly added one. You can also go to the Object tab of the Properties editor and look in the Collections panel to see what collections an object belongs to.
Интервал:
Закладка:
Похожие книги на «Blender For Dummies»
Представляем Вашему вниманию похожие книги на «Blender For Dummies» списком для выбора. Мы отобрали схожую по названию и смыслу литературу в надежде предоставить читателям больше вариантов отыскать новые, интересные, ещё непрочитанные произведения.


Обсуждение, отзывы о книге «Blender For Dummies» и просто собственные мнения читателей. Оставьте ваши комментарии, напишите, что Вы думаете о произведении, его смысле или главных героях. Укажите что конкретно понравилось, а что нет, и почему Вы так считаете.