Julie Adair King - Canon EOS Rebel T8i/850D For Dummies
Здесь есть возможность читать онлайн «Julie Adair King - Canon EOS Rebel T8i/850D For Dummies» — ознакомительный отрывок электронной книги совершенно бесплатно, а после прочтения отрывка купить полную версию. В некоторых случаях можно слушать аудио, скачать через торрент в формате fb2 и присутствует краткое содержание. Жанр: unrecognised, на английском языке. Описание произведения, (предисловие) а так же отзывы посетителей доступны на портале библиотеки ЛибКат.
- Название:Canon EOS Rebel T8i/850D For Dummies
- Автор:
- Жанр:
- Год:неизвестен
- ISBN:нет данных
- Рейтинг книги:5 / 5. Голосов: 1
-
Избранное:Добавить в избранное
- Отзывы:
-
Ваша оценка:
Canon EOS Rebel T8i/850D For Dummies: краткое содержание, описание и аннотация
Предлагаем к чтению аннотацию, описание, краткое содержание или предисловие (зависит от того, что написал сам автор книги «Canon EOS Rebel T8i/850D For Dummies»). Если вы не нашли необходимую информацию о книге — напишите в комментариях, мы постараемся отыскать её.
Photographers who like full control over all aspects of their images use digital SLR cameras—and the Canon EOS Rebel T8i/850D gives you that power plus the ability to shoot video in 4k resolution and edit images right in the camera. In twelve easy-to-follow chapters, veteran photography author Julie Adair King helps you understand the basics of photography, the tools in your camera, and proven techniques that will produce shots that even pros will envy.
Customize your camera Get a grip on technical stuff Choose the best shooting mode Solve exposure problems Manipulate image focus Record 4k video Shoot and convert RAW photos Connect to a smartphone or tablet
Canon EOS Rebel T8i/850D For Dummies — читать онлайн ознакомительный отрывок
Ниже представлен текст книги, разбитый по страницам. Система сохранения места последней прочитанной страницы, позволяет с удобством читать онлайн бесплатно книгу «Canon EOS Rebel T8i/850D For Dummies», без необходимости каждый раз заново искать на чём Вы остановились. Поставьте закладку, и сможете в любой момент перейти на страницу, на которой закончили чтение.
Интервал:
Закладка:
AF Method/AF Area Selection button: Press this button to access the AF Method and AF Area Selection settings, both related to autofocusing. Chapter 5explains.
ISO button: True to its name, this button displays a screen where you can adjust the ISO setting, which determines how sensitive the camera is to light. Chapter 4details this critical setting.
DISP button: This button affects the Quick Control screen, which displays shooting information when you’re taking still pictures. (Check out “ Displaying the Quick Control screen,” later in this chapter, for a look.) Normally, the screen appears automatically when you turn the camera on or press the shutter button halfway and release it; the screen then turns off after a period of inactivity. But you can press the DISP button at any time to toggle the screen on and off.
Shutter button: You no doubt already understand the function of this button, but you may not realize that when you use autofocus and autoexposure, you need to use a two-stage process when taking a picture: Press the shutter button halfway, pause to let the camera set focus and exposure, and then press down the rest of the way to capture the image. You’d be surprised how many people mess up their pictures because they press that button with one quick jab, denying the camera the time it needs to set focus and exposure.
Flash hot shoe: Labeled in Figure 1-6, this is the connection for attaching an external flash and other accessories such as flash adapters and the Canon GP-E2 GPS Receiver.
Focal plane indicator: Should you need to know the exact distance between your subject and the camera, the focal plane indicator, labeled in Figure 1-6, is key. This mark indicates the plane at which light coming through the lens is focused onto the camera’s image sensor. Basing your measurement on this mark produces a more accurate camera-to-subject distance than using the end of the lens or some other point on the camera body as your reference point. You might take advantage of this feature when taking pictures for a legal or scientific purpose that requires you to submit the camera-to-subject distance along with the photos.
Speaker: When you play a movie that contains audio, the sound comes wafting through these holes.
Microphone: You can record movie audio via the built-in microphone, which picks up sound from the two holes labeled “Microphone” in Figure 1-6.
Back-of-the-body controls
Traveling over the top of the camera to its back, you encounter the smorgasbord of controls shown in Figure 1-8.
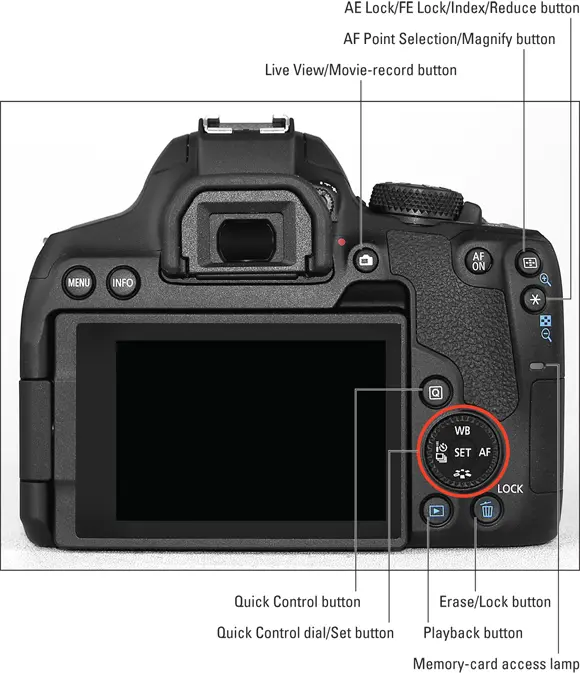
FIGURE 1-8:Having lots of external buttons makes accessing the camera’s functions easier.
 Some buttons have multiple “official” names because they serve multiple purposes depending on whether you’re taking pictures, reviewing images, recording a movie, or performing some other function. In most cases, this book refers to these buttons by the first label you see in the following list (and in Figure 1-8) to simplify things. Again, though, the margin icons and figures show you exactly which button to press to accomplish the task being discussed.
Here’s an introduction to the controls on this side of the camera:
AF Point Selection/Magnify button: In certain shooting modes, you press this button to specify which autofocus points or zones you want the camera to use when establishing focus. You can also press and hold the button during Live View or Movie shooting to magnify the display to check focus. ( Chapter 5tells you about focusing features.) In Playback mode, covered in Chapter 9, you press the button to magnify the image display (thus the plus sign in the button’s magnifying glass icon).
AE Lock/FE Lock/Index/Reduce button: During shooting, you can press this button to lock autoexposure (AE) settings, as covered in Chapter 4, or to lock flash exposure (FE), a feature detailed in Chapter 2.This button also serves two playback functions: It switches the display to Index mode, enabling you to see multiple image thumbnails at once. And if you magnify a photo, pressing the button reduces the magnification level.
AF ON button: In the camera instruction manual, Canon uses the name AF Start button for this control, which no doubt will stymie many users’ efforts to search the manual for information on the AF ON button. But AF Start actually is applicable in that pressing the button initiates autofocusing, giving you an alternative to pressing the shutter button halfway to get that job done. Experienced photographers refer to this as back-button autofocus because the button usually is located on the back of the camera, as it is on the T8i/850D. There are several situations in which using the AF ON button makes good sense; the autofocus sections of Chapter 5provide more insight.Two additional points about the AF ON button: The AF ON function works only when the Mode dial is set to P, Tv, Av, or M. In Canon lingo, those four shooting modes are called Creative Zone modes.You can assign a different function to the button if you don’t want to use it for autofocusing. Chapter 11explains how to modify the function of this and other buttons on your camera.
Live View/Movie-record button: Press this button to shift to Live View mode, which enables you to compose your pictures using the monitor instead of the viewfinder. When shooting movies, press the button to start and stop recording. (You must first set the On/Off/Movie switch to the Movie position.)
Q (Quick Control) button: Press this button to shift to Quick Control mode, which enables you to adjust major shooting settings quickly. See “ Using Quick Control Mode,” later in this chapter, for help.
Memory-card access lamp: Labeled in Figure 1-8, this lamp blinks while the camera is accessing the memory card. Don’t power off the camera while the lamp is blinking, or you may damage the card or camera as well as corrupt files on the card.
Quick Control dial/Set button: Figure 1-8 points out this multifaceted control, shown in close-up view in Figure 1-9. Here are a few basics to know about using it:You can rotate the outer ring of the Quick Control dial to select and adjust some settings. If nothing happens when you rotate the ring or the word Locked appears on the screen, you may have inadvertently locked the dial, preventing it from having any effect. See the upcoming bullet point “Erase/Lock button” to find out more.Pressing the top, right, bottom, or left edge of the dial provides quick access to the four settings labeled in Figure 1-9. White Balance and Picture Style settings are discussed in Chapter 6; AF Operation, in Chapter 5; and Drive mode, in Chapter 2. You also may need to press the dial right/left or up/down when adjusting certain other settings. If I tell you to “press the right edge of the Quick Control dial,” for example, press near where the AF label appears. (On previous editions of this camera, there were four arrow keys, called cross keys, surrounding the Set button. No more; now you just have to deduce that you can press the edges of the dial to get something done. Farewell, cross keys, we’ll miss your easily understood nomenclature.) The camera’s instruction manual, however, still refers to these edges as arrow keys, even though there aren’t any arrow markings on the dial. FIGURE 1-9:The Quick Control dial and Set button are key to making picture-taking and playback operations.The Set button is key to activating an option when you’re scrolling through menus or settings screens. For example, you might need to rotate the Quick Control dial or press one of its sides to highlight an option and then press the Set button to unlock the option. Once the option is unlocked, you use the Quick Control dial to adjust the setting and then lock in your choice by pressing the Set button again.The symbol labeled in the menu screen on the right in Figure 1-9 represents the Quick Control dial and is your reminder that you can use the dial to adjust the setting marked by the symbol. This particular screen is related to an advanced White Balance function that I cover in Chapter 6.
Читать дальшеИнтервал:
Закладка:
Похожие книги на «Canon EOS Rebel T8i/850D For Dummies»
Представляем Вашему вниманию похожие книги на «Canon EOS Rebel T8i/850D For Dummies» списком для выбора. Мы отобрали схожую по названию и смыслу литературу в надежде предоставить читателям больше вариантов отыскать новые, интересные, ещё непрочитанные произведения.


Обсуждение, отзывы о книге «Canon EOS Rebel T8i/850D For Dummies» и просто собственные мнения читателей. Оставьте ваши комментарии, напишите, что Вы думаете о произведении, его смысле или главных героях. Укажите что конкретно понравилось, а что нет, и почему Вы так считаете.