Peter Bauer - Adobe Photoshop CC For Dummies
Здесь есть возможность читать онлайн «Peter Bauer - Adobe Photoshop CC For Dummies» — ознакомительный отрывок электронной книги совершенно бесплатно, а после прочтения отрывка купить полную версию. В некоторых случаях можно слушать аудио, скачать через торрент в формате fb2 и присутствует краткое содержание. Жанр: unrecognised, на английском языке. Описание произведения, (предисловие) а так же отзывы посетителей доступны на портале библиотеки ЛибКат.
- Название:Adobe Photoshop CC For Dummies
- Автор:
- Жанр:
- Год:неизвестен
- ISBN:нет данных
- Рейтинг книги:3 / 5. Голосов: 1
-
Избранное:Добавить в избранное
- Отзывы:
-
Ваша оценка:
Adobe Photoshop CC For Dummies: краткое содержание, описание и аннотация
Предлагаем к чтению аннотацию, описание, краткое содержание или предисловие (зависит от того, что написал сам автор книги «Adobe Photoshop CC For Dummies»). Если вы не нашли необходимую информацию о книге — напишите в комментариях, мы постараемся отыскать её.
is your experienced guide to the technical terrain, slashing away the foliage for a clear picture of how to produce the perfectly framed and beautifully curated images you want.
Beginning with an overview of the basic kit bag you need for your journey toward visual mastery, Peter Bauer—Photoshop instructor and an award-winning fine art photographer in his own right—shows you how to build your skills and enrich your creative palette with enhanced colors and tone, filters and layering, and even how undertake a foray into digital painting. Add in instructions on combining text with images and the how-tos of video and animation editing, and you have all the tools you need to carve out a one-person multimedia empire.
Master everything from the basics to professional insider tips Combine, layer, tone, and paint your images Explore the colorfully creative world of Photoshop filters Fix common problems You’ll find everything on the latest version of the software that you could dream of—and an improved shot at artistic success!
Adobe Photoshop CC For Dummies — читать онлайн ознакомительный отрывок
Ниже представлен текст книги, разбитый по страницам. Система сохранения места последней прочитанной страницы, позволяет с удобством читать онлайн бесплатно книгу «Adobe Photoshop CC For Dummies», без необходимости каждый раз заново искать на чём Вы остановились. Поставьте закладку, и сможете в любой момент перейти на страницу, на которой закончили чтение.
Интервал:
Закладка:
History States: This field determines how many entries (up to 1,000) appear in the History panel. Storing more history states provides more flexibility, but at a cost: Storing too many history states uses up all your available memory and slows Photoshop to a crawl. Generally speaking, 20 or 30 is a good number. If, however, you do a lot of operations that use what I call “little clicks,” such as painting or dodging/burning with short strokes, that History panel fills quickly. For such operations, a setting of perhaps 50 or even 60 is more appropriate.
Cache Levels: The image cache stores low-resolution copies of your image to speed onscreen display at various zoom levels. Although this process speeds up screen redraw, the price is accuracy. Unless your video card has trouble driving your monitor at your selected resolution and color depth, you might be better served by Cache Levels: 1. That gives the most accurate picture of your work. (But remember to make critical decisions at 100% zoom, where one image pixel equals one screen pixel.)
Graphics Processor Settings: This area displays information about your computer’s video card. If your system has the capability, you’ll see a check box for Use Graphics Processor. Using this processor provides smoother, more accurate views at all zoom levels and other enhancements, including the capability to rotate the image onscreen — not rotate the canvas, but rotate just the onscreen image. And that’s too cool for words when painting a complex layer mask!
Preferences ⇒ Scratch Disks
 Photoshop’s scratch disks are hard drive space used to support the memory. Use only internal hard drives as scratch disks — never an external drive, a network drive, or removable media! If you have multiple internal hard drives, consider a dedicated partition (perhaps 15–50GB) on the second drive — not the drive on which the operating system is installed. Name the partition Scratch and use it exclusively as a scratch disk for Photoshop (and perhaps Adobe Illustrator). If you have a couple of extra internal drives, each can have a scratch partition. (On a Windows computer, you might see a message warning you that the scratch disk and the Windows paging file, which serves the same basic purpose at the system level, are on the same drive. If you have only one internal hard drive, ignore the message.) To re-order the scratch disks, click the scratch disk in the list and then, instead of dragging, use the arrows keys to the right.
Preferences ⇒ Cursors
Photoshop offers you a couple of ways to display cursors for painting tools. You can show the tool icon (Standard), a small crosshair (Precise), or a representation of the tool’s brush tip, indicating the size and shape of the brush (Brush Size). With soft-edged brushes, the brush size cursor shows where the tool will be applied at 50% strength or higher. Alternatively, select the Full Size Brush Tip option, which always shows the full extent of the brush tip, regardless of the Hardness setting.
You also have the option of adding a crosshair in the middle of either brush-size cursor. The crosshair option is great for keeping a brush centered along an edge or path, and it just about eliminates the need for the Precise cursor option. As you can see in Figure 3-10 when working with a soft brush, showing all the pixels that are changed even a little (to the right) might not give you an accurate view of your work. (The Normal Brush Tip cursor is shown at the top center and the Show Crosshair in Brush Tip option can be seen at the lower left.)
When the Show Only Crosshair While Painting option is selected in Preferences, the brush cursor appears at the selected diameter display (Full Size or Normal) until you press the mouse button (or press the stylus to the tablet). It then automatically switches to the crosshair and remains as a precise cursor until you release the mouse button (or lift the stylus). Experienced brush-tool-using Photoshoppers might want to experiment with this option — if you know the diameter, you might want to better focus on the center of the brush when you are, for example, painting or dodging or burning along a distinct edge.
 When you’re sure that you have a brush-size cursor selected in the Preferences but Photoshop shows you the precise cursor, check the Caps Lock key. Pressing Caps Lock toggles the painting cursors between Precise and Brush Size.
Also found in the Cursors panel is the Brush Preview color. Click the color swatch to open the Color Picker and assign a color to use when dynamically resizing your brushes. (If you don’t have OpenCL drawing capability, the brushes can still be resized, but the color preview will not be visible.) With a brush-using tool active, press and hold down the Option+Control keys on a Mac and drag left or right; on a Windows machine, Alt-right-click and drag left or right to resize the brush — on the fly! Want to change the brush hardness? Hold down those same keys and drag up or down rather than left or right.
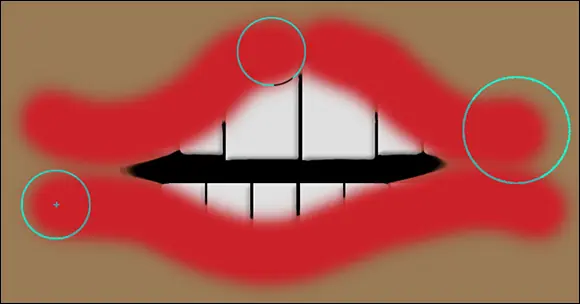
FIGURE 3-10:When working with a low Hardness setting, Normal Brush Tip is usually best.
Preferences ⇒ Transparency & Gamut
If you work in grayscale regularly, you might want to change the color of the transparency grid to something that contrasts with your image; perhaps pale blue and pale yellow. If you find the gray-and-white checkerboard pattern distracting in images with transparency, you can set Grid Size to None, which gives you a plain white background in transparent areas of your artwork.
Preferences ⇒ Units & Rulers
If you create web graphics rather than print images, you probably want to change the unit of measure from Inches to Pixels. Keep in mind that you can change the unit of measure on the fly by right-clicking the rulers in your image (which you show and hide with the shortcut ⌘ +R/Ctrl+R). If you regularly print at a resolution other than 300 ppi, you might also want to adjust the default resolution for print-size new documents.
Preferences ⇒ Guides, Grid & Slices
Photoshop offers Smart Guides, which appear and disappear automatically as you drag the content of one layer into and out of alignment with the content of other layers. Smart Guides (magenta in color by default) show when the content of the layer you’re dragging aligns perfectly with the edges or center of other layers’ content. See Figure 3-11. (Show/hide Smart Guides through the View ⇒ Show menu. They are active by default now.)

FIGURE 3-11:The magenta guides show how the layer aligns with other layers.
Preferences ⇒ Plug-Ins
 Extensions are panels created outside of the Adobe Photoshop development process that you can download or purchase. Allowing them to connect to the Internet to search for new content may or may not be a good idea, depending on your level of network security. I’m not suggesting that a panel could steal your passwords or anything like that, but unless you trust the source of the panel …
Интервал:
Закладка:
Похожие книги на «Adobe Photoshop CC For Dummies»
Представляем Вашему вниманию похожие книги на «Adobe Photoshop CC For Dummies» списком для выбора. Мы отобрали схожую по названию и смыслу литературу в надежде предоставить читателям больше вариантов отыскать новые, интересные, ещё непрочитанные произведения.


Обсуждение, отзывы о книге «Adobe Photoshop CC For Dummies» и просто собственные мнения читателей. Оставьте ваши комментарии, напишите, что Вы думаете о произведении, его смысле или главных героях. Укажите что конкретно понравилось, а что нет, и почему Вы так считаете.