Peter Bauer - Adobe Photoshop CC For Dummies
Здесь есть возможность читать онлайн «Peter Bauer - Adobe Photoshop CC For Dummies» — ознакомительный отрывок электронной книги совершенно бесплатно, а после прочтения отрывка купить полную версию. В некоторых случаях можно слушать аудио, скачать через торрент в формате fb2 и присутствует краткое содержание. Жанр: unrecognised, на английском языке. Описание произведения, (предисловие) а так же отзывы посетителей доступны на портале библиотеки ЛибКат.
- Название:Adobe Photoshop CC For Dummies
- Автор:
- Жанр:
- Год:неизвестен
- ISBN:нет данных
- Рейтинг книги:3 / 5. Голосов: 1
-
Избранное:Добавить в избранное
- Отзывы:
-
Ваша оценка:
Adobe Photoshop CC For Dummies: краткое содержание, описание и аннотация
Предлагаем к чтению аннотацию, описание, краткое содержание или предисловие (зависит от того, что написал сам автор книги «Adobe Photoshop CC For Dummies»). Если вы не нашли необходимую информацию о книге — напишите в комментариях, мы постараемся отыскать её.
is your experienced guide to the technical terrain, slashing away the foliage for a clear picture of how to produce the perfectly framed and beautifully curated images you want.
Beginning with an overview of the basic kit bag you need for your journey toward visual mastery, Peter Bauer—Photoshop instructor and an award-winning fine art photographer in his own right—shows you how to build your skills and enrich your creative palette with enhanced colors and tone, filters and layering, and even how undertake a foray into digital painting. Add in instructions on combining text with images and the how-tos of video and animation editing, and you have all the tools you need to carve out a one-person multimedia empire.
Master everything from the basics to professional insider tips Combine, layer, tone, and paint your images Explore the colorfully creative world of Photoshop filters Fix common problems You’ll find everything on the latest version of the software that you could dream of—and an improved shot at artistic success!
Adobe Photoshop CC For Dummies — читать онлайн ознакомительный отрывок
Ниже представлен текст книги, разбитый по страницам. Система сохранения места последней прочитанной страницы, позволяет с удобством читать онлайн бесплатно книгу «Adobe Photoshop CC For Dummies», без необходимости каждый раз заново искать на чём Вы остановились. Поставьте закладку, и сможете в любой момент перейти на страницу, на которой закончили чтение.
Интервал:
Закладка:
The most efficient way to customize your work area is to create and save specialized workspaces. Arrange the panels exactly as you need them for a particular job you do regularly, choose Window ⇒ Workspace ⇒ New Workspace (in the Window menu, visible panels are indicated with a check mark), and name the workspace for that type of job. Then you can make a specialized workspace for each type of work you do. For example, perhaps when you do color correction, you need to see the Histogram panel (in the expanded view), the Info panel, and the Channels panel. Arrange those panels how you need them and then hide the rest, saving the workspace named as Color Correction. Or, perhaps when you create illustrations in Photoshop, you need to see the Layers and Paths panels at the same time. Drag one out of the group to separate it, position them both where convenient, and save the workspace as Illustration.
To access a saved workspace, choose Window ⇒ Workspace and select it from the list at the top of the menu, as shown in Figure 3-6. You can see some preset custom workspaces in the top section of the menu.

FIGURE 3-6:Select a workspace from the menu to instantly rearrange your panels.
 You can also save the current state of the customizable keyboard shortcuts and menus in your workspace. Although streamlining the menus for the specific work you’re doing is a great idea, it’s probably not such a great idea to have more than one set of custom keyboard shortcuts. The time it takes to remember which shortcuts go with the current workspace (or to undo a mistake caused by the wrong shortcut) is time wasted.
To customize shortcuts for Photoshop’s menu commands, choose Edit ⇒ Menus, which opens the Keyboard Shortcuts and Menus dialog box, shown in Figure 3-7. Alternatively, choose Edit ⇒ Keyboard Shortcuts and click the Menus tab. Here you can find every available menu command listed. (Filters available in the Filter Gallery cannot have individual keyboard shortcuts unless, in Photoshop’s Preferences ⇒ Plug-Ins, you have elected to list all filters on the Filter menu.) You also have the option of hiding a command or assigning a custom color to make it easier to identify in the menu. You might, for example, hide the blur filters that you never use, and color-code the others according to how you like or use them.

FIGURE 3-7:You can hide menu commands and color-code the visible commands.
In addition to the application menu commands (from the menus at the top of the screen), you can switch the Menu For pop-up to Panel menus and customize those menus, too. Don’t forget to save your customized menu arrangements with the button directly to the right of the Settings pop-up. Your saved menu set appears in that Settings pop-up for easy access. Keep in mind, too, that while customizing shortcuts, you can drag the lower-right corner of the window to expand it, making it easier to find specific items for which you want to assign shortcuts.
Photoshop keyboard shortcuts can save a bunch of time. Rather than move the cursor to the Toolbox to select the Brush tool, just press the B key. To open the Levels dialog box, press ⌘ +L/Ctrl+L instead of going to the Image menu, down to the Adjustments submenu, and then over and down to Levels. You assign keyboard shortcuts in the same dialog box in which you customize menus. Simply click Keyboard Shortcuts at the top and optimize for efficient workflow.
Spoons can’t chop: Creating tool presets
One of the keys to efficient, accurate work in Photoshop is using the right tool for the job. For example, the Patch tool with Normal active in the Options bar (the default) copies texture only. If you need to cover a spot on a client’s face, changing both texture and color, you may need the Clone Stamp tool or the Patch tool with the Content-Aware option. (You can read about how the tools work throughout this book.)
You can ensure that you’re using not only the correct tool but also the correct settings for that tool by creating tool presets, which store your settings from the Options bar. You can then select the preset tool (and, of course, that’s where the catchy name comes from) from the Tool Presets panel or from the left end of the Options bar, as shown in Figure 3-8.

FIGURE 3-8:Tool presets help you work faster and more accurately.
Although just about any tool is a good candidate for tool presets, some are just plain naturals. Consider, if you will, the Crop tool. As I explain in Chapter 4, a photo from a high-end digital camera has an aspect ratio (relationship between width and height of the image) of 2:3, and common print and frame aspect ratios include 4:5 for 8-x-10 prints, 5:7, and 13:19 for large prints. (Some digital cameras shoot in different aspect ratios.) You’ll often find a need to crop an image to a specific size to meet your printing requirements. And, don’t forget resolution — printing in the correct size at the wrong resolution is simply a waste of paper and ink! Set up a number of Crop tool presets for your typical print sizes and relax, knowing that you’ll always be cropping correctly.
Another logical candidate for tool presets is the Type tool. When you consider all the options for the Type tool in not only the Options bar but also in the Character and Paragraph panels, you have quite a bit to select and track. To ensure consistent text from project to project, consider creating tool presets for each project, including (as appropriate) headline and body text, special effects and accent type, and even your copyright information. Keep in mind, too, that you can use Type tool presets in conjunction with the Character Styles and Paragraph Styles panels (which are discussed in Chapter 12).
Season to Taste: The Photoshop Settings
The program-level Preferences and the Color Settings flavor all your work in Photoshop. The options that you choose in Photoshop’s Preferences (or simply the Prefs ) control many facets of the program’s basic behavior. Choices made in the Color Settings dialog box determine how your work looks, both onscreen and in print. And when you get down to brass tacks, that’s what it’s all about — the appearance of your artwork.
Standing orders: Setting the Preferences
Photoshop’s Preferences file stores a whole lot of information about how you use the program. Regardless of whether you prefer to measure in inches or pixels, how you like the grid and guides displayed, what size thumbnails you prefer in your panels, which font you used last — all sorts of data is maintained in the Prefs. Much of the info in the Preferences is picked up automatically as you work (such as the size and color mode of the last new document you created, whether the Character panel was visible when you last shut down the program, and which tool options were selected in the Options bar), but you must actively select a number of options in the Preferences dialog box, as shown in Figure 3-9.
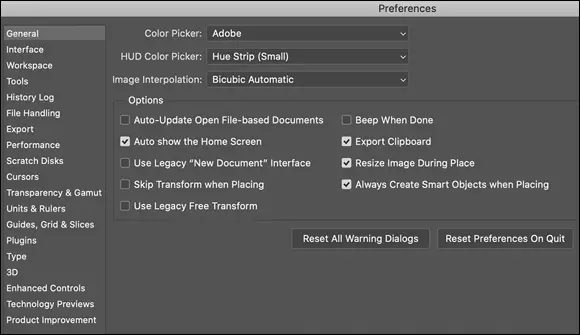
FIGURE 3-9:Use Photoshop’s Preferences to establish many program behaviors.
Читать дальшеИнтервал:
Закладка:
Похожие книги на «Adobe Photoshop CC For Dummies»
Представляем Вашему вниманию похожие книги на «Adobe Photoshop CC For Dummies» списком для выбора. Мы отобрали схожую по названию и смыслу литературу в надежде предоставить читателям больше вариантов отыскать новые, интересные, ещё непрочитанные произведения.


Обсуждение, отзывы о книге «Adobe Photoshop CC For Dummies» и просто собственные мнения читателей. Оставьте ваши комментарии, напишите, что Вы думаете о произведении, его смысле или главных героях. Укажите что конкретно понравилось, а что нет, и почему Вы так считаете.