Peter Bauer - Adobe Photoshop CC For Dummies
Здесь есть возможность читать онлайн «Peter Bauer - Adobe Photoshop CC For Dummies» — ознакомительный отрывок электронной книги совершенно бесплатно, а после прочтения отрывка купить полную версию. В некоторых случаях можно слушать аудио, скачать через торрент в формате fb2 и присутствует краткое содержание. Жанр: unrecognised, на английском языке. Описание произведения, (предисловие) а так же отзывы посетителей доступны на портале библиотеки ЛибКат.
- Название:Adobe Photoshop CC For Dummies
- Автор:
- Жанр:
- Год:неизвестен
- ISBN:нет данных
- Рейтинг книги:3 / 5. Голосов: 1
-
Избранное:Добавить в избранное
- Отзывы:
-
Ваша оценка:
Adobe Photoshop CC For Dummies: краткое содержание, описание и аннотация
Предлагаем к чтению аннотацию, описание, краткое содержание или предисловие (зависит от того, что написал сам автор книги «Adobe Photoshop CC For Dummies»). Если вы не нашли необходимую информацию о книге — напишите в комментариях, мы постараемся отыскать её.
is your experienced guide to the technical terrain, slashing away the foliage for a clear picture of how to produce the perfectly framed and beautifully curated images you want.
Beginning with an overview of the basic kit bag you need for your journey toward visual mastery, Peter Bauer—Photoshop instructor and an award-winning fine art photographer in his own right—shows you how to build your skills and enrich your creative palette with enhanced colors and tone, filters and layering, and even how undertake a foray into digital painting. Add in instructions on combining text with images and the how-tos of video and animation editing, and you have all the tools you need to carve out a one-person multimedia empire.
Master everything from the basics to professional insider tips Combine, layer, tone, and paint your images Explore the colorfully creative world of Photoshop filters Fix common problems You’ll find everything on the latest version of the software that you could dream of—and an improved shot at artistic success!
Adobe Photoshop CC For Dummies — читать онлайн ознакомительный отрывок
Ниже представлен текст книги, разбитый по страницам. Система сохранения места последней прочитанной страницы, позволяет с удобством читать онлайн бесплатно книгу «Adobe Photoshop CC For Dummies», без необходимости каждый раз заново искать на чём Вы остановились. Поставьте закладку, и сможете в любой момент перейти на страницу, на которой закончили чтение.
Интервал:
Закладка:
Many of the panels are resizable. Like an image window, you drag the lower-right corner of the panel to expand or contract it. Almost all the Photoshop panels have a panel menu from which you select various options. (The Toolbox and Options bar are the exceptions — they don’t have menus.) You open the panel menu by clicking the small button in the upper-right corner of the panel, as shown in Figure 3-4. The panel menu contains such options as thumbnail size (for example, the Layers, Channels, and Paths panels); how to display items in the panel (Swatches, Styles, and Brush among others); or even the size and content of the panel (Info and Histogram).
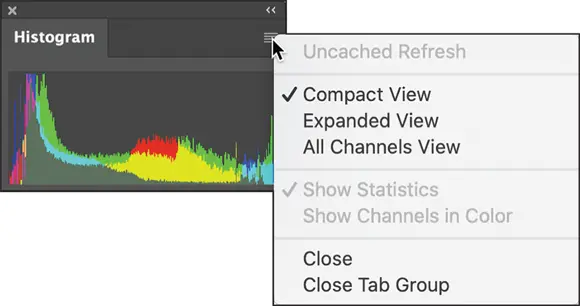
FIGURE 3-4:Access a panel’s menu by clicking the button in the upper right. (Clicking the double-arrow above the button expands or collapses the panel or panel group.)
The content of some panels changes automatically as you work with your image. Add a layer, and the Layers panel shows a new layer. Save a selection, and the Channels panel shows a new alpha channel. If you create a vector shape, the Layers panel gets a new layer, and the Paths panel shows the layer’s vector path. You control some other panels by loading and deleting content through the panel menus.
In a move that some may find controversial, the Preset Manager has been degraded and is no longer used to manage the content of most panels. Brushes, gradients, and patterns, for example, are now loaded (“imported”) and saved (“exported”) through the panel menus only. Other items, such as custom shapes, are managed through the pickers in the Options bar when the appropriate tool is active.
The tools of your trade
Near the bottom of the Toolbox is an ellipsis (visible in Figure 3-3, shown previously). Click that and you can customize the Toolbox to optimize it for your workflow. You can also use the menu command Edit ⇒ Toolbar.
You control the behavior of Photoshop’s tools through the Options bar. With the exception of a few path-related tools (Add Anchor Point, Delete Anchor Point, and Convert Point), every tool in Photoshop has options. The Options bar changes as you switch tools. The behavior of some tools changes when you add one or more modifier keys (⌘ , Shift, and Option for the Mac; Ctrl, Shift, and Alt for Windows). As an example of how modifier keys can affect tool behavior, consider the Rectangular Marquee and Elliptical Marquee tools:
Hold down the Shift key while dragging. Normally the marquee selection tools are freeform — you drag however you like. When you hold down the Shift key while dragging, on the other hand, you constrain the proportions of the selection to a square or circle (rather than a rectangle or ellipse).
Hold down the Option/Alt key while dragging. When you hold down the Option/Alt key while dragging a marquee selection tool, the selection is centered on the point where you first clicked. Rather than being a corner of a selection, that starting point is the center of the selection.
Hold down the Shift and Option/Alt keys while dragging. You can select from the center while constraining proportions by using the Shift and Option/Alt keys together.
Use the Shift key to add to an existing selection. If you already have an active selection in your image, Shift+dragging a selection tool adds to that selection. (Press Shift before you click and drag.)
Use the Option/Alt key to subtract from an existing selection. When you have an existing selection and you hold down the Option/Alt key, you can drag to subtract from the selection. Note in Figure 3-5 that the selection tool’s cursor shows a small minus sign when subtracting from a selection.
“Double-clutch” with the Shift or Option/Alt key. You can even constrain proportions or select from the center and add to or subtract from a selection. Press the Shift key (to add to the existing selection) or the Option/Alt key (to subtract from the existing selection). Click and start dragging the marquee selection tool. While continuing to hold down the mouse button, release the modifier key and press and hold Shift (to constrain proportions), Option/Alt (to center the selection), or both; then continue to drag your selection tool. You might want to use this technique, for example, when creating a donut-shaped selection. Drag the initial circular selection and then subtract a smaller circular selection from the center of the initial circle.
Don’t be afraid to experiment with modifier keys while working with tools. After all, you always have the Undo command (⌘ +Z/Ctrl+Z) at hand!
If you’re using a current version of Windows, you also have Microsoft Dial Support available, which enables you to adjust brush attributes using the Microsoft Dial (if it’s on your hardware).
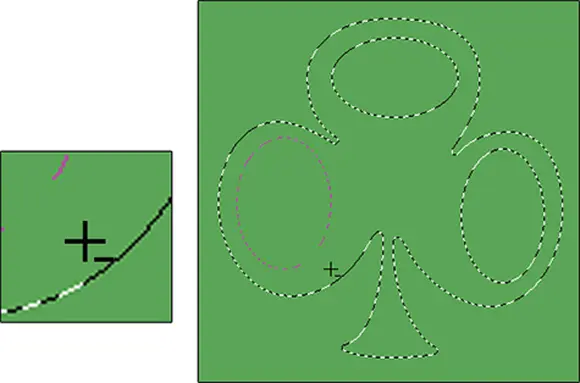
FIGURE 3-5:Use the Option/Alt key with a selection tool to subtract from a selection.
Get Cookin’ with Customization
Customizing Photoshop not only helps you work faster and more efficiently but can also help you work more precisely and prevent tragic errors. Consider using a Crop tool preset to create a 5-x-7 print at 300 pixels per inch (ppi). Such a preset will always produce exactly those dimensions, every single time. Setting up the Crop tool each time you need a 5-x-7 at 300 ppi doesn’t just waste time: It also opens the door for time-consuming or project-wrecking typos. (“Oops! I guess I made a mistake — this image is 5-x-7 at only 30 pixels per inch!”)
Clearing the table: Custom workspaces
One of the easiest ways to work more efficiently is to see your image better. Generally speaking, bigger is better, so the more room you have on the monitor to display your artwork, the better you can zoom in and do precise work. As mentioned earlier, the easiest way to gain workspace is to press the Tab key to hide Photoshop’s panels. Pressing Shift+Tab hides all the panels except the Options bar and the Toolbox.
Keep in mind that it’s best to use 100% zoom when evaluating your image for banding (areas of similar color that should blend smoothly, but don’t) or moiré (which can occur when scanning printed material — see Figure 4-3 in the following chapter for an example) and when applying filters. Any other zoom factor is a simulation of the image’s appearance. If you have a computer and video card that support OpenCL drawing (take a look in Photoshop’s Preferences ⇒ Performance, activate Use Graphics Processor, and click the Advanced Settings), you have much better on-screen display. But 100% zoom is safest when making critical decisions.
You can also drag the panels that you need regularly to a custom group of panels. To move a panel, drag it by the tab and “nest” it with other panels. And don’t forget that the major panels have keyboard shortcuts assigned to show and hide. Although keyboard shortcuts are customizable (as you can read later in this chapter), here are the primary panels’ assigned F keys, the function keys that appear at the top of your keyboard:
Actions: Option/Alt+F9
Brush Settings: F5
Color: F6
Info: F8
Layers: F7
 Any panels nested with the panel that you show/hide are also shown and hidden. And don’t forget that you can always restore all panels to their default locations by choosing Window ⇒ Workspace ⇒ Essentials (Default) from Photoshop’s main menu. If the default workspace is already selected, choose Window ⇒ Workspace ⇒ Reset Essentials to get back to the default panel layout.
Интервал:
Закладка:
Похожие книги на «Adobe Photoshop CC For Dummies»
Представляем Вашему вниманию похожие книги на «Adobe Photoshop CC For Dummies» списком для выбора. Мы отобрали схожую по названию и смыслу литературу в надежде предоставить читателям больше вариантов отыскать новые, интересные, ещё непрочитанные произведения.


Обсуждение, отзывы о книге «Adobe Photoshop CC For Dummies» и просто собственные мнения читателей. Оставьте ваши комментарии, напишите, что Вы думаете о произведении, его смысле или главных героях. Укажите что конкретно понравилось, а что нет, и почему Вы так считаете.