Food for Thought: How Things Work
A good understanding of certain fundamental operations and features in Photoshop provides you with the background that you need to follow the recipes or get creative and whip up some delicious artwork.
Photoshop now makes it easier to learn Photoshop as you work. In addition to Tool Tips and Rich Tool Tips (those very short videos you see when pausing the cursor over a tool), you’ll find a Learn button in the upper-left of the home screen. It offers both “in-app” tutorials and links to web-based tutorials. You can open the home screen at any time by clicking the little house button at the far left end of the Options bar.
 Even cooler is the new Search, Learn, and Help panel, shown in Figure 3-1. Rather than use the formal name, you can just call the panel “Photoshop Search.” As you can see, the panel content changes depending on what you want to know. To the left is the basic appearance of the panel. In the center, you see some of the results from using the Search field to find info on (in this case) the Crop tools. To the right, you see browsing among the “Hands-on” tutorials.
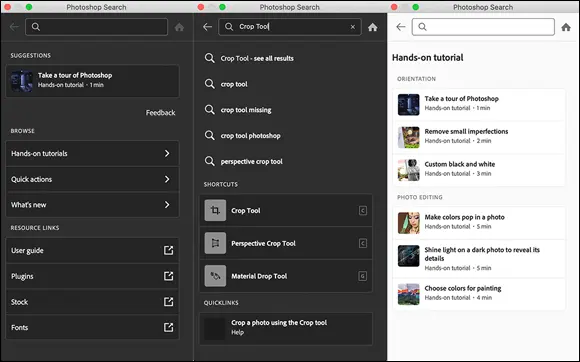
FIGURE 3-1:Some commands have submenus, and some have dialog boxes.
You access the Search, Learn and Help panel not through Photoshop’s Window menu (the way you open most panels), but rather through the Help menu. Choose Photoshop Help, Hands-on Tutorials, or What’s New in Photoshop to open the panel. (Each menu command opens the panel to the appropriate content.) The keyboard shortcut to open Photoshop Search is ⌘ +F/Ctrl+F. The content available through the Photoshop Search panel is regularly updated, so in that oh-so-uncommon free time you have, you might want to simply browse.
When you’re working in Photoshop, you see a horizontal list of menus spread across the very top (Mac) or near the top (Windows) of the application window: File, Edit, Image, Layer, Type, Select, Filter, 3D, View, Window, and Help. On the Mac, the program also has a menu named Photoshop, just to the left of the File menu.
As with most programs, you click the name of a menu to reveal its commands. For both Mac and Windows, you can click and hold down the mouse button until you’re over the command you want; or you can click and release, move the cursor, and then click again. Some commands, such as Crop and Reveal All, are executed immediately after you choose them. When a command name in the menu is followed by an ellipsis (…) — the Image Size command shown in Figure 3-2, for example — you know that a dialog box will open so that you can input variables and make decisions. A triangle to the right of a command name, such as that which you see next to Image Rotation, indicates a submenu. If you click the command name, another menu appears to the right. The cryptic set of symbols to the right of some commands (for example, Image Size) is the keyboard shortcut for opening the command’s dialog box. (I show you how to assign keyboard shortcuts later, in the section “Sugar and spice, shortcuts are nice.”)
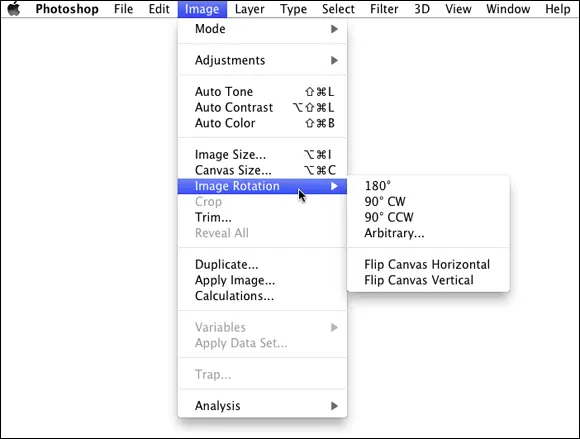
FIGURE 3-2:Some commands have submenus, and some have dialog boxes.
 If you’re working with a HiDPI or Retina screen, the user interface (UI) can be scaled for a better working environment. This would be a great opportunity to explore Photoshop’s Discover panel! Click Photoshop’s Help menu and in the Search field, enter scale UI to fontand then press Return/Enter. In the Photoshop Search panel, double-click HiDPI and Retina Display Support FAQ. Voilà! Instant info that explains exactly what you need to do.
As you read in the upcoming section “ Clearing the table: Custom workspaces,” Photoshop menus are customizable — you don’t have to see commands that you never use. You can also color-code your menu commands, making it easier to spot those that you use regularly.
When a specific command appears grayed out in the menu (in gray type rather than black), that command isn’t available. Some commands, such as Reveal All in Figure 3-2, are available only under specific circumstances, such as when part of the image is being hidden with the Crop tool. When working with Photoshop’s creative filters, you’ll find that many aren’t available unless you’re working with an 8-bit RGB (red/green/blue) image. (I cover color modes and bit depth in Chapter 5, and you can explore filters in Chapter 14.)
Your platter full of panels
Photoshop, like the other programs of the Adobe Creative Cloud, uses floating panels. The panels, many of which you see along the right edge of your screen, usually appear on top of (float over) your image window. (As you drag panels around to customize your workspace, as described later in this section, you’ll find that panels can hide other panels.) The Options bar across the top of the work area and the Toolbox (technically, it’s called the Tools panel) along the left edge of the screen are also panels.
Panels contain Photoshop features that you might need to access so regularly that using a menu command is inconvenient. (I can’t imagine having to mouse to a menu command every time I want to change tools or select a specific layer!) You don’t always need to have your panels visible. In Photoshop, press the Tab key to hide all the panels or press Shift+Tab to hide all but the Toolbox and the Options bar. (Press Tab again to show the panels.) With fewer panels visible, you provide more room for your image. You can selectively hide and show panels via Photoshop’s Window menu.
Photoshop uses expanding/collapsing panel docks. As shown to the right in Figure 3-3, clicking the double-arrow button at the top of a stack of panels expands or collapses that stack to a tidy group of icons. The Color, Libraries, and Layers panels are fully visible. The Swatches, Gradients, Patterns, Adjustments, Channels, and Paths panels — “nested” with the three visible panels — can be made visible by clicking the panel tab. The collapsed History, Properties, Character, and Paragraph panels together occupy only a tiny fraction of the screen — those four buttons to the left of the Color panel. In Figure 3-3, the Application Frame (Mac only) is deselected in Photoshop’s Window menu, allowing the program to utilize the entire screen.
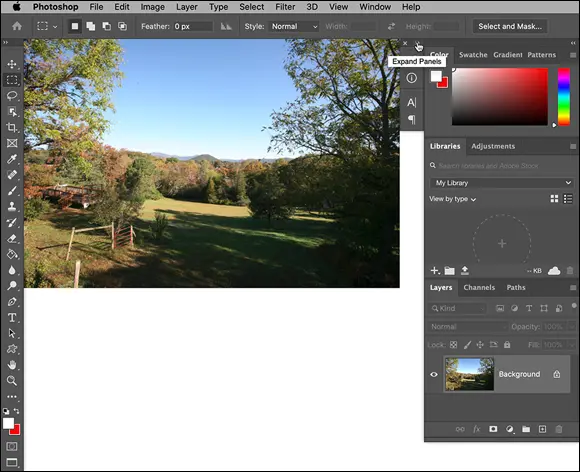
FIGURE 3-3:Nesting and collapsing panels opens up the work area.
By clicking and dragging a panel’s tab when the panel isn’t collapsed, you can move it to another grouping or pull it out of its grouping and away from the edge of the screen. You might, for example, want to drag the Clone Source panel away from its buddies to make it more easily accessible while performing a complex clone operation. (The Clone Source panel is used with the Clone Stamp tool. You can specify up to five different source locations and easily switch among them.)
Читать дальше

 Even cooler is the new Search, Learn, and Help panel, shown in Figure 3-1. Rather than use the formal name, you can just call the panel “Photoshop Search.” As you can see, the panel content changes depending on what you want to know. To the left is the basic appearance of the panel. In the center, you see some of the results from using the Search field to find info on (in this case) the Crop tools. To the right, you see browsing among the “Hands-on” tutorials.

 If you’re working with a HiDPI or Retina screen, the user interface (UI) can be scaled for a better working environment. This would be a great opportunity to explore Photoshop’s Discover panel! Click Photoshop’s Help menu and in the Search field, enter scale UI to fontand then press Return/Enter. In the Photoshop Search panel, double-click HiDPI and Retina Display Support FAQ. Voilà! Instant info that explains exactly what you need to do.


