John Paul Mueller - Algorithms For Dummies
Здесь есть возможность читать онлайн «John Paul Mueller - Algorithms For Dummies» — ознакомительный отрывок электронной книги совершенно бесплатно, а после прочтения отрывка купить полную версию. В некоторых случаях можно слушать аудио, скачать через торрент в формате fb2 и присутствует краткое содержание. Жанр: unrecognised, на английском языке. Описание произведения, (предисловие) а так же отзывы посетителей доступны на портале библиотеки ЛибКат.

- Название:Algorithms For Dummies
- Автор:
- Жанр:
- Год:неизвестен
- ISBN:нет данных
- Рейтинг книги:3 / 5. Голосов: 1
-
Избранное:Добавить в избранное
- Отзывы:
-
Ваша оценка:
Algorithms For Dummies: краткое содержание, описание и аннотация
Предлагаем к чтению аннотацию, описание, краткое содержание или предисловие (зависит от того, что написал сам автор книги «Algorithms For Dummies»). Если вы не нашли необходимую информацию о книге — напишите в комментариях, мы постараемся отыскать её.
Algorithms For Dummies,
Algorithms For Dummies
Algorithms For Dummies — читать онлайн ознакомительный отрывок
Ниже представлен текст книги, разбитый по страницам. Система сохранения места последней прочитанной страницы, позволяет с удобством читать онлайн бесплатно книгу «Algorithms For Dummies», без необходимости каждый раз заново искать на чём Вы остановились. Поставьте закладку, и сможете в любой момент перейти на страницу, на которой закончили чтение.
Интервал:
Закладка:
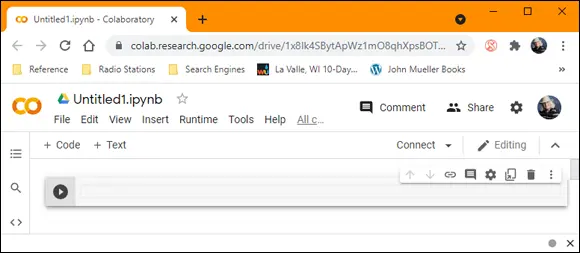
FIGURE 3-5:Create a new Python 3 Notebook.
The notebook shown in Figure 3-5 lets you change the filename by clicking it. To run the code in a particular cell, you click the right-pointing arrow on the left side of that cell. After you run the code, you must choose the next cell directly.
Opening existing notebooks
You can open existing notebooks found in local storage, on Google Drive, or on GitHub. You can also open any of the Colab examples or upload files from sources that you can access, such as a network drive on your system. In all cases, you begin by choosing File ⇒ Open Notebook. You see the dialog box shown in Figure 3-6.
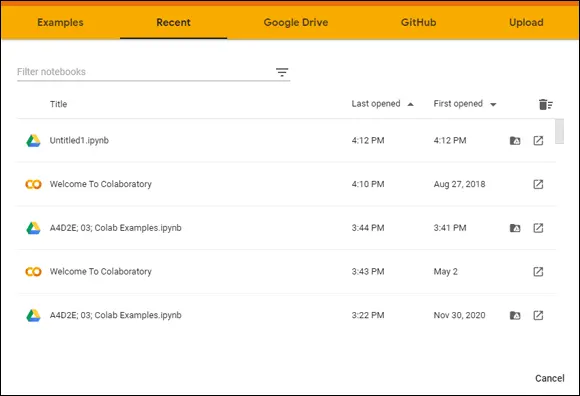
FIGURE 3-6:Use this dialog box to open existing notebooks.
The default view shows all the files you opened recently, regardless of location. The files appear in alphabetical order. You can filter the number of items displayed by typing a string into the Filter Notebooks field. Across the top are other options for opening notebooks.
 Even if you’re not logged in, you can still access the Colab example projects. These projects help you understand Colab but won’t allow you to do anything with your own projects. Even so, you can still experiment with Colab without logging into Google first. The following sections tell you more details about these options.
Using Google Drive for existing notebooks
Google Drive is the default location for many operations in Colab, and you can always choose it as a destination. When working with Google Drive, you see a list of files similar to those shown in Figure 3-6. To open a particular file, you click its link in the dialog box. The file opens in the current tab of your browser.
Using GitHub for existing notebooks
When working with GitHub, you initially need to provide the location of the source code online, as shown in Figure 3-7. The location must point to a public project; you can’t use Colab to access private projects.
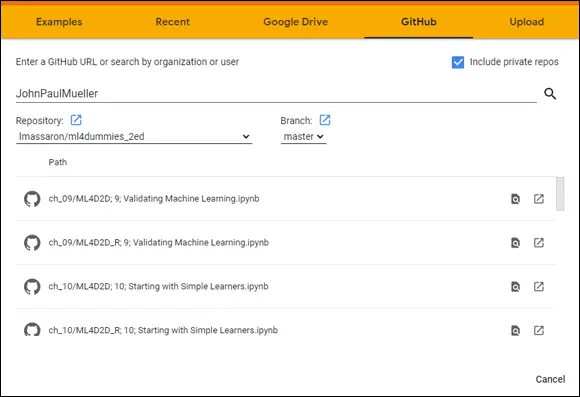
FIGURE 3-7:When using GitHub, you must provide the location of the source code.
After you make the connection to GitHub, you see two lists: repositories, which are containers for code related to a particular project; and branches, a particular implementation of the code. Selecting a repository and branch displays a list of notebook files that you can load into Colab. Simply click the required link, and it loads as if you were using a Google Drive ( https://drive.google.com/ ), which is another type of online storage.
Using local storage for existing notebooks
If you want to use the downloadable source for this book, or any local source for that matter, you select the Upload tab of the dialog box. In the center is a single button, Choose File. Clicking this button opens the File Open dialog box for your browser. You locate the file you want to upload, just as you normally would for opening any file.
 Selecting a file and clicking Open uploads the file to Google Drive. If you make changes to the file, those changes appear on Google Drive, not on your local drive. Depending on your browser, you usually see a new window open with the code loaded. However, you could also simply see a success message, in which case you must now open the file using the same technique as you would when using Google Drive. In some cases, your browser asks whether you want to leave the current page. You should tell the browser to do so.
The File ⇒ Upload Notebook command also uploads a file to Google Drive. In fact, uploading a notebook works like uploading any other kind of file, and you see the same dialog box. If you want to upload other kinds of files, using the File ⇒ Upload Notebook command is likely faster.
Saving notebooks
Colab provides a significant number of options for saving your notebook. However, none of these options works with your local drive. After you upload content from your local drive to Google Drive or GitHub, Colab manages the content in the cloud and not on your local drive. To save updates to your local drive, you must download the file to your local drive. The following sections review the cloud-based options for saving notebooks.
Using Drive to save notebooks
The default location for storing your data is Google Drive. When you choose File ⇒ Save, the content you create goes to the root directory of your Google Drive. If you want to save the content to a different folder, you need to select that folder in Google Drive ( https://drive.google.com/ ).
Colab tracks the versions of your project as you perform saves. However, as these revisions age, Colab removes them. To save a version that won’t age, you use the File ⇒ Save and Pin Revision command. To see the revisions for your project, choose File ⇒ Revision History.
You can also save a copy of your project by choosing File ⇒ Save a Copy In Drive. The copy receives the word Copy as part of its name. Of course, you can rename it later. Colab stores the copy in the current Google Drive folder.
Using GitHub to save notebooks
GitHub provides an alternative to Google Drive for saving content. It offers an organized method of sharing code for the purpose of discussion, review, and distribution. You can find GitHub at https://github.com/ . The source code for this book appears at https://github.com/lmassaron/algo4d_2ed , so you can access it easily from Colab.
You may use only public repositories when working with GitHub from Colab, even though GitHub also supports private repositories. To save a file to GitHub, choose File ⇒ Save a Copy in GitHub. If you aren’t already signed into GitHub, Colab displays a window that requests your sign-in information. After you sign in, you see a dialog box similar to the one shown in Figure 3-8.
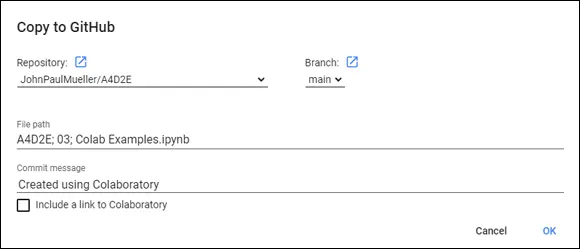
FIGURE 3-8:Using GitHub means storing your data in a repository.
If your account doesn’t currently have a repository, you must either create a new repository or choose an existing repository in which to store your data. After you save the file, it appears in the GitHub repository of your choice. The repository includes a link to open the data in Colab by default, unless you choose not to include this feature.
Читать дальшеИнтервал:
Закладка:
Похожие книги на «Algorithms For Dummies»
Представляем Вашему вниманию похожие книги на «Algorithms For Dummies» списком для выбора. Мы отобрали схожую по названию и смыслу литературу в надежде предоставить читателям больше вариантов отыскать новые, интересные, ещё непрочитанные произведения.


Обсуждение, отзывы о книге «Algorithms For Dummies» и просто собственные мнения читателей. Оставьте ваши комментарии, напишите, что Вы думаете о произведении, его смысле или главных героях. Укажите что конкретно понравилось, а что нет, и почему Вы так считаете.