Chris McCain - Mastering VMware® Infrastructure3
Здесь есть возможность читать онлайн «Chris McCain - Mastering VMware® Infrastructure3» — ознакомительный отрывок электронной книги совершенно бесплатно, а после прочтения отрывка купить полную версию. В некоторых случаях можно слушать аудио, скачать через торрент в формате fb2 и присутствует краткое содержание. Город: Indianapolis, Год выпуска: 2008, ISBN: 2008, Издательство: WILEY Wiley Publishing, Inc., Жанр: Программы, ОС и Сети, на английском языке. Описание произведения, (предисловие) а так же отзывы посетителей доступны на портале библиотеки ЛибКат.

- Название:Mastering VMware® Infrastructure3
- Автор:
- Издательство:WILEY Wiley Publishing, Inc.
- Жанр:
- Год:2008
- Город:Indianapolis
- ISBN:978-0-470-18313-7
- Рейтинг книги:5 / 5. Голосов: 1
-
Избранное:Добавить в избранное
- Отзывы:
-
Ваша оценка:
Mastering VMware® Infrastructure3: краткое содержание, описание и аннотация
Предлагаем к чтению аннотацию, описание, краткое содержание или предисловие (зависит от того, что написал сам автор книги «Mastering VMware® Infrastructure3»). Если вы не нашли необходимую информацию о книге — напишите в комментариях, мы постараемся отыскать её.
Mastering VMware® Infrastructure3 — читать онлайн ознакомительный отрывок
Ниже представлен текст книги, разбитый по страницам. Система сохранения места последней прочитанной страницы, позволяет с удобством читать онлайн бесплатно книгу «Mastering VMware® Infrastructure3», без необходимости каждый раз заново искать на чём Вы остановились. Поставьте закладку, и сможете в любой момент перейти на страницу, на которой закончили чтение.
Интервал:
Закладка:
Table 2.3: Custom ESX Partition Scheme
| Mount point name | Type | Size |
|---|---|---|
| /boot | Ext3 | 200MB |
| / | Ext3 | 25,000MB (25GB) |
| (none) | VMFS3 | Varies |
| (none) | Swap | 1,600MB(1.6GB) |
| /var | Ext3 | 12,000MB (12GB) |
| (none) | vmkcore | 100MB |
Just because local VMFS 3 storage might not hold much significance in an ESX Server deployment does not mean that all local storage is irrelevant. The availability of the /(root) file system, vmkcore, Service Console swap, and so forth is critical to a functioning ESX Server. For the safety of the installed Service Console always install ESX Server on a hardware-based RAID array. Unless you intend to use a product like LeftHand Networks' VSA, there is little need to build a RAID 5 array with three or more large hard drives. A RAID1 (mirrored) array provides the needed reliability while minimizing the disk requirements.
ESX Server 3.5 offers a CD-based installation and an unattended installation that uses the same kickstart file technology commonly used for unattended Linux installations. We'll begin by looking at a standard CD installation and then transition into the automated ESX Server installation method.
CD-ROM-Based Installation
Readers who have already done ESX Server installs are probably wondering what we could be talking about in this section given that the installation can be completed by simply clicking Next until the Finish button shows up. And though this is true, there are some significant decisions to be made through the installation — decisions that affect the future of the ESX Server deployment as well as decisions that could cause severe damage to company data. For this reason, it is important for the experienced administrator and the installation newbie to read this section carefully and understand how best to install ESX Server to support the current and future demands of the VI3 deployment.
Perform the following steps to install ESX Server 3.5 from a CD:
1. Configure the server to boot from the CD, insert the VMware ESX Server 3.5 CD, and reboot the computer.
2. Select the graphical installation mode by pressing the Enter key at the boot options screen, shown in Figure 2.3.
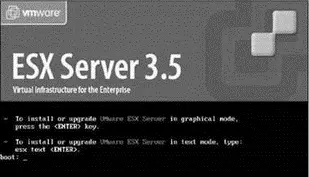
Figure 2.3ESX Server 3.5 includes a graphical installation mode, which includes an enhanced GUI and a text-based installation mode better suited for installing over a wide area network.
3. At the CD Media Test screen, shown in Figure 2.4, click the Skip button to continue with the installation. Click the Test button to identify any errors in the installation media.

Figure 2.4To prevent installation errors due to bad media, the CD can be tested early in the install procedure.
4. Click the Next button on the Welcome to the ESX Server 3.5 Installer screen.
5. Select the U.S. English keyboard layout, or whichever is appropriate for your installation, as shown in Figure 2.5. Then click the Next button.
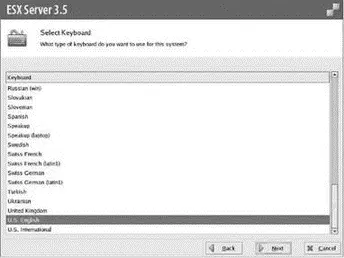
Figure 2.5ESX Server 3.5 offers support for numerous keyboard layouts.
6. Select the Wheel Mouse (PS/2), shown in Figure 2.6. Or if you choose to match your mouse model exactly, select the appropriate option.
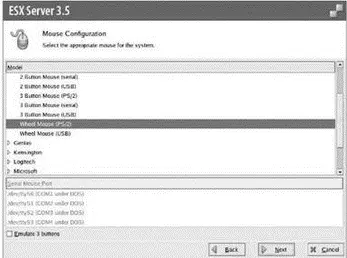
Figure 2.6ESX Server 3.5 offers support for numerous models of mouse devices.
7. Select the Yes button to initialize any device to be used for storing the ESX Server 3.5 installation partitions, shown in Figure 2.7.
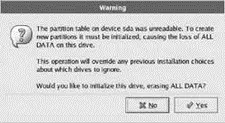
Figure 2.7Unknown devices must be initialized for ESX Server 3.5 to be installed.
If SAN storage has already been presented to the server being installed, it could be possible to initialize SAN LUNs with production data. As a precaution, it is an excellent idea to disconnect the server from the SAN or ensure LUN masking has been performed to prevent the server from accessing LUNs.
Access to the SAN is only required during installation if a boot from SAN configuration is required.
8. As shown in Figure 2.8, select the check box labeled I Accept the Terms of the License Agreement and click the Next button.

Figure 2.8The ESX Server 3.5 license agreement must be accepted; however no licenses are configured during the installation wizard.
9. As shown in Figure 2.9, select the Recommended radio button option to allow the installation wizard to automatically partition the local disk. Ensure that the local disk option is selected in the Install ESX Server on the drop-down list. To protect any existing VMFS data, ensure that the Keep Virtual Machines and the VMFS (Virtual Machine File System) That Contains Them option is selected.
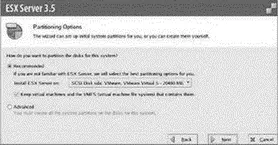
Figure 2.9The ESX Server 3.5 installation wizard offers automatic partitioning of the selected disk and protection for any existing data that resides in a VMFS-formatted partition.
10. Click the Yes button on the partition removal warning, shown in Figure 2.10.
11. Review the partitioning strategy, as shown in Figure 2.11, and click the Next button to continue the installation.
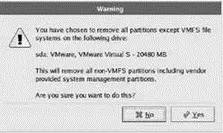
Figure 2.10The ESX Server 3.5 installation wizard offers a warning before removing all partitions on the selected disk.
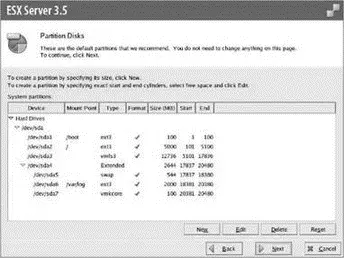
Figure 2.11ESX Server 3.5 default partitioning provides a configuration that offers successful installation and system operation.
As discussed in the previous section, it might be necessary to alter the default partitioning strategy. This does not mean that all partitions must be built from scratch. To change the default partition strategy, select the partition to change and click the Edit button.
Start the partition customization by reducing the space allocated to the local partition with a type of VMFS 3. Once this partition is reduced, the other partitions — /boot, /swap, and /var/log — can be edited. After these partitions have been reconfigured, any leftover space can be given back to the local VMFS 3 partition and the installation can proceed.
12. Ensure that the ESX Server 3.5 installation wizard has selected to boot from the same drive that was selected for partitioning. By default, the selection should be correct and should not be configurable without selecting the option to allow editing. As shown in Figure 2.12, this screen provides a default configuration consistent with the previous installation configuration. This avoids misconfiguration in which the installation is performed on a local disk but the server is booted from a SAN LUN, or vice versa.
Читать дальшеИнтервал:
Закладка:
Похожие книги на «Mastering VMware® Infrastructure3»
Представляем Вашему вниманию похожие книги на «Mastering VMware® Infrastructure3» списком для выбора. Мы отобрали схожую по названию и смыслу литературу в надежде предоставить читателям больше вариантов отыскать новые, интересные, ещё непрочитанные произведения.


Обсуждение, отзывы о книге «Mastering VMware® Infrastructure3» и просто собственные мнения читателей. Оставьте ваши комментарии, напишите, что Вы думаете о произведении, его смысле или главных героях. Укажите что конкретно понравилось, а что нет, и почему Вы так считаете.