Chris McCain - Mastering VMware® Infrastructure3
Здесь есть возможность читать онлайн «Chris McCain - Mastering VMware® Infrastructure3» — ознакомительный отрывок электронной книги совершенно бесплатно, а после прочтения отрывка купить полную версию. В некоторых случаях можно слушать аудио, скачать через торрент в формате fb2 и присутствует краткое содержание. Город: Indianapolis, Год выпуска: 2008, ISBN: 2008, Издательство: WILEY Wiley Publishing, Inc., Жанр: Программы, ОС и Сети, на английском языке. Описание произведения, (предисловие) а так же отзывы посетителей доступны на портале библиотеки ЛибКат.

- Название:Mastering VMware® Infrastructure3
- Автор:
- Издательство:WILEY Wiley Publishing, Inc.
- Жанр:
- Год:2008
- Город:Indianapolis
- ISBN:978-0-470-18313-7
- Рейтинг книги:5 / 5. Голосов: 1
-
Избранное:Добавить в избранное
- Отзывы:
-
Ваша оценка:
Mastering VMware® Infrastructure3: краткое содержание, описание и аннотация
Предлагаем к чтению аннотацию, описание, краткое содержание или предисловие (зависит от того, что написал сам автор книги «Mastering VMware® Infrastructure3»). Если вы не нашли необходимую информацию о книге — напишите в комментариях, мы постараемся отыскать её.
Mastering VMware® Infrastructure3 — читать онлайн ознакомительный отрывок
Ниже представлен текст книги, разбитый по страницам. Система сохранения места последней прочитанной страницы, позволяет с удобством читать онлайн бесплатно книгу «Mastering VMware® Infrastructure3», без необходимости каждый раз заново искать на чём Вы остановились. Поставьте закладку, и сможете в любой момент перейти на страницу, на которой закончили чтение.
Интервал:
Закладка:
By default, an ESX Server 3.5 host is not configured to allow access to the scripted installer. An error, shown in Figure 2.23, identifies clearly that a given host has not been configured.
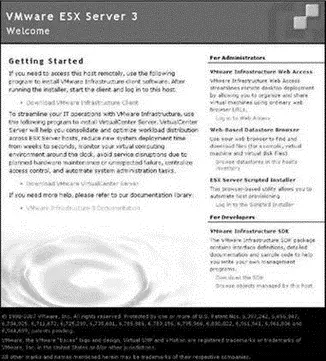
Figure 2.22The home page for an ESX Server host provides access to the Scripted Installer, which generates an answer file through a web-based wizard.

Figure 2.23Access to the scripted installer must be enabled on an ESX Server 3.5 host.
Perform the following steps to enable the Scripted Installer on an ESX Server 3.5 host and to create a kickstart file:
1. Establish a console session with an ESX Server 3.5 host.
2. Type the following command:
cd /usr/lib/vmware/webAccess/tomcat/apache-tomcat-5.5.17/webapps/ui/WEB-INF
3. Type the following command to get a list of all files and folders in the current directory:
ls
4. Type the following command:
nano -w struts-config.xml
5. Comment out the following line by adding to the end of the line, as shown here and in Figure 2.24:
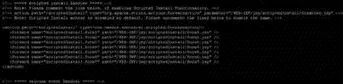
Figure 2.24Enabling the Scripted Installer requires minor editing of the struts-config.xml file.
6. Uncomment the following lines by removing the that precede and conclude the series of lines, as shown here and in Figure 2.24:
7. Type the following command:
service vmware-webAccess restart
8. Return to the ESX Server 3.5 home page and click the link labeled Log In to the Scripted Installer.
9. The Scripted Install web-based wizard will begin. Select the appropriate options for the unattended installation, as shown in Figure 2.25, and then click the Next button. The options include:
♦ Installation Type: Initial Installation | Upgrade
♦ Installation Method: CD-ROM | Remote | NFS
♦ This selection identifies where the installation files are located.
♦ Remote Server URL:
♦ Network Method: DHCP | Static IP
♦ Static will be the more common selection.
♦ Create a default network for VMs: Yes | No
♦ This option is negligible. If Yes is selected, the VM network can be deleted later. If No is selected, the VM network can be created later.
♦ VLAN:
♦ Provide a VLAN ID for Service Console only if you know that a VLAN is configured on the physical switch to which the network adapter is connected.
♦ Time Zone
♦ Reboot After Installation: Yes | No
♦ Root password
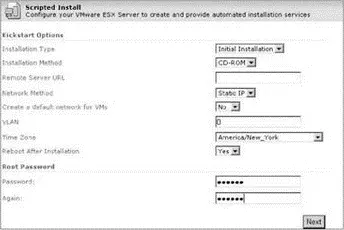
Figure 2.25The Scripted Installer wizard defines the installation type and method as well as the Service Console configuration information.
10. As shown in Figure 2.26, set the hostname and IP address information of the server to be installed with the answer file and then click the Next button.
11. Select the check box labeled I Have Read and Accept the Terms of the License Agreement and then click the Next button.
12. As shown in Figure 2.27, configure the disk partitioning strategy and licensing mode for the target server and then click the Next button. Apply any necessary customizations to the partitions. Licensing options include: Post Install | Use License Server | Use Host License File.
13. Configure the licensing options, as shown in Figure 2.28, and then click the Next button.
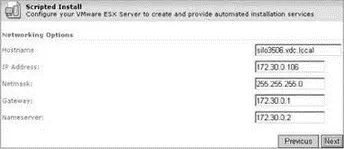
Figure 2.26The Scripted Installer defines the hostname and IP address configuration for the target ESX Server.
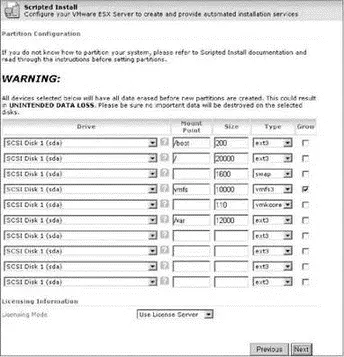
Figure 2.27The Scripted Installer allows disk partitioning customizations and licensing mode.
14. Click the Download Kickstart File from the final page of the Scripted Installer, as shown in Figure 2.29.
Since a Windows file share is not an option for the location of a kickstart file, the file must be copied to an appropriate location, which is most commonly an NFS directory. Use WordPad to review the kickstart file created by the Scripted Installer wizard. A sample default file is shown in Figure 2.30.
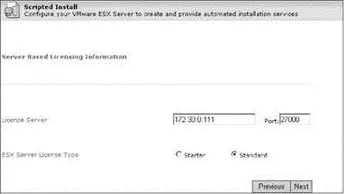
Figure 2.28The Scripted Installer automates the configuration of pointing an ESX Server to a license server.
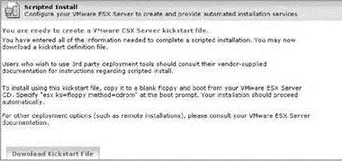
Figure 2.29The finished kickstart file can be saved to the local computer accessing the Scripted Installer web-based wizard.
Using free tools like Veeam FastSCP (http://www.veeam.com) or WinSCP (http://www.winscp.com), the kickstart file can be copied to an NFS directory that is accessible to the target ESX Server. Once the file is in place on the NFS directory, the unattended installation can be launched from the target server.
Perform the following steps to perform an unattended installation using a CD for the installation files and a remote NFS directory for the kickstart file:
1. Boot the target computer from the ESX Server 3.5 CD.
2. At the installation mode selection screen, type the following command, as shown in Figure 2.31:
esx ks=nfs:: ksdevice=
3. The installation will begin and continue until the final reboot.
Kickstart files can be edited directly through WordPad so that the wizard does not have to be executed for each new installation. Unfortunately, the kickstart file does not provide a way of generating unique information for each installation and therefore each install will require a manually created (or adjusted) kickstart file that is specific to that installation — particularly configuration of static information that must be unique like IP address and hostname.
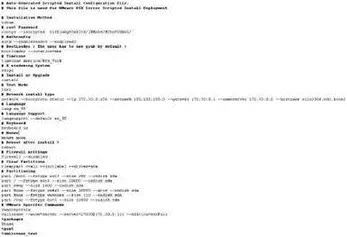
Figure 2.30A sample kickstart file created by the Scripted Installer wizard, viewed through WordPad
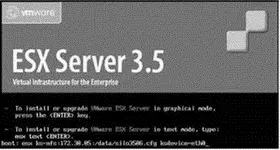
Figure 2.31Using a local installation media with a kickstart file on an NFS directory
You may have noticed the kickstart file creation wizard did not allow for configuration of Service Console NIC or any virtual networking or storage configuration. That's because by default it doesn't. The lack of Service Console NIC configuration can cause access problems because the kickstart installation automatically selects the NIC with the lowest PCI address. If your Service Console is not to be associated with the NIC that has the lowest PCI address, a postinstallation configuration will be required to unlink the current NIC and link the correct NIC. We will cover how to do this in the next section of this chapter.
Читать дальшеИнтервал:
Закладка:
Похожие книги на «Mastering VMware® Infrastructure3»
Представляем Вашему вниманию похожие книги на «Mastering VMware® Infrastructure3» списком для выбора. Мы отобрали схожую по названию и смыслу литературу в надежде предоставить читателям больше вариантов отыскать новые, интересные, ещё непрочитанные произведения.


Обсуждение, отзывы о книге «Mastering VMware® Infrastructure3» и просто собственные мнения читателей. Оставьте ваши комментарии, напишите, что Вы думаете о произведении, его смысле или главных героях. Укажите что конкретно понравилось, а что нет, и почему Вы так считаете.