Chris McCain - Mastering VMware® Infrastructure3
Здесь есть возможность читать онлайн «Chris McCain - Mastering VMware® Infrastructure3» — ознакомительный отрывок электронной книги совершенно бесплатно, а после прочтения отрывка купить полную версию. В некоторых случаях можно слушать аудио, скачать через торрент в формате fb2 и присутствует краткое содержание. Город: Indianapolis, Год выпуска: 2008, ISBN: 2008, Издательство: WILEY Wiley Publishing, Inc., Жанр: Программы, ОС и Сети, на английском языке. Описание произведения, (предисловие) а так же отзывы посетителей доступны на портале библиотеки ЛибКат.

- Название:Mastering VMware® Infrastructure3
- Автор:
- Издательство:WILEY Wiley Publishing, Inc.
- Жанр:
- Год:2008
- Город:Indianapolis
- ISBN:978-0-470-18313-7
- Рейтинг книги:5 / 5. Голосов: 1
-
Избранное:Добавить в избранное
- Отзывы:
-
Ваша оценка:
Mastering VMware® Infrastructure3: краткое содержание, описание и аннотация
Предлагаем к чтению аннотацию, описание, краткое содержание или предисловие (зависит от того, что написал сам автор книги «Mastering VMware® Infrastructure3»). Если вы не нашли необходимую информацию о книге — напишите в комментариях, мы постараемся отыскать её.
Mastering VMware® Infrastructure3 — читать онлайн ознакомительный отрывок
Ниже представлен текст книги, разбитый по страницам. Система сохранения места последней прочитанной страницы, позволяет с удобством читать онлайн бесплатно книгу «Mastering VMware® Infrastructure3», без необходимости каждый раз заново искать на чём Вы остановились. Поставьте закладку, и сможете в любой момент перейти на страницу, на которой закончили чтение.
Интервал:
Закладка:
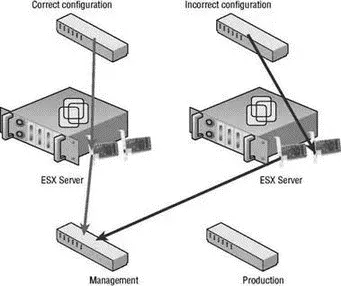
Figure 2.32The virtual switch used by the Service Console must be associated with the physical switch that makes up the logical subnet from which the Service Console will be managed.
Should the incorrect PCI address be selected, the result is an inability to reach the ESX Server Web Access page after the installation is complete. The simplest fix for this problem is to unplug the network cable from the current Ethernet port and continue trying the remaining ports until the web page is accessible. The problem with this solution is that it puts a quick end to any type of documented standard that dictates the physical connectivity of the ESX Server hosts in a virtual environment.
So what then is the better fix? Is a reinstallation in order? If you like installations, go for it, but there is something much better. A quick visit to the command line and this problem is solved:
Remember that ESX Server holds its roots in Linux and therefore any type of command-line management or configuration will always be case sensitive.
1. Log in to the console of the ESX Server using the root user account.
2. Review the PCI addresses of the physical NICs in the server by typing the following command:
esxcfg-nics -l
3. The results, as shown in Figure 2.33, will list identifying information for each NIC. Note the PCI addresses and names of each adapter.
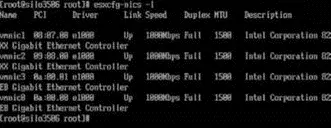
Figure 2.33The esxcfg-nics command provides detailed information about each adapter in an ESX Server host.
4. Review the existing Service Console configuration by typing the following command:
esxcfg-vswitch -l
5. The results, as shown in Figure 2.34, will display the current configuration of the Service Console port association.
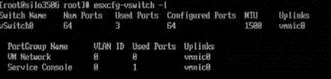
Figure 2.34The esxcfg-vswitch command provides information about the current Service Console configuration.
6. To change the NIC association, the existing NIC must be unlinked by typing the following command:
esxcfg-vswitch -U vmnic# vSwitch#
In this example the appropriate command would be:
esxcfg-vswitch -U vmnic0 vSwitch0
7. Use the following command to associate a new NIC with the vSwitch0 used by the Service Console:
esxcfg-vswitch -L vmnic# vSwitch#
If still unsure of the correct NIC, try each NIC listed in the output from step 2. For this example, to associate vmnic1 with a PCI address of 08:07:00, the appropriate command would be:
esxcfg-vswitch -L vmnic1 vSwitch0
8. Repeat steps 6 and 7 until a successful connection is made to the Web Access page of the ESX Server host.
Service Console Memory
Adjusting the amount of memory given to the Service Console is not mandatory but is strongly recommended if you have to install third-party applications into the console operating system. These third-party applications will consume memory available to the Service Console. As noted earlier, the Service Console is only granted 272MB of RAM by default, as shown in Figure 2.35, with a hard-coded maximum of 800MB.
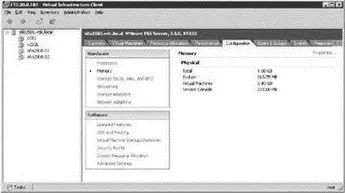
Figure 2.35The Service Console is allocated 272 MB of RAM by default.
The difference of 528MB is, and should be, negligible in relation to the amount of memory in the ESX Server host. Certainly an ESX Server host in a production network would not have less than 8GB of memory. Even that would be the low end. So adding 528MB of memory for use by the Service Console does not place a significant restriction on the number of virtual machines a host is capable of running due to lack of available memory.
Perform the following steps to increase the amount of memory allocated to the Service Console:
1. Use the VI Client to connect to an ESX Server host or VirtualCenter Server installation.
2. Select the appropriate host from the inventory tree on the left and then select the Configuration tab from the details pane on the right.
3. Select Memory from the Hardware menu.
4. Click the Properties link.
5. As shown in Figure 2.36, enter the amount of memory to be allocated to the Service Console in the text box and then click the OK button. The value entered must be between 256 and 800.
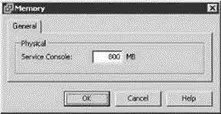
Figure 2.36The amount of memory allocated to the Service Console can be increased to a maximum of 800 MB.
6. Reboot the ESX Server host. As shown in Figure 2.37, the Configuration tab now reflects the current memory allocated and the new amount of memory to be allocated after a reboot.
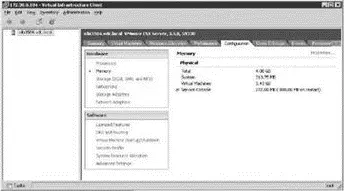
Figure 2.37Altering the amount of memory allocated to the Service Console requires a reboot of the ESX Server host.
Time Synchronization
Time synchronization in ESX Server is an important configuration because the ramifications of incorrect time run deep. Time synchronization issues can affect things like performance charting, SSH key expirations, NFS access, backup jobs, authentication, and more. After the installation of ESX Server (or in a kickstart script), the host should be configured to perform time synchronization with a reliable time source. This source could be another server on your network or an Internet time source. For the sake of managing time synchronization, it is easiest to synchronize all your servers against one reliable internal time server and then synchronize the internal time server with a reliable Internet time server.
Configuring time synchronization for an ESX Server requires several steps, including Service Console firewall configuration and edits to several configuration files.
Perform the following steps to enable the NTP Client in the Service Console firewall:
1. Use the VI Client to connect directly to the ESX Server host or to a VirtualCenter installation.
2. Select the hostname from the inventory tree on the left and then click the Configuration tab in the details pane on the right.
3. Select Security Profile from the Software menu.
4. As shown in Figure 2.38, enable the NTP Client option in the Firewall Properties dialog box.
5. Alternatively the NTP client could be enabled using the following command:
esxcfg-firewall -e ntpClient
Type the following command to apply the changes made to the Service Console Firewall: service mgmt-vmware restart
Perform the following steps to configure the ntp.conf and step-tickers files for NTP time synchronization on an ESX Server host:
1. Log in to a console or SSH session with root privileges. If SSH has not been enabled for the host, log in with a standard user account and use the su - command to elevate to the root user privileges and environment.

Figure 2.38The NTP Client can be enabled through the Security Profile of an ESX Server host configuration.
Читать дальшеИнтервал:
Закладка:
Похожие книги на «Mastering VMware® Infrastructure3»
Представляем Вашему вниманию похожие книги на «Mastering VMware® Infrastructure3» списком для выбора. Мы отобрали схожую по названию и смыслу литературу в надежде предоставить читателям больше вариантов отыскать новые, интересные, ещё непрочитанные произведения.


Обсуждение, отзывы о книге «Mastering VMware® Infrastructure3» и просто собственные мнения читателей. Оставьте ваши комментарии, напишите, что Вы думаете о произведении, его смысле или главных героях. Укажите что конкретно понравилось, а что нет, и почему Вы так считаете.