Mark Middlebrook - AutoCAD 2005 for Dummies
Здесь есть возможность читать онлайн «Mark Middlebrook - AutoCAD 2005 for Dummies» — ознакомительный отрывок электронной книги совершенно бесплатно, а после прочтения отрывка купить полную версию. В некоторых случаях можно слушать аудио, скачать через торрент в формате fb2 и присутствует краткое содержание. Город: Indianapolis, Год выпуска: 2004, ISBN: 2004, Издательство: Wiley Publishing, Inc, Жанр: Программы, на английском языке. Описание произведения, (предисловие) а так же отзывы посетителей доступны на портале библиотеки ЛибКат.

- Название:AutoCAD 2005 for Dummies
- Автор:
- Издательство:Wiley Publishing, Inc
- Жанр:
- Год:2004
- Город:Indianapolis
- ISBN:0-7645-7138-9
- Рейтинг книги:5 / 5. Голосов: 1
-
Избранное:Добавить в избранное
- Отзывы:
-
Ваша оценка:
AutoCAD 2005 for Dummies: краткое содержание, описание и аннотация
Предлагаем к чтению аннотацию, описание, краткое содержание или предисловие (зависит от того, что написал сам автор книги «AutoCAD 2005 for Dummies»). Если вы не нашли необходимую информацию о книге — напишите в комментариях, мы постараемся отыскать её.
AutoCAD is more than just another application program, it’s a complete environment for drafting and design. So if you’re new to AutoCAD, you need to know several things to get off to a good start — especially how to use the command line area and set up your drawing properly. These key techniques are described in this part of the book.
If you’ve used earlier versions of AutoCAD, you’ll be most interested in the high points of the new release, including some newer interface components. The lowdown on what’s new is here, too.
AutoCAD 2005 for Dummies — читать онлайн ознакомительный отрывок
Ниже представлен текст книги, разбитый по страницам. Система сохранения места последней прочитанной страницы, позволяет с удобством читать онлайн бесплатно книгу «AutoCAD 2005 for Dummies», без необходимости каждый раз заново искать на чём Вы остановились. Поставьте закладку, и сможете в любой момент перейти на страницу, на которой закончили чтение.
Интервал:
Закладка:
The default here is four sides, and you can accept it simply by pressing the Enter key. (That is, you don’t have to type 4first.)
 AutoCAD uses two kinds of brackets in command line prompts.
• Command options appear in regular brackets: [Close/Undo].
To activate a command option, type the letter(s) that appear in uppercase and then press Enter.
• A Default value or option appears in angled brackets: . To choose the default value or option, simply press Enter.
□ Observe the command line.
You’ll discover a lot about how to use the command line simply by watching it after each action that you take. When you click a toolbar button or menu choice, AutoCAD types the name of the command automatically, so if you’re watching the command line, you’ll absorb the command names more-or-less naturally.
 When AutoCAD types commands automatically in response to your toolbar and menu clicks, it usually adds one or two extra characters to the front of the command name.
• AutoCAD usually puts an underscore in front of the command name (for example, _LINE instead of LINE). The underscore is an Autodesk programmers’ trick that enables non-English versions of AutoCAD to understand the English command names that are embedded in the menus.
• AutoCAD sometimes puts an apostrophe in front of the command name and any underscore (for example, ‘_ZOOM instead of ZOOM). The apostrophe indicates a transparent command; you can run the command in the middle of another command without canceling the first command. For example, you can start the LINE command, run the ZOOM command transparently, and then pick up where you left off with the LINE command.
□ Leave the command line in the default configuration initially.The command line area, like most other parts of the AutoCAD screen, is resizable and relocateable. The default location (docked at the bottom of the AutoCAD screen) and size (three lines deep) work well for most people. Resist the temptation to mess with the command line area’s appearance — at least until you’re comfortable with how to use the command line.
□ Right-click in the command line area for options.If you right-click in the command line area, you’ll see a menu with some useful choices, including Recent Commands — the last six commands that you ran.
□ Press the up-and down-arrow keys to cycle through the stack of commands that you’ve typed recently.This is another handy way to recall and rerun a command. Press the left-and right-arrow keys to edit the command line text that you’ve typed or recalled.
After all these screen hors d’oeuvres, you’re probably getting hungry for the main course — the AutoCAD drawing area. This is where you do your drawing, of course. In the course of creating drawings, you click points to specify locations and distances, click objects to select them for editing, and zoom and pan to get a better view of what you’re working on.
The back and forth needed to get AutoCAD to draw and complete a line is a great example of AutoCAD’s power — and its power to confuse new users. It’s kind of like a wine that tastes a bit harsh initially, but that ages better than something more immediately drinkable.
In other programs, if you want to draw a line, you just draw it. In AutoCAD, you have to press Enter one extra time when you’re done just to tell AutoCAD you really are finished drawing.
But the fact that the Line command remains active after you draw the first line segment makes it much faster to draw complicated, multisegment lines, which is a common activity in a complex drawing.
This is just one example of how AutoCAD favors ease of use for power users doing complex drawings over ease of mastery for beginners, who frequently forget to hit Enter that extra time to close out a command.
Most of this book shows you how to interact with the drawing area, but you should know a few things up front.
One of the initially disorienting things about AutoCAD is that finished drawings can be composed of objects drawn in different spaces , which AutoCAD indicates with the tabs along the bottom of the drawing area (Model, Layout1, and Layout2 by default).
□ Model space is where you create and modify the objects that represent things in the real world — walls, widgets, waterways, or whatever.
□ Paper space is where you create particular views of these objects for plotting, usually with a title block around them. Paper space comprises one or more layouts , each of which can contain a different arrangement of model space views and different title block information.
When you click the Model tab in the drawing area, you see pure, unadulterated model space, as shown in Figure 2-7. When you click one of the paper space layout tabs (Layout1 or Layout2, unless someone has renamed or added to them), you see a paper space layout, as shown in Figure 2-8. A completed layout usually includes one or more viewports , which are windows that display all or part of model space at a particular scale. A layout also usually includes a title block or other objects that exist only in the layout and don’t appear when you click the Model tab. (Think of the viewport as a window looking into model space and the title block as a frame around the window.) Thus, a layout displays model space and paper space objects together, and AutoCAD lets you draw and edit objects in either space. See Chapter 3 for information about creating paper space layouts and Chapter 12 for the lowdown on plotting them.
As I describe in the “Looking for Mr. Status Bar” section in this chapter, after you’ve clicked one of the layout tabs, the status bar’s MODEL/PAPER button moves the cursor between model and paper space while remaining in the particular layout. (As shown in Figures 2-7 and 2-8, the orientation icon at the lower-left corner of the AutoCAD drawing area changes between an X-Y axis for model space and a drafting triangle for paper space as an additional reminder of which space the cursor currently resides in.) Chapter 3 describes the consequences of changing the MODEL/PAPER setting and advises you on how to use it.
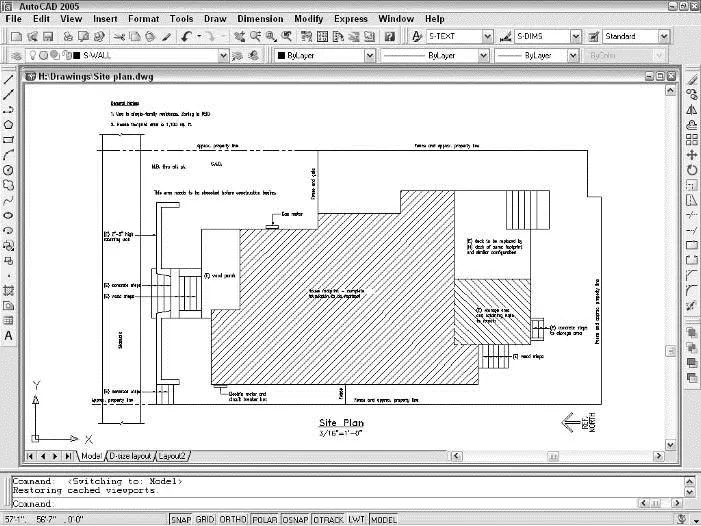
Figure 2-7:Our model lounging around in model space.
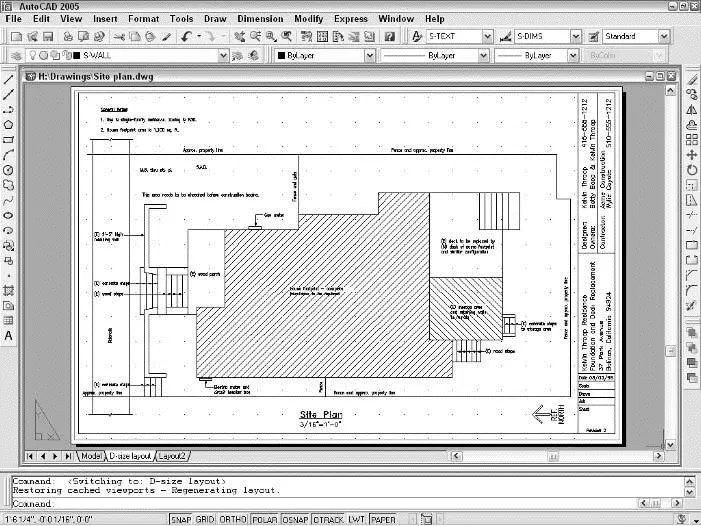
Figure 2-8:Freshly laid out in paper space.
 This back-and-forth with the MODEL/PAPER button or double-clicking is necessary only when you’re drawing things while viewing one of the paper space layouts. In practice, you probably won’t encounter that situation very often. Instead, you’ll do most of your drawing on the Model tab and, after you’ve set up a paper space layout, click its layout tab only when you want to plot.
Here a few other things to know about the AutoCAD drawing area:
□ Efficient, confident use of AutoCAD requires that you continually glance from the drawing area to the command line area (to see those all-important prompts!) and then back up to the drawing area. This sequence is not a natural reflex for most people. Get in the habit of looking at the command line after each action that you take, whether picking something on a toolbar, on a menu, or in the drawing area.
Читать дальшеИнтервал:
Закладка:
Похожие книги на «AutoCAD 2005 for Dummies»
Представляем Вашему вниманию похожие книги на «AutoCAD 2005 for Dummies» списком для выбора. Мы отобрали схожую по названию и смыслу литературу в надежде предоставить читателям больше вариантов отыскать новые, интересные, ещё непрочитанные произведения.


Обсуждение, отзывы о книге «AutoCAD 2005 for Dummies» и просто собственные мнения читателей. Оставьте ваши комментарии, напишите, что Вы думаете о произведении, его смысле или главных героях. Укажите что конкретно понравилось, а что нет, и почему Вы так считаете.