Mark Middlebrook - AutoCAD 2005 for Dummies
Здесь есть возможность читать онлайн «Mark Middlebrook - AutoCAD 2005 for Dummies» — ознакомительный отрывок электронной книги совершенно бесплатно, а после прочтения отрывка купить полную версию. В некоторых случаях можно слушать аудио, скачать через торрент в формате fb2 и присутствует краткое содержание. Город: Indianapolis, Год выпуска: 2004, ISBN: 2004, Издательство: Wiley Publishing, Inc, Жанр: Программы, на английском языке. Описание произведения, (предисловие) а так же отзывы посетителей доступны на портале библиотеки ЛибКат.

- Название:AutoCAD 2005 for Dummies
- Автор:
- Издательство:Wiley Publishing, Inc
- Жанр:
- Год:2004
- Город:Indianapolis
- ISBN:0-7645-7138-9
- Рейтинг книги:5 / 5. Голосов: 1
-
Избранное:Добавить в избранное
- Отзывы:
-
Ваша оценка:
AutoCAD 2005 for Dummies: краткое содержание, описание и аннотация
Предлагаем к чтению аннотацию, описание, краткое содержание или предисловие (зависит от того, что написал сам автор книги «AutoCAD 2005 for Dummies»). Если вы не нашли необходимую информацию о книге — напишите в комментариях, мы постараемся отыскать её.
AutoCAD is more than just another application program, it’s a complete environment for drafting and design. So if you’re new to AutoCAD, you need to know several things to get off to a good start — especially how to use the command line area and set up your drawing properly. These key techniques are described in this part of the book.
If you’ve used earlier versions of AutoCAD, you’ll be most interested in the high points of the new release, including some newer interface components. The lowdown on what’s new is here, too.
AutoCAD 2005 for Dummies — читать онлайн ознакомительный отрывок
Ниже представлен текст книги, разбитый по страницам. Система сохранения места последней прочитанной страницы, позволяет с удобством читать онлайн бесплатно книгу «AutoCAD 2005 for Dummies», без необходимости каждый раз заново искать на чём Вы остановились. Поставьте закладку, и сможете в любой момент перейти на страницу, на которой закончили чтение.
Интервал:
Закладка:
Using a suitable template can save you time and worry because many of the setup options are already set correctly for you. You know the drawing will print correctly; you just have to worry about getting the geometry and text right. Of course, all this optimism assumes that the person who set up the template knew what he or she was doing.
The stock templates that come with AutoCAD are okay as a starting point, but you’ll need to modify them to suit your purposes, or create your own from scratch. In particular, the stock AutoCAD templates aren’t set up for the scales that you’ll want to use. The instructions in the rest of this chapter tell you how to specify scale-dependent setup information.
So the only problems with templates are creating good ones and then later finding the right one to use when you need it. Later in this chapter, in the section “Cooking Up Terrific Templates,” I show you how to create templates from your own setup drawings. Here I show you how to use an already created template, such as one of the templates that comes with AutoCAD 2004 or from one of your CAD-savvy colleagues. If you’re lucky, someone in your office will have created suitable templates that you can use to get going quickly.
Follow these steps to create a new drawing from a template drawing:
1. Run the NEW command by pressing Ctrl+N or choosing File→New.
The Select Template dialog box appears.
The first button on the Standard toolbar runs the QNEW (“Quick NEW”) command instead of the ordinary NEW command. Unless you or someone else has changed the Drawing Template Settings in the Options dialog box, QNEW does the same thing as NEW. See “Cooking Up Terrific Templates,” later in this chapter, for information about how to take advantage of QNEW.
2. Click the name of the template that you want to use as the starting point for your new drawing.
3. Click the Open button.
A new drawing window with a temporary name, such as Drawing2.dwg, appears. (The template you opened remains unchanged on your hard disk.)
 Depending on which template you choose, your new drawing may open with a paper space layout tab, not the Model tab, selected. If that’s the case, click the Model tab before changing the settings described in “The Main Course: Model Space.” The section “Plot Layouts for Any Palate,” later in this chapter, describes how to set up and take advantage of paper space layouts.
4. Press Ctrl+S and save the file under a new name.
Take the time to save the drawing to the appropriate name and location now.
5. Make needed changes.
For most of the templates that come with AutoCAD, you need to consider changing the units, limits, grid and snap settings, linetype scale, and dimension scale. See the section, “The Main Course: Model Space,” for instructions.
6. Consider saving the file as a template.
If you’ll need other drawings in the future similar to the current one, consider saving your modified template as a template in its own right. See the section “Cooking Up Terrific Templates” later in this chapter.
 The simplest, no-frills templates are
 Acad.dwt(for people who customarily work with sheet sizes expressed in inches) and Acadiso.dwt(for people who customarily work with sheet sizes expressed in millimeters). Most of the remaining templates that come with AutoCAD include title blocks for various sizes of sheets. In addition, most templates come in two versions — one for people who use color-dependent plot styles and one for people who use named plot styles. You probably want the color-dependent versions. (Chapter 12 describes the two kinds of plot styles and why you probably want the color-dependent variety.) I warned you that this drawing setup stuff would be complicated!
If you dig around in the Options dialog box, you may discover a setting that turns on the old Startup dialog box, which offers several options other than starting with a template. Among these options are the enticingly named Setup Wizards. These so-called wizards were lame when they first appeared; they’re no better now. Autodesk acknowledges as much by making them almost impossible to find in AutoCAD 2005.
The Main Course: Model Space
Most drawings require a two-part setup:
1. First, set up the model space tab, where you’ll create most of your drawing.
2. Next, create one or more paper space layout tabs for plotting.
After you’ve decided on drawing scale and sheet size, you can perform model space setup as described in this section.
First, you should set the linear and angular units that you want to use in your new drawing. The following procedure describes how:
1. Choose Format→Units from the menu bar.
The Drawing Units dialog box appears, as shown in Figure 3-5.
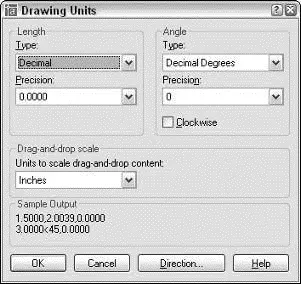
Figure 3-5:The default unit-less units.
2. Choose a linear unit type from the Length Type drop-down list.
Choose the type of unit representation that’s appropriate for your work. Engineering and Architectural units are displayed in feet and inches; the other types of units aren’t tied to any particular unit of measurement. You decide whether each unit represents a millimeter, centimeter, meter, inch, foot, or something else. Decimal units usually are a good choice for metric drawings.
AutoCAD can think in inches! If you’re using Engineering or Architectural units (feet and inches), AutoCAD understands any coordinate you enter as a number of inches. You use the ’ (apostrophe) character on your keyboard to indicate a number in feet instead of inches.
3. From the Length Precision drop-down list, choose the degree of precision you want when AutoCAD displays coordinates and linear measurements.
The precision setting controls how precisely AutoCAD displays coordinates, distances, and prompts in some dialog boxes. In particular, the Coordinates box on the status bar displays the current cursor coordinates using the current precision. A grosser — that is, less precise — precision setting makes the numbers displayed in the status bar more readable and less jumpy. So be gross for now; you can always act a little less gross later.
The linear and angular precision settings only affect AutoCAD’s display of coordinates, distances, and angles on the status bar, in dialog boxes, and in the command line area. For drawings stored as DWG files, AutoCAD always uses maximum precision to store the locations and sizes of all objects that you draw. In addition, AutoCAD provides separate settings for controlling the precision of dimension text — see Chapter 10 for details.
4. Choose an angular unit type from the Angle Type drop-down list.
Читать дальшеИнтервал:
Закладка:
Похожие книги на «AutoCAD 2005 for Dummies»
Представляем Вашему вниманию похожие книги на «AutoCAD 2005 for Dummies» списком для выбора. Мы отобрали схожую по названию и смыслу литературу в надежде предоставить читателям больше вариантов отыскать новые, интересные, ещё непрочитанные произведения.


Обсуждение, отзывы о книге «AutoCAD 2005 for Dummies» и просто собственные мнения читателей. Оставьте ваши комментарии, напишите, что Вы думаете о произведении, его смысле или главных героях. Укажите что конкретно понравилось, а что нет, и почему Вы так считаете.