Wei-Meng Lee - C# 2008 Programmer's Reference
Здесь есть возможность читать онлайн «Wei-Meng Lee - C# 2008 Programmer's Reference» весь текст электронной книги совершенно бесплатно (целиком полную версию без сокращений). В некоторых случаях можно слушать аудио, скачать через торрент в формате fb2 и присутствует краткое содержание. Город: Indianapolis, Год выпуска: 2009, ISBN: 2009, Издательство: Wiley Publishing, Inc., Жанр: Программирование, на английском языке. Описание произведения, (предисловие) а так же отзывы посетителей доступны на портале библиотеки ЛибКат.

- Название:C# 2008 Programmer's Reference
- Автор:
- Издательство:Wiley Publishing, Inc.
- Жанр:
- Год:2009
- Город:Indianapolis
- ISBN:978-0-470-28581-7
- Рейтинг книги:4 / 5. Голосов: 1
-
Избранное:Добавить в избранное
- Отзывы:
-
Ваша оценка:
C# 2008 Programmer's Reference: краткое содержание, описание и аннотация
Предлагаем к чтению аннотацию, описание, краткое содержание или предисловие (зависит от того, что написал сам автор книги «C# 2008 Programmer's Reference»). Если вы не нашли необходимую информацию о книге — напишите в комментариях, мы постараемся отыскать её.
C# 2008 Programmer's Reference — читать онлайн бесплатно полную книгу (весь текст) целиком
Ниже представлен текст книги, разбитый по страницам. Система сохранения места последней прочитанной страницы, позволяет с удобством читать онлайн бесплатно книгу «C# 2008 Programmer's Reference», без необходимости каждый раз заново искать на чём Вы остановились. Поставьте закладку, и сможете в любой момент перейти на страницу, на которой закончили чтение.
Интервал:
Закладка:
Set the TextBlock's font size to 18 and Bold (see Figure 19-30).
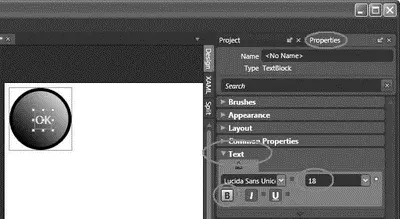
Figure 19-30
Control-click the following controls in the Objects and Timeline window and right-click on them and then select Group Into→Canvas (see Figure 19-31):
□ Ellipse
□ EllipsePressed
□ TextBlock
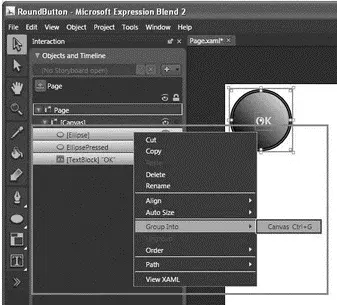
Figure 19-31
All the selected controls are now grouped into one. Name the new composite control RoundButton(see Figure 19-32).
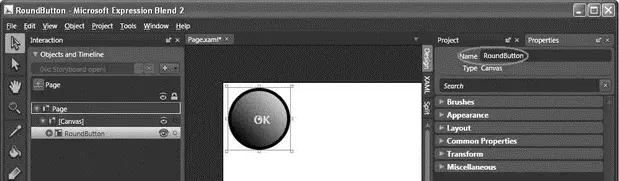
Figure 19-32
Switch to the XAML view of the project (see Figure 19-33).
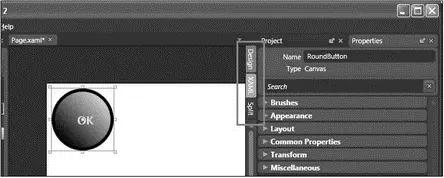
Figure 19-33
Insert the following highlighted code into the RoundButton Canvascontrol:
xmlns="http://schemas.microsoft.com/client/2007"
xmlns:x="http://schemas.microsoft.com/winfx/2006/xaml"
Width="640" Height="480"
Background="White" x:Name="Page">
Width="100" Height="100"
Canvas.Top="8" Canvas.Left="8">
Width="100" Height="100" x:Name="RoundButton"
MouseLeftButtonDown="ButtonClicked"
MouseLeftButtonUp="ButtonReleased"
MouseLeave="ButtonReleased">
In the Project window, double-click the Page.xaml.jsfile. Append the following block of code to the end of the file:
function ButtonClicked(sender, eventArgs) {
if (sender.name == "RoundButton") {
//---Get a reference to the ellipse---
var pressedEllipse = sender.findName("EllipsePressed");
pressedEllipse.opacity = 1;
}
}
function ButtonReleased(sender, eventArgs) {
if (sender.name == "RoundButton") {
//---Get a reference to the ellipse---
var pressedEllipse = sender.findName("EllipsePressed");
pressedEllipse.opacity = 0;
}
}
Finally, press F5 to test the application. Click the button and observe the effect (see Figure 19-34).
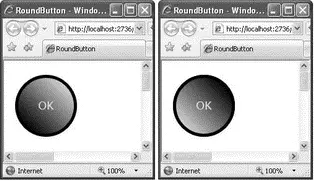
Figure 19-34
Silverlight 1.0
Animation is one of the core capabilities of Silverlight. The following sections describe how to perform simple animations in Silverlight 1.0.
Animation — Part 1
You can use the Timelineobject to perform some simple animation. Figure 19-35 shows the page displaying an image. When the mouse hovers over the image, the image will expand. When you move the mouse away, the image returns to its original size.
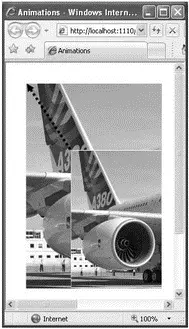
Figure 19-35
Using Expression Blend 2, create a new Silverlight project and name it Animations. Add an Image element to the page (see Figure 19-36).
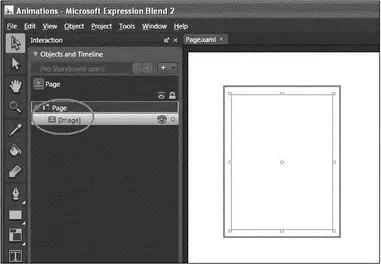
Figure 19-36
The XAML source of the page looks like this:
xmlns="http://schemas.microsoft.com/client/2007"
xmlns:x="http://schemas.microsoft.com/winfx/2006/xaml"
Width="640" Height="480" Background="White" x:Name="Page">
Set the Sourceproperty of the Image control to reference an image (see Figure 19-37).
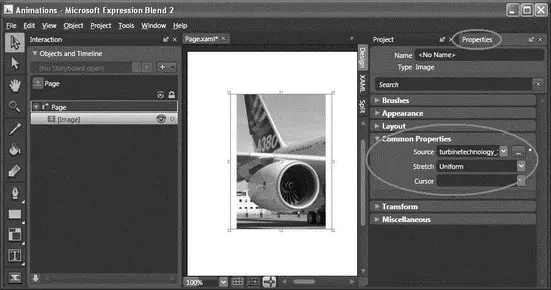
Figure 19-37
In the Objects and Timeline window, click the + button (see Figure 19-38), use the default name of StoryBoard1, and click OK.
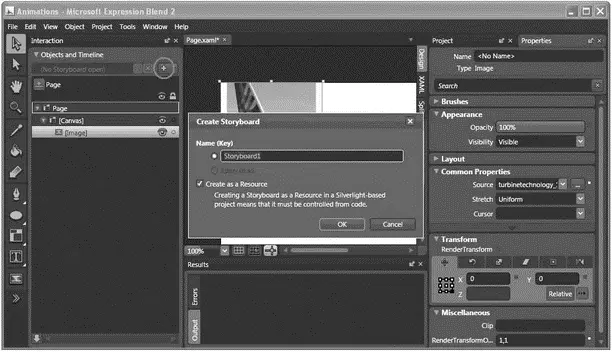
Figure 19-38
Click the Record Keyframe button (see Figure 19-39).
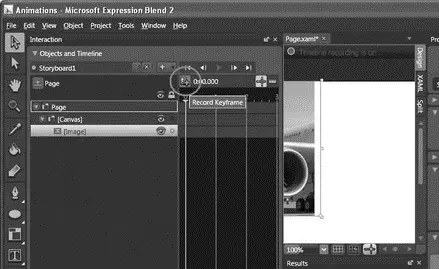
Figure 19-39
Move the yellow timeline (see Figure 19-40) to the 0:00.200 position and click the Record Keyframe button again.
If you like, you can magnify the timeline by setting the Timeline zoom to 500%.
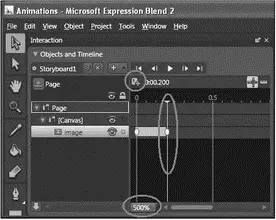
Figure 19-40
With the Image element selected, select the Properties Inspector and expand the Transform section. Click on the Scale tab. Set both X and Y to 1.5 (see Figure 19-41).
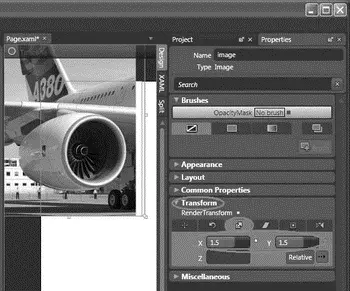
Figure 19-41
Add a second timeline to the project, and use its default name of StoryBoard2.
Click the Record Keyframe button, and then in the Properties Inspector's Transform section, click on the Scale tab again. Set both X and Y to 1.5 .
Move the yellow timeline to the 0:00.200 position and click the Record Keyframe button again.
In the Properties Inspector's Transform section, click the Scale tab. This time set both X and Y to 1.
Switch the project to XAML view, and add the following highlighted code:
Width="165" Height="220"
RenderTransformOrigin="1,1"
Source="turbinetechnology_1.jpg"
x:Name="image"
MouseEnter="MouseEnter"
MouseLeave="MouseLeave">
Append the following block of code to Page.xaml.js:
function MouseEnter(sender, eventArgs) {
var obj = sender.findName("Storyboard1");
obj.Duration="00:00:00.2000000";
obj.begin();
}
function MouseLeave(sender, eventArgs) {
var obj = sender.findName("Storyboard2");
obj.Duration="00:00:00.2000000";
obj.begin();
}
Press F5 to test the application. When the mouse now hovers over the image, the MouseEnter event is fired, and the Storyboard1 timeline object is executed for a duration of 0.2 second. The Storyboard1 timeline object basically scales the image horizontally and vertically by 1.5 times. When the mouse leaves the image, the MouseLeave event is fired, and the Storyboard2 timeline object is executed. It scales the image from 1.5 times down to its original size (within 0.2 second; see Figure 19-42).
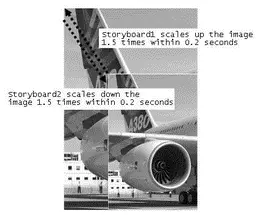
Figure 19-42
Читать дальшеИнтервал:
Закладка:
Похожие книги на «C# 2008 Programmer's Reference»
Представляем Вашему вниманию похожие книги на «C# 2008 Programmer's Reference» списком для выбора. Мы отобрали схожую по названию и смыслу литературу в надежде предоставить читателям больше вариантов отыскать новые, интересные, ещё непрочитанные произведения.


Обсуждение, отзывы о книге «C# 2008 Programmer's Reference» и просто собственные мнения читателей. Оставьте ваши комментарии, напишите, что Вы думаете о произведении, его смысле или главных героях. Укажите что конкретно понравилось, а что нет, и почему Вы так считаете.