Wei-Meng Lee - C# 2008 Programmer's Reference
Здесь есть возможность читать онлайн «Wei-Meng Lee - C# 2008 Programmer's Reference» весь текст электронной книги совершенно бесплатно (целиком полную версию без сокращений). В некоторых случаях можно слушать аудио, скачать через торрент в формате fb2 и присутствует краткое содержание. Город: Indianapolis, Год выпуска: 2009, ISBN: 2009, Издательство: Wiley Publishing, Inc., Жанр: Программирование, на английском языке. Описание произведения, (предисловие) а так же отзывы посетителей доступны на портале библиотеки ЛибКат.

- Название:C# 2008 Programmer's Reference
- Автор:
- Издательство:Wiley Publishing, Inc.
- Жанр:
- Год:2009
- Город:Indianapolis
- ISBN:978-0-470-28581-7
- Рейтинг книги:4 / 5. Голосов: 1
-
Избранное:Добавить в избранное
- Отзывы:
-
Ваша оценка:
C# 2008 Programmer's Reference: краткое содержание, описание и аннотация
Предлагаем к чтению аннотацию, описание, краткое содержание или предисловие (зависит от того, что написал сам автор книги «C# 2008 Programmer's Reference»). Если вы не нашли необходимую информацию о книге — напишите в комментариях, мы постараемся отыскать её.
C# 2008 Programmer's Reference — читать онлайн бесплатно полную книгу (весь текст) целиком
Ниже представлен текст книги, разбитый по страницам. Система сохранения места последней прочитанной страницы, позволяет с удобством читать онлайн бесплатно книгу «C# 2008 Programmer's Reference», без необходимости каждый раз заново искать на чём Вы остановились. Поставьте закладку, и сможете в любой момент перейти на страницу, на которой закончили чтение.
Интервал:
Закладка:
PUBLIC "-//W3C//DTD XHTML 1.0 Transitional//EN"
"http://www.w3.org/TR/xhtml1/DTD/xhtml1-transitional.dtd">
// Retrieve the div element you created in the previous step.
var parentElement =
document.getElementById("SilverlightPluginHost");
// creates the Silverlight plug-in.
createSilverlightPlugin();
This HTML file is the page that will host the Silverlight plug-in. Notice that it references two JavaScript files:
□ Silverlight.js
□ MySilverlight.js
You've already added the first one. Now, using Notepad, create the following JavaScript file; name it MySilverlight.js, and save it in C:\Silverlight\.
function createSilverlightPlugin() {
Silverlight.createObject(
"UI.xaml", // Source property value.
parentElement, // DOM reference to hosting DIV tag.
"mySilverlightPlugin", // Unique plug-in ID value.
{ // Per-instance properties.
width:'300', // Width of rectangular region of
// plug-in area in pixels.
height:'300', // Height of rectangular region of
// plug-in area in pixels.
inplaceInstallPrompt:false, // Determines whether to display
// in-place install prompt if
// invalid version detected.
background:'#D6D6D6', // Background color of plug-in.
isWindowless:'false', // Determines whether to display
// plug-in in Windowless mode.
framerate:'24', // MaxFrameRate property value.
version:'1.0' // Silverlight version to use.
},
{
onError:null, // OnError property value --
// event handler function name.
onLoad:null // OnLoad property value --
// event handler function name.
},
null); // Context value -- event handler
// function name.
}
This JavaScript file contains the logic behind your Silverlight application. It loads the Silverlight plug- in as well as the XAML file ( UI.xaml, which is defined in the next section).
Double-click on Default.htmlnow to load it in Internet Explorer. You will see the message shown in Figure 19-2 if your web browser does not have the Silverlight plug-in installed.
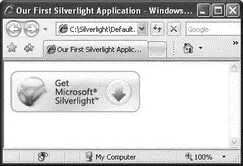
Figure 19-2
To install the Silverlight plug-in, click on the Get Microsoft Silverlight logo and follow the onscreen instructions. Once the plug-in is installed, refresh the page and you should see a gray box (there is nothing displayed yet, thus just a gray box). Right-click on the gray box and select Silverlight Configuration to verify the version of the plug-in installed (see Figure 19-3).
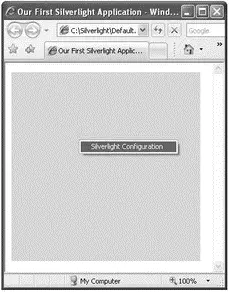
Figure 19-3
Understanding XAML
In this section, you see how to create the user interface of a Silverlight application using the Extensible Application Markup Language (XAML).
Using Notepad, create the following XAML file; name it UI.xamland save it in C:\Silverlight\.
xmlns="http://schemas.microsoft.com/client/2007"
xmlns:x="http://schemas.microsoft.com/winfx/2006/xaml">
Height="200" Width="200"
Stroke="Black"
StrokeThickness="10"
Fill="Yellow"/>
Canvas.Left="80"
Canvas.Top="80"
Height="200"
Width="200"
Stroke="Black"
StrokeThickness="10"
Fill="LightBlue"/>
Double-click on Default.htmlnow to load it in the web browser. Figure 19-4 shows the output.
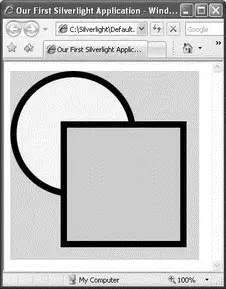
Figure 19-4
This XAML file contains two elements, and , which display an ellipse and a rectangle, respectively, on the page. Both elements are embedded within a Canvascontrol.
The Canvascontrol (every Silverlight application has at least one Canvas control) is designed to contain and position other controls and elements.
To define the positioning of controls within the Canvascontrol, you use the Canvas.Leftand Canvas.Topattributes. The z order of objects embedded within a Canvasobject is determined by the sequence in which they are declared. As the previous section shows, the element is defined after the element, and hence it overlaps the element. However, you can override this default ordering by specifying the ZIndexattribute, as the following example shows.
Edit the UI.xamlfile created in the previous section, and add the Canvas.ZIndexattribute for both the and elements:
xmlns="http://schemas.microsoft.com/client/2007"
xmlns:x="http://schemas.microsoft.com/winfx/2006/xaml">
Canvas.ZIndex="2"
Height="200" Width="200"
Stroke="Black"
StrokeThickness="10"
Fill="Yellow"/>
Canvas.ZIndex="1"
Canvas.Left="80"
Canvas.Top="80"
Height="200" Width="200"
Stroke="Black"
StrokeThickness="10"
Fill="LightBlue"/>
Reload the Default.htmlfile in the web browser, and notice that the ellipse is now on top of the rectangle (see Figure 19-5).

Figure 19-5
You can also nest Canvas controls within one another. Edit the UI.xamlfile created earlier and replace its content with the following:
xmlns="http://schemas.microsoft.com/client/2007"
xmlns:x="http://schemas.microsoft.com/winfx/2006/xaml">
Canvas.Left="80" Canvas.Top="80"
Height="250" Width="250"
Background="lightgreen">
Canvas.ZIndex="2"
Canvas.Left="10" Canvas.Top="10"
Height="200" Width="200"
Stroke="Black"
StrokeThickness="10"
Fill="Yellow"/>
Reload the Default.htmlfile in the web browser, and observe the changes (see Figure 19-6).

Figure 19-6
The positions specified by the Canvas.Leftand Canvas.Topattributesof each element or control are relative to its parent control, and not the root control.
Интервал:
Закладка:
Похожие книги на «C# 2008 Programmer's Reference»
Представляем Вашему вниманию похожие книги на «C# 2008 Programmer's Reference» списком для выбора. Мы отобрали схожую по названию и смыслу литературу в надежде предоставить читателям больше вариантов отыскать новые, интересные, ещё непрочитанные произведения.


Обсуждение, отзывы о книге «C# 2008 Programmer's Reference» и просто собственные мнения читателей. Оставьте ваши комментарии, напишите, что Вы думаете о произведении, его смысле или главных героях. Укажите что конкретно понравилось, а что нет, и почему Вы так считаете.