Chris Tyler - Fedora Linux
Здесь есть возможность читать онлайн «Chris Tyler - Fedora Linux» весь текст электронной книги совершенно бесплатно (целиком полную версию без сокращений). В некоторых случаях можно слушать аудио, скачать через торрент в формате fb2 и присутствует краткое содержание. Год выпуска: 2006, ISBN: 2006, Издательство: O'Reilly, Жанр: ОС и Сети, на английском языке. Описание произведения, (предисловие) а так же отзывы посетителей доступны на портале библиотеки ЛибКат.

- Название:Fedora Linux
- Автор:
- Издательство:O'Reilly
- Жанр:
- Год:2006
- ISBN:978-0-596-52682-5
- Рейтинг книги:5 / 5. Голосов: 1
-
Избранное:Добавить в избранное
- Отзывы:
-
Ваша оценка:
Fedora Linux: краткое содержание, описание и аннотация
Предлагаем к чтению аннотацию, описание, краткое содержание или предисловие (зависит от того, что написал сам автор книги «Fedora Linux»). Если вы не нашли необходимую информацию о книге — напишите в комментариях, мы постараемся отыскать её.
Fedora Linux: A Complete Guide to Red Hat's Community Distribution In this book, you'll learn how to:
Install Fedora and perform basic administrative tasks
Configure the KDE and GNOME desktops
Get power management working on your notebook computer and hop on a wired or wireless network
Find, install, and update any of the thousands of packages available for Fedora
Perform backups, increase reliability with RAID, and manage your disks with logical volumes
Set up a server with file sharing, DNS, DHCP, email, a Web server, and more
Work with Fedora's security features including SELinux, PAM, and Access Control Lists (ACLs)
Whether you are running the stable version of Fedora Core or bleeding-edge Rawhide releases, this book has something for every level of user. The modular, lab-based approach not only shows you how things work - but also explains why--and provides you with the answers you need to get up and running with Fedora Linux.
Fedora Linux — читать онлайн бесплатно полную книгу (весь текст) целиком
Ниже представлен текст книги, разбитый по страницам. Система сохранения места последней прочитанной страницы, позволяет с удобством читать онлайн бесплатно книгу «Fedora Linux», без необходимости каждый раз заново искать на чём Вы остановились. Поставьте закладку, и сможете в любой момент перейти на страницу, на которой закончили чтение.
Интервал:
Закладка:
Figure 3-7. New Device Type window
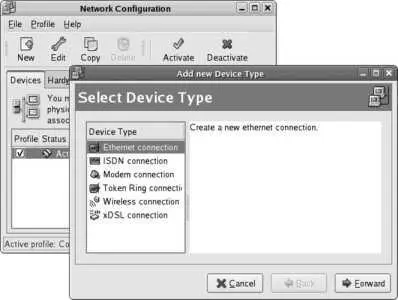
Use the default Ethernet connection option for any LAN connection, including cable modem connections as well as all DSL connections made through a router or gateway device. Click Forward to proceed to the device-selection window in Figure 3-8 .
Figure 3-8. Device-selection window
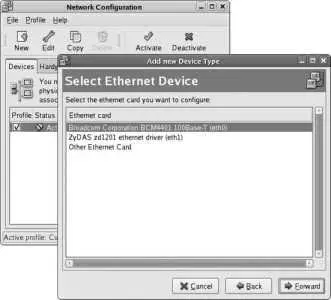
All of the Ethernet devices that have been automatically detected (or previously configured manually) will be listed, with the device name in parentheses (such as eth0 ). Select the device you wish to configure and click Forward.
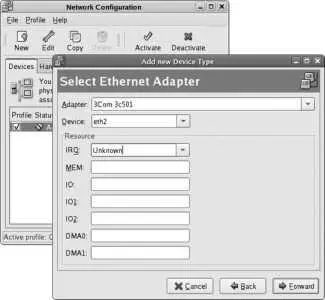
If the device is not in the list, select Other Ethernet Card from the bottom of the list and click Forward. The window shown in Figure 3-9 will appear; select the Adapter type (which selects the device driver to be used), the device name to be used (the default is usually OK), and any resources the card will use (this area should almost always be left blank). Click Forward.
Figure 3-9. New device-setup window
You will now see the window shown in Figure 3-10 . Select one of the two options to assign the IP address for this network connection:
Automatically obtain IP address settings
Use this option if you wish to use an IP address assigned by a system on your network (such as another computer running a DHCP server, a gateway or router device, or a cable modem). Set the adjacent protocol control to DHCP unless your network uses the older BOOTP protocol (rare).
Statically set IP addresses
Select this option to manually configure the IP address. Fill in the IP address, subnet mask, and gateway (router) address in the labeled fields.
Click Forward to proceed.
Figure 3-10. IP address configuration
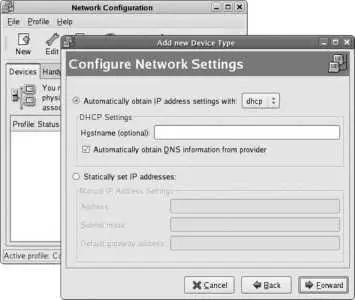
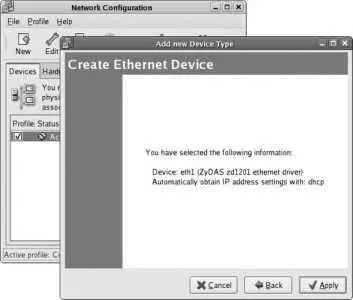
Figure 3-11 shows the final confirmation window that appears. Review the information for accuracy and then click Apply.
Figure 3-11. Confirmation window
3.2.1.1.1. Changing a device configuration
To edit an existing network device, double-click on it in the main Network Configuration window (shown earlier in Figure 3-6), or select it and click the Edit icon. Figure 3-12 shows the editing window that appears.
The editing window includes some options that are unavailable when the device is first created.
Figure 3-12. Network Configuration device-editing window
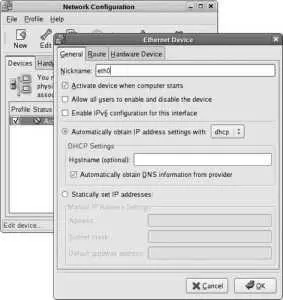
There are three tabs in this window. The first tab, General, provides fields for basic device configuration:
Nickname
Any name of your choice. This is provided only for your reference; for example, if you have two Ethernet cards, you might nickname one Internet and the other Corporate to identify the networks to which they are connected.
Activate device when computer starts
Most network devices will have this box checked, but you should leave it unchecked for unused devices and for devices that are used only in certain contextsfor example, a wireless card on a laptop that is used only at home.
Allow all users to enable and disable this device
If selected, this feature enables any user to activate or deactivate the network device without the root password.
Enable IPv6 configuration for this interface
If your network supports IP version 6 (which is rare but becoming more common), select this box.
IP address settings
These fields replicate the fields used during the initial device setup.
Changing the hostname field and then saving the network configuration will prevent you from opening any new GUI applications because the X Window System uses the hostname in the security key used to control access to the display. To correct this problem, log out and then log in again after changing the hostname, or enter this command before doing so:
$ xhost +localhost
Figure 3-13 shows the Route tab, which is used to configure network routes when there is more than one gateway (router) available to your system.
For single-gateway networksincluding most home and office networksuse the Default Gateway field on the Devices tab and do not fill in any information on the Route tab.
Figure 3-13. Routing configuration
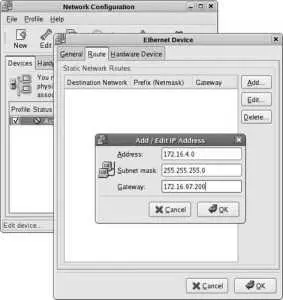
To add a new route, click the Edit button, then enter the network to be routed as an IP network address and a netmask, and then enter the Gateway ( router) to which packets destined for that network are to be sent.
Figure 3-13 shows a new routing entry for an 8-bit subnet: the network number is 172.16.4.0, and the netmask is 255.255.255.0, which means that any packets addressed to an IP address that starts with 172.16.4 must be sent through the gateway associated with this route, which has been set to 172.16.97.200.
The gateway must be on the same subnet as the network interface device.
To edit or delete existing routes, select the route and click on the Edit or Delete buttons.
Figure 3-14 shows the third tab, labeled Hardware Device, which contains three groups of fields:
Figure 3-14. Hardware Device tab
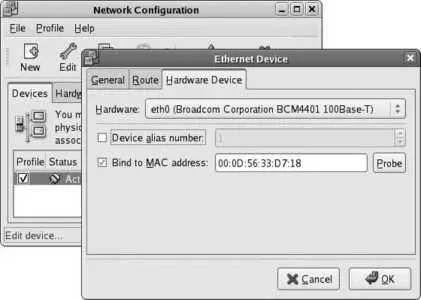
Hardware
Selects the physical network device used for this interface.
Device alias number
Used to configure multiple IP addresses for one device. If you have one Ethernet card and wish to assign it the IP addresses 192.168.4.13 and 10.0.17.42, one IP address could be assigned to the base device ( eth0 ), and the other IP address could be assigned to a different interface device entry connected to the same hardware (which would result in a device alias, such as eth0:1 ). This field is used to set the alias number ( 1 in this example).
To create alias devices, use the same procedure that you use to create physical interfaces. The configuration tool will set the alias number for you automatically.
Bind to MAC address
This field associates this device entry with a specific physical network interface card via the MAC address (electronic serial number) of the network card. This is desirable in most cases because it prevents the network interfaces from being renumbered if network hardware is later added to the system, shifting (for example) eth0 into eth1 . However, this can cause problems if you replace a network card with a different card of the same model, or if you are using removable disks that are moved between systems (such as hard drives in removable drive trays, which are often used in testing environments and schools). If you do expect the MAC address to change, deselect this checkbox.
Читать дальшеИнтервал:
Закладка:
Похожие книги на «Fedora Linux»
Представляем Вашему вниманию похожие книги на «Fedora Linux» списком для выбора. Мы отобрали схожую по названию и смыслу литературу в надежде предоставить читателям больше вариантов отыскать новые, интересные, ещё непрочитанные произведения.


Обсуждение, отзывы о книге «Fedora Linux» и просто собственные мнения читателей. Оставьте ваши комментарии, напишите, что Вы думаете о произведении, его смысле или главных героях. Укажите что конкретно понравилось, а что нет, и почему Вы так считаете.