Chris Tyler - Fedora Linux
Здесь есть возможность читать онлайн «Chris Tyler - Fedora Linux» весь текст электронной книги совершенно бесплатно (целиком полную версию без сокращений). В некоторых случаях можно слушать аудио, скачать через торрент в формате fb2 и присутствует краткое содержание. Год выпуска: 2006, ISBN: 2006, Издательство: O'Reilly, Жанр: ОС и Сети, на английском языке. Описание произведения, (предисловие) а так же отзывы посетителей доступны на портале библиотеки ЛибКат.

- Название:Fedora Linux
- Автор:
- Издательство:O'Reilly
- Жанр:
- Год:2006
- ISBN:978-0-596-52682-5
- Рейтинг книги:5 / 5. Голосов: 1
-
Избранное:Добавить в избранное
- Отзывы:
-
Ваша оценка:
Fedora Linux: краткое содержание, описание и аннотация
Предлагаем к чтению аннотацию, описание, краткое содержание или предисловие (зависит от того, что написал сам автор книги «Fedora Linux»). Если вы не нашли необходимую информацию о книге — напишите в комментариях, мы постараемся отыскать её.
Fedora Linux: A Complete Guide to Red Hat's Community Distribution In this book, you'll learn how to:
Install Fedora and perform basic administrative tasks
Configure the KDE and GNOME desktops
Get power management working on your notebook computer and hop on a wired or wireless network
Find, install, and update any of the thousands of packages available for Fedora
Perform backups, increase reliability with RAID, and manage your disks with logical volumes
Set up a server with file sharing, DNS, DHCP, email, a Web server, and more
Work with Fedora's security features including SELinux, PAM, and Access Control Lists (ACLs)
Whether you are running the stable version of Fedora Core or bleeding-edge Rawhide releases, this book has something for every level of user. The modular, lab-based approach not only shows you how things work - but also explains why--and provides you with the answers you need to get up and running with Fedora Linux.
Fedora Linux — читать онлайн бесплатно полную книгу (весь текст) целиком
Ниже представлен текст книги, разбитый по страницам. Система сохранения места последней прочитанной страницы, позволяет с удобством читать онлайн бесплатно книгу «Fedora Linux», без необходимости каждый раз заново искать на чём Вы остановились. Поставьте закладку, и сможете в любой момент перейти на страницу, на которой закончили чтение.
Интервал:
Закладка:
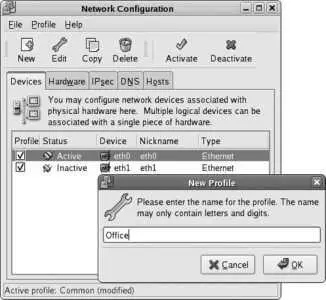
The graphical network configuration tool supports the concept of profiles to permit easy roaming between different networks. You can configure a separate profile for each network that you use (such as home , office , and coffeeshop ).
A standard profile named Common is created when your system is installed. The Common profile is automatically selected at boot time, and it's the only profile that can define interfaces that will be started when the system boots.
To create additional profiles, use the Profile→New menu option. The dialog shown in Figure 3-19 will appear; enter the name of the new profile. You can then select a specific profile from the Profile menu, use the checkboxes in front of the network devices to configure which interfaces are active in that profile, and then select File→Save to save the configuration of that profile.
Figure 3-19. Creating a new Network Configuration profile
Once you have created at least one profile in addition to the standard Common profile, the Network Device Control window will gain a new pull-down menu that enables you to select the active profile, as shown in Figure 3-20 (compare with Figure 3-18).
Figure 3-20. The Active Profile control has been added
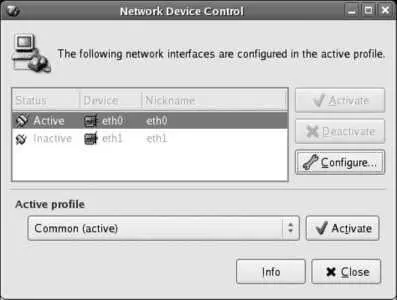
To change profiles, select the desired profile from the pull-down menu, and then click on the Activate button. The list of configured network interface devices will change to reflect the interfaces configured as part of the selected profile. Interfaces that are part of the profile but that cannot be activated or deactivated by ordinary users will appear in the interface list, but will be grayed out and unselectable.
3.2.1.1.5. Configuring other network connection types
The procedure for configuring an ISDN or analog telephone dial-up connection, a token-ring connection, or an xDSL (DSL, ADSL, SDSL, or IDSL) connection is identical to the procedure for configuring an Ethernet connection, except that additional (or slightly different) details are required in order to configure the connection:
Token Ring
This configuration is almost identical to Ethernet configuration, except that the configured device name starts with tr instead of eth (for example, the first token ring interface is called TR0 instead of eth0 ).
Wireless
Wireless configuration adds a window right after the Ethernet device driver selection and resource settings. This window requests the management mode (Auto, Managed [for normal communication with a permanent network], or Ad Hoc [for temporary networks of peer systems]), network name (set this to the SSID or ESSID of the network to which you are connecting), channel, transmit rate, and WEP encryption key. In most cases, entering the network name and WEP key is all that is required.
xDSL
All varieties of DSL lines require just one screen to set up. The configuration tool will ask you for the Ethernet device (such as eth0 ) that is connected to the DSL modem, the Internet service provider name (such as Bell Sympatico, which is recorded only for your reference), the account type (normal or T-Online), and the PPOE login name and password provided by your ISP.
ISDN and Modem Dial-Up Connections
Although ISDN and analog modems use very different technology, the configuration process is similar. First, you'll need to enter the device details. For an ISDN line, this is the ISDN adapter type and resources (usually left blank), as well as the D-channel type (leave this set to Euro ISDN in all countries except Germany, where it should be set to 1TR6). For a modem, this includes the modem device, baud rate, and flow control (these settings are usually all left at their defaults), plus volume and touch-tone settings (adjust these according to your preferences). For both types of dial-up connections, the next window asks you to select your Internet service provider and enter the phone number, username, and password that were provided by your ISP; the last window asks for the encapsulation mode (usually Sync PPP) and IP settings (whether to obtain these from the provider or manually configure them).
3.2.1.2. Using GNOME NetworkManager
The GNOME NetworkManager facility provides an alternative to the use of profiles. NetworkManager is a service that automatically detects network configuration changes and determines available options. A small GUI application permits you to quickly select the network option you wish to use. It's ideal for laptop users because it permits rapid switching between multiple wired and wireless networks.
At this time, NetworkManager is a work in progress. When it works, it works well, but some hardware that works fine with other configuration techniques does not work at all with NetworkManager. It is proposed that NetworkManager will eventually become the configuration tool of choice.
The NetworkManager service is enabled in the same way as every other service (see Lab 4.6, "Managing and Configuring Services "). You can configure it to start at the next boot by choosing the menu option System→Administration→Services, and then selecting the checkboxes labeled NetworkManger (the related NetworkManagerDispatcher service is not usually required); to start the services immediately, select each of them in turn and then click the Start button.
From the command line, you can start the service immediately using the service command, and you can configure it to start at boot time using chkconfig :
# service NetworkManager start
Setting network parameters...
Starting NetworkManager daemon: [ OK ]
# chkconfig NetworkManager on
Notice the nonstandard use of capital letters in the name NetworkManager.
As soon as the NetworkManager starts, an icon should appear in your panel's notification area, which is shown in Figure 3-21 . This icon will indicate the type of IP connection currently in use. To switch to a different connection, click on the icon; a list of available connections will appear (including all broadcast local network names if you have a wireless card, plus a little signal-strength bar graph for each wireless network). Click on the network you wish to connect to, and NetworkManager will attempt to make the connection. You will be prompted to enter WEP or WPA encryption keys if necessary.
Figure 3-21. NetworkManager icon (left), showing that a wired Ethernet connection is active

NetworkManager will establish connections with wired networks automatically, but it will not automatically connect to wireless networks to which you have not previously connected because they may belong to your neighbor, or to companies that you are passing if you are in a vehicle. It will also detect the loss of network connectivity when a wireless signal is no longer usable or a network cable is unplugged.
You can also view the NetworkManager status from the command line by using nm-tool :
# nm-tool
NetworkManager Tool
State: connected
- Device: eth0 ----------------------------------------------------------------
NM Path: /org/freedesktop/NetworkManager/Devices/eth0
Интервал:
Закладка:
Похожие книги на «Fedora Linux»
Представляем Вашему вниманию похожие книги на «Fedora Linux» списком для выбора. Мы отобрали схожую по названию и смыслу литературу в надежде предоставить читателям больше вариантов отыскать новые, интересные, ещё непрочитанные произведения.


Обсуждение, отзывы о книге «Fedora Linux» и просто собственные мнения читателей. Оставьте ваши комментарии, напишите, что Вы думаете о произведении, его смысле или главных героях. Укажите что конкретно понравилось, а что нет, и почему Вы так считаете.